Tutorial: Render Properties Last edited 22 years ago2002-03-15 05:00:00 UTC
You are viewing an older revision of this wiki page. The current revision may be more detailed and up-to-date.
Click here to see the current revision of this page.
Download attachment
Most of the brush-based entites (like the func_ type) and point-based monster entities have a set of basic rendering properties. They are:Render FX
Render Mode
FX Amount
FX Color
I'll be talking about them in this tutorial, so get ready...
Render FX
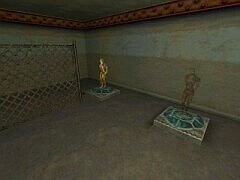
Render FX is probably the simplest property - it sets any special effects that the entity is rendered with, such as fading in and out, flickering etc. You may need to tweak the other properties before the effect looks good though. I used the hologram FX for the hologram woman on the left in the example map.Render Mode
Render Mode is a pretty fundamental part of the rendering properties - it sets the way in which the entity is rendered. The options are:Normal
This is the default, plain, solid rendering mode.
Color
Setting this replaces the entity's texture with the colour specified in FX Color. The FX Amount controls the translucency. It doesn't affect model entities or sprites.
Texture
Texture mode allows you to make an entity translucent, and I've been over it in my glass tutorial. FX Amount controls the level of translucency. The hologram on the right in the example map is using this mode.
Glow
This mode (it's almost an effect) only works with sprites, and makes them scale down as the player approaches, and fade away as the player moves back. This is a realistic way of creating halo effects for lights. It also overlays geometry that would normally obscure sprites (providing the player can see the centre of the sprite). The Constant Glow setting in Render FX cancels the resizing. FX Amount controls translucency, and FX Color sets the colour of the sprite. I've covered the use of this in context in the Using Sprites tutorial.
Solid
Solid allows you to make the blue parts of masked textures (ones beginning with '{') transparent. Things like fences and grates are often masked because they are too complex to be created in geometry. I have put a demonstration into the example map - the fence on the left looks realistic, but it's actually just one brush made into a func_illusionary (see below) with solid set, and FX Amount set to 255.
Additive
Additive mode is most often used for things like steam sprites, or for holograms, such as the one on the right in the example map. Combined with the hologram Render FX setting, an effect like the one seen in the Half-Life Hazard Course is created. Basically the colours of the entity are 'added' to the colours behind, which gives a brighter look. An example of this can be found in the Using Sprites tutorial.
FX Amount
This property usually controls the translucency of the effect, and can have a value ranging from 1 to 255, with 1 being totally invisible, and 255 being opaque.FX Color
It should be spelled 'colour', but anyway... Only two Render Modes use this property - Color and Glow (although some entities, such as env_beam need a colour, it isn't called FX Color in SmartEdit). A pretty self-explanetory property - it sets the colour.Making a Real Fence
You might have noticed that in some areas in Half-Life, there are fences that the player can shoot through. It's a simple idea, but it requires a little trick to set up.You will notice that some entities, including the monster_generic ones that are in the example map as holograms, have a flag called Not Solid that allows you to let the player to walk through them. This has obvious uses, such as... well... for making a hologram. But it won't work for fences, because, firstly, func_wall entites don't have a Not Solid flag, and even if they did, the player would be able to move though as well as bullets. But there is a way round this problem.
It just so happens that func_illusionary was designed to be, um, illusionary, so it's basically a non-solid func_wall, and can be made to display masked textures in the same way as a normal func_wall. Then, to stop the player moving though, you can simply create a 'clip' brush - Select the texture called 'clip', and create a brush. This stops the player moving through, but not bullets... and not monsters. To stop the monsters, create another brush with some texture other than 'clip', and bind it to a func_monsterclip entity. Place all three brushes over each other, and you have a 'real' fence!
 Holographic.
2 Comments
You must log in to post a comment. You can login or register a new account.
Best to keep it a non special texture for it to work properly.