Tutorial: Light Last edited 8 months ago2023-07-23 09:01:24 UTC
Some of the basics of lighting were covered in In the Beginning Part 4: Basic Lighting but people are still asking questions about lighting and texlights. So this tutorial is going to cover the basics and some more advanced stuff to help you get some good lighting in your maps.
Note: The value of any tutorial is in direct proportion to the effort YOU put into learning the material. If you just read it without trying out the examples and exercises on your own, in a map you make just to play around, you will not get the visual feedback, particularly in this "Light" tutorial, that will make you a better mapper.
This tutorial was developed using WorldCraft/Hammer 3.4 and 3.5. Some of the screenshots may not look exactly like your editor, but the descriptions of the editor menus, entity properties, etc., should give you the information you need. It is also a good idea to get the latest .fgd file and include it in your Configuration Menu. Currently, for HL, that is version 3.0.0.1. While we are on the subject I also recommend using Zoners Half Life Tools 2.5.3 custom Build 1.7. If fact, you'll have to have those tools to do everything described in this tutorial. Light, glorious light!
Build a simple box 512 x 512 x 256, hollow it and apply a some texture to the walls. To place a Light in your map, Select the Entity Tool [Shift+E] or click on the Entity Tool button (it looks like a rounded-top mushroom) and choose light from the drop down list in the Object Bar. [If you haven't got an Object Bar like the one on the right hand side of the picture above, go to View then Screen Elements and select the Object Bar.] Ok, now place the axe-like cursor over the top (x/y) 2D view, near the center of the room and Left Click, then Right Click and select Create Object. If you have selected the light from the drop down list, then you should be the proud owner of a light entity. Now select the info_player_start entity from the entity, place it in your map and "create" it. Compile your map by using F9 and using the Normal Mode. Make sure that all the compiling options are checked at Normal. Hammer 'Normal' compile has a habit of defaulting it's Run VIS and Run RAD setting to No, so make sure they are checked. You should have something like this:
Light, glorious light!
Build a simple box 512 x 512 x 256, hollow it and apply a some texture to the walls. To place a Light in your map, Select the Entity Tool [Shift+E] or click on the Entity Tool button (it looks like a rounded-top mushroom) and choose light from the drop down list in the Object Bar. [If you haven't got an Object Bar like the one on the right hand side of the picture above, go to View then Screen Elements and select the Object Bar.] Ok, now place the axe-like cursor over the top (x/y) 2D view, near the center of the room and Left Click, then Right Click and select Create Object. If you have selected the light from the drop down list, then you should be the proud owner of a light entity. Now select the info_player_start entity from the entity, place it in your map and "create" it. Compile your map by using F9 and using the Normal Mode. Make sure that all the compiling options are checked at Normal. Hammer 'Normal' compile has a habit of defaulting it's Run VIS and Run RAD setting to No, so make sure they are checked. You should have something like this:
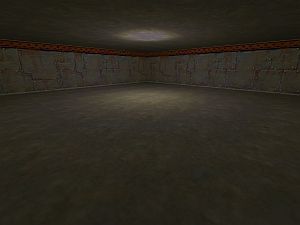 Lights On
NOTE: If you don't have something like this then, there is possibly something wrong with your map. Check the error log as the most common problem for new mappers is a LEAK. If you have a LEAK, your map will default to 'Fullbright' and look as though it is totally lit without shadow. Fix the leak and compile again. If it isn't a LEAK, have a look at where your light entity and info_player_start entities are. Are they both inside the map? Can you see both of them inside the box? Sometimes you can place a light inside a thick wall and the compile program will behave as though it is there but you will get a totally dark map. The first thing I am going to look are the Properties of the light. Select the light you have created by Left Clicking on it in one of the views. In the 3D view, it will appear as a light bulb. In the 2D views, it will be a small colored square. When you select it, it will go Red with little white handles. Now Right Click on the light and select Properties from the dropdown menu. You should have something like this:
Lights On
NOTE: If you don't have something like this then, there is possibly something wrong with your map. Check the error log as the most common problem for new mappers is a LEAK. If you have a LEAK, your map will default to 'Fullbright' and look as though it is totally lit without shadow. Fix the leak and compile again. If it isn't a LEAK, have a look at where your light entity and info_player_start entities are. Are they both inside the map? Can you see both of them inside the box? Sometimes you can place a light inside a thick wall and the compile program will behave as though it is there but you will get a totally dark map. The first thing I am going to look are the Properties of the light. Select the light you have created by Left Clicking on it in one of the views. In the 3D view, it will appear as a light bulb. In the 2D views, it will be a small colored square. When you select it, it will go Red with little white handles. Now Right Click on the light and select Properties from the dropdown menu. You should have something like this:
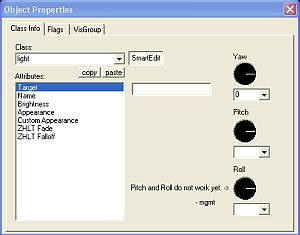 Get used to this window. It'll be your new best friend!
Compile and run the map. A room with a plain whitish light in it, right? Now bring up the properties of the light entity and change the Appearance to 'Flourescent flicker.' Just for fun, change the brightness to 0 255 128 150. Compile and run it. You should now see a dimmer, flickering blue-green light. Play around with the Appearance, color and brightness to see their effects. Use the color picker to set the Brightness property numbers, if you like. If everything's dark when you run the map, bump up the 4th number in the brightness property or run up the scale on the right of the color picker to make the light brighter. Depending on your monitor's settings, you may need a brightness of 150 or more to see the effect.
Now, set the Brightness and Appearance properties back to their defaults: Brightness = 255 255 128 200, and a 'Normal' Appearance. Enter a Name of 'light1' (without the quotation marks). If you were to compile and run the map now, you'll just have the old vanilla normal light in a room thing. So click on the Custom Appearance property and enter the string abcdefghijklmnopqrstuvwxyzyxwvutsrqponmlkjihgfedcb. You can highlight the string in the tutorial, hit ctrl-C to copy it, and hit ctrl-v to paste in the Custom Appearance field. When you run it, you should get light that varies from dark to bright and back to dark over about a 5 second period (50 characters in the string at 1/10 of a second apiece). Note that once you have the Custom Appearance that you want, you can change the color and the brightness to get the overall effect you want.
If you're not interested in the ZHLT flags, more of an advanced application anyway, you can skip the next couple of exercises. Make sure your light is near the center of the room and near (but not IN) the ceiling brush. Set the Brightness of your light to 255 255 128 150 (not too bright), set Appearance to Normal, and erase anything you have in Custom Appearance. Compile it, run it and take note of how the room is illuminated. The corners of the room should be a bit darker than the center of the room. Now change the ZHLT Fade property of your light to 2.0. Compile it, run it and note that the center of the room is at just about the same brightness as before but the corners of the room are darker. If you had decreased the brightness to get dark corners instead, the center of the room would be darker also. Change the ZHLT Fade to 0.5, compile and run. Once again, the center of the room is about the same but the corners are lighter. Increasing the brightness to get light in the corners would increase the light in the center of the room as well as the corners. You don't want light in the corners of a room in Half-Life, anyway! The Fade property actually does effect the light in the center of the room. But, by using the Fade property this way, you can more easily maintain the general brightness of a room consistent with other rooms in your map, while still adding some dark corners.
Now move your light to one end of the room. Keep it near the ceiling (but not IN the ceiling brush). Change the ZHLT Fade back to 1.0 and set the ZHLT Falloff to Inverse Linear. Keep the brightness at 150. Compile and run. One bright room, huh? The light drops off much less dramatically using this setting. In fact, you'd have to set up a very long hallway to see much dropoff at all at a brightness of 150. In addition, this setting tends to illuminate brushes a long way off in ways that definitely do not make sense to the eye. With the room setup for this tutorial, you'll probably have to drop the brightness down to 50 or less to see much affect. Even then, the far wall seems unusually bright compared to the adjacent floor.
Enough about plain old lights. Let's look at the... Inner and outer angles.
In this picture, the inner angle (the black circle) is 30 degrees. The outer angle is 45 and you can the fading between the outside the black circle.
Inner and outer angles.
In this picture, the inner angle (the black circle) is 30 degrees. The outer angle is 45 and you can the fading between the outside the black circle.
The third light entity to discuss is the...
Texture lighting is the use of textures to provide lighting. Once your editor has been set up to use them, basic texlights are quick and simple to apply. Texture lights, or texlights for short, can be used for lighting by themselves (quite effectively) or you can 'group' them with light entities to achieve more specialized effects. The basic form of texlight is simple to use. By applying more advanced principles, you can switch texlights on and off and give them varying appearances (as described in the Appearance property in the light entity discussion above) and even custom appearances as described in Custom Appearance above).
1. Save a copy of your existing halflife.fgd file in case you screw up.
2. Make sure Hammer is closed and open your halflife.fgd file in Notepad or some simple text editor.
3. Copy the following single line and insert it into the file anywhere. I recommend putting it right after info_teleport_destination so it'll appear in alphabetical order in your entities dropdown list.
9. Restart Hammer for the modifications to take effect.
10. Select the entity tool, drop the entity list down and check that info_texlights appears somewhere in the list. If you've done it correctly, it will follow info_teleport_destination.
11. Create a brush, tie it to a func_wall entity and check that Texlight style appears as a Property of the func_wall.
Now that we have a newly modified fgd to play with, let's work through a quick example so you can get an idea how the info_texlights entity works.
Note: a texlight, unlike a light entity, gives off light in proportion to the size of the texlight. If the texlight brush is small, you get a small amount of light. If you make the texlight big, it will give off more light. I suggest making the texlight the size and shape you want and then adjust the luminosity, the 4th number in the Brightness of the texture in the info_texlights list, to get the desired level of lighting. You can also increase the number of texlights to brighten the area.
Quite a bit can be accomplished with simple texlights and they can simplify the construction of portions of your map. Rather than add multiple light entities to light a hallway, for instance, you can add texlights directly to world brush faces as shown in the picture below. Light with no light.
There are no light entities used in that map. The hallway started as a hollowed block forming the hull of the map, the ceiling was clipped to correctly sized brushes and a texlight texture (defined in an info_texlights) applied to look like flourescent lights. Quick but effective. The original Doom maps were lighted only with textures. The light areas were bright textures and the dark areas were dark textures. "Blinking" lights were really just textures with two brightnesses that were rendered alternately every few frames. The areas lit by that blinking light appeared to be lit by the blinking light only because the mapper applied a blinking texture to adjacent shaped brushes to make it look that way.
Light with no light.
There are no light entities used in that map. The hallway started as a hollowed block forming the hull of the map, the ceiling was clipped to correctly sized brushes and a texlight texture (defined in an info_texlights) applied to look like flourescent lights. Quick but effective. The original Doom maps were lighted only with textures. The light areas were bright textures and the dark areas were dark textures. "Blinking" lights were really just textures with two brightnesses that were rendered alternately every few frames. The areas lit by that blinking light appeared to be lit by the blinking light only because the mapper applied a blinking texture to adjacent shaped brushes to make it look that way.
The Hammer editor and accompanying compiler simplify life by letting you define lights and texlights and assume they emit light that casts shadows and bounces off other surfaces. Note, however, that, with just a couple of exceptions, Half-Life maps are not dynamically lighted. That is, the compiler determines lighting before the map is created. When you actually play Half-Life maps, the "lighting" you see are just textures with bright pixels where there is supposed to be light and darker pixels where there is supposed to be shadows. Differently shaded textures are rendered in a view when a light is turned on or off to make it appear that light is being cast. The few exceptions I know of are the flashlight and, perhaps, the light that an alien slave gives off when it charges up.
To create a texlight with a Texlight style:
Like the simple texlight, the texture that is to emit light is defined in the info_texlights entity with the desired color and luminosity. The principle behind this type of texlight is that the map compiler uses information from the info_texlights entity to set the Brightness of the texlight. The map compiler also uses the Name of the light entity and its Custom Appearance (if it's set) to allow the texlight to be turned on and off and/or give it the Custom Appearance defined in the light entity.
First, here's how to create a grouped texlight:
So what's the point?
However, you can use two textures that look identical but have different names. What I've done is to create a separate wad file and copied textures from halflife.wad (for instance) into my special wad file (using Wally) but given them a different name. For instance, I copied the texture +0~FIFTS_LGHT06 into my special wad file and gave it the name FIFTS_LGHT06x. Where I want a regular looking light fixture, I use the +0~FIFTS_LGHT06 texture. Where I want the same looking texture as a texlight, I use FIFTS_LGHT06x and define its Brightness in an info_texlights entity in my map. I added my special wad to the Textures tab I have set up in my Configuration. That ensures I have those "special" textures available when I build a map. I also added "-wadinclude <Specialwadname>" to the command line for my csg compiler ("Expert" option in the compile dialog). This results in any textures I've used from my special wad to be included directly in the bsp file.
There are advantages and disadvantages to this setup. On the plus side, I can distribute a bsp file without hassling anyone with an extra wad file. No special instructions on where to copy an extra wad file, etc. Just load and run the bsp as you would any bsp. On the negative side, the bsp file size is increased by the size of a texture that the user already has in his/her halflife.wad file. If the texture isn't too big, no big deal. If I use lots of special textures, the bsp size can be dominated by the size of the extra textures. In the neutral area, if I wanted to distribute the .rmf file, I'd have to include the special wad file. The info_texlights entity included in the .rmf would, however, have the Brightness for any texlights already set. There'd be no need to provide instructions on how to edit the user's lights.rad file which, as a mapper, I would find a pain in the backside.
I made lots and lots of test maps to prepare this tutorial. I got into the habit of inserting a func_button + info_texlights + info_player_start prefab, just to make sure I had a lit button with a defined texlight texture where I could find it in the dark. I did a lot of turning lights on and off and it didn't take long to get into that habit.
Note: The value of any tutorial is in direct proportion to the effort YOU put into learning the material. If you just read it without trying out the examples and exercises on your own, in a map you make just to play around, you will not get the visual feedback, particularly in this "Light" tutorial, that will make you a better mapper.
This tutorial was developed using WorldCraft/Hammer 3.4 and 3.5. Some of the screenshots may not look exactly like your editor, but the descriptions of the editor menus, entity properties, etc., should give you the information you need. It is also a good idea to get the latest .fgd file and include it in your Configuration Menu. Currently, for HL, that is version 3.0.0.1. While we are on the subject I also recommend using Zoners Half Life Tools 2.5.3 custom Build 1.7. If fact, you'll have to have those tools to do everything described in this tutorial.
Light entity
Let's start with the humble light entity:Light, glorious light!Lights OnGet used to this window. It'll be your new best friend!Properties
Target
This property really is only useful for a light_spot entity (see below). A light entity shines light in all directions and having a target makes no difference to the lighting. If you are using the light to target an info_target, then enter the info_target's name here. More on that later...Name
If you're not going to switch your light on and off or give it a Custom Appearance, leave this blank. If you want to turn your light 'on' and 'off,' or if you want to give it a Custom Appearance, then you will need to give it a name. This name will be the target in the Properties of the device you are using to switch the light. E.g., the target of a func_button or a trigger_once. Here's the rub: if you give a light without a Custom Appearance a name so you can switch it on and off, it will have a Normal Appearance no matter what type of Appearance style you have selected. Have I got you confused yet? See the section on Switching Lights and Texlights below.Brightness
Brightness is comprised of 4 numbers. The default is 255 255 128 200. The first three numbers are the coresponding Red, Green and Blue (RGB) pallete scales, the fourth number is the luminosity, or the actual brightness of the light. To make a light brighter or darker, you need to change that 4th number. The Default is 200. You can use the Pick Color button to select the color and luminosity if you prefer that to editing the numbers. The ratio of the 3 RGB values to one another, not the actual numbers themselves, is what determines the color of the light. For instance, RGB values of 200 0 200 and 100 0 100 will both appear purple. Values of 200 200 0 and 100 100 0 will both appear yellow(ish). The size of the color numbers also affects the luminosity of the light. RGB values of 200 200 200 contribute a brightness of 200. Using the values in the previous paragraph, a light with a Brightness property setting of 200 0 200 255 will appear to be about twice as bright as a light with values of 100 0 100 255. Although I've used examples of RGB and brightness values in the range of 0 to 255, you can use much larger numbers if you'd like. A Brightness property of 1000 0 1000 255 will just be a very bright purple light. However, to help you keep track of the colors and brightnesses of lights relative to one another, just use RGB values in the range of 0 to 255 and vary the luminosity (the 4th number) to suit your needs. If you want a really bright purple light, use 255 0 255 1000 instead. Note: A light with a Brightness value of "0 0 0 0" will actually appear as a light of color "255 255 255" with a mid level brightness. So if you chose this to make a really dark room, then you now know why it didn't work.Appearance
This property applies only if your light does not have a name. Remember? You can change the appearance of your light to one of the 11 different types listed below:- Normal: A steady light of the chosen color.
- Fluorescent Flicker: Alternates the light between 'off' and 'on' in a random timed sequence.
- Slow,strong pulse: Goes from fully light to dark and back again slowly.
- Slow pulse,noblack: Same as above, but it doesn't go totally dark.. although that is a matter of perception.
- Gentle pulse: Not quite as harsh as the above "pulses."
- Flicker A: a short quick flicker, but only changing the light level slightly.
- Flicker B: a slightly quicker flicker.
- Candle A: Nothing like a candle.. Sort of erratic pulse to black and then a few bright pulses.
- Candle B: Two 'on','off' pulses then a fade to bright.
- Candle C: Three 'on','off' pulses and a bit of Candle 'A' and 'B' thrown in for good measure.
- Fast Strobe: Exactly what it says... 'on and 'off' quickly.
- Slow Strobe: A slower version of the Fast Strobe, no surprises there.
Custom Appearance
Used for designing your own custom effect or to give a named light an appearance other than Normal. If you want to design your own light effect, you need to give the light a Name. The brightness will vary according to the strings of letters you enter in this property. If you want, you can trigger a light with a custom appearance and toggle the light on and off. You give the light the appearance you want by specifying a string of letters (a-z) where a is completely dark and z is maximum brightness, the 4th number in the Brightness property. Letters in between a and z represent brightness levels in between. Each letter will give you about 1/10th of a second at that brightness. If you want more than a 10th of a second at that brightness, repeat the same letter. The letters do not have to go in alphabetical sequence and can be in any order that varies the light the way you want it. There is a maximum number of alpha characters you can enter of 63. So for a really slow pulse you could try: aaaabbbbccccddddeeeeffffgggghhhhggggffffeeeeddddccccbbbbbaaaa and this will give you about a six second dark to bright to dark effect. Note: You can create some major funkiness by using capital letters, numbers or other characters instead of lower case letters in the custom appearance property! Since you're using Zoner's Half Life Tools and the most recent .fgd file (right?), you will have noticed that your light entity has a few extra values: ZHLT Fade and ZHLT Falloff. The brightness of a real point source of light in nature will decrease as the inverse square of the distance it travels. That is, the brightness at 2 meters will be 1/4 of the brightness at 1 meter. If the brightness at 1 meter is 1/(1*1) = 1, the brightness at 2 meters is 1/(2*2), or 1/4. This "falloff" of brightness, the spreading out of light from a source, looks natural to us 'cause that's, like, how nature actually works. The ZHLT Fade and Falloff properties allow us to change the way the compiler calculates the brightness of a light as it gets farther and farther from its source.ZHLT Fade
If the explanation of this property makes your head hurt and you don't understand it anyway, just leave it at the default of 1.0. This property applies to any light, light_environment, or light_spot entity. ZHLT Fade adds in an artificial factor into the normal (1 / dist * dist) inverse square falloff calculations, by multiplying the denominator of the scale by the fade value. That's why just leaving it at 1 is okay. Individual point lights (point entities) can set their own individual fade and falloff values, which override any global setting on the command line. These fade and falloff values only affect the direct lighting layer, as the radiosity pass always uses plain inverse square falloff. The default fade value is 1.0. Numbers less than 1.0 and greater than 0 will cause the lights to illuminate objects further away. Fade values greater than 1.0 will travel less. This can have uses in making dark corners (we'll get to that in the exercises below) and in texture lighting. See the discussion on texture lighting below. [Note]: I played around with the falloff parameter a lot. Personally I think Zoner messed up a bit implementing this. To get a light with linear falloff to look even close to a light with inverse square, I had to jack up the fade to, like, 50-150. The parameters between the two types of falloff don't appear to be consistent. In addition, brush areas that are perpendicular to a linear falloff light seemed to be illuminated inconsistently with areas at lesser angles. I've got a map that shows a brush some 1000 units away down a dark hallway lit like the sun. I included the explanation solely for consistency and kind of left the application to the student.ZHLT Falloff
You can select: Default (normally Inverse Square. [Perhaps intended to allow override by commandline switches[???]]) Inverse Linear Inverse Square This property can also be applied to any light, light_environment, or light_spot entity [test this]. This option can change the normal inverse square falloff of lighting in the direct lighting layer with inverse linear falloff. That is, instead of light falling off at a normal, more realistic 1/dist*dist rate, it will fall off more slowly, i.e., 1/dist. A light that decreases in brightness linearly instead of at an inverse square rate is like a highly collimated beam that doesn't decrease in brightness because it's spreading out, but because something in the air (smoke, haze) is attenuating it. This could be useful if you wanted to simulate a searchlight, a movie projector or a lighthouse beacon that has mirrors or lenses collimating the beam.Flags
When you bring up the Properties box, you'll see three tabs at the top - Class Info, Flags and Visgroup. Click on the Flags tab and you'll see a bunch of (mostly untitled) checkboxes.- 'Initially dark' - You can check this flag if you want the light to be 'off' when you start the map. Kinda useless unless you intend to give the light a name and turn it 'on' with a trigger at some point.
Testing it Yourself
So far we have only covered the light entities properties, I am hoping to show you how to use the thing, or this tutorial will be pretty pointless. If you haven't made up a test map as described above, make one now, just for playing around. Put just an info_player_start and a light entity in a room. What we'll do (actually, what you'll do) is to change a property or two of the light, compile the map and look at the result of the changes. Leave the light's properties all at the default values - no Name, Appearance 'Normal', no Custom Appearance.Compile and run the map. A room with a plain whitish light in it, right? Now bring up the properties of the light entity and change the Appearance to 'Flourescent flicker.' Just for fun, change the brightness to 0 255 128 150. Compile and run it. You should now see a dimmer, flickering blue-green light. Play around with the Appearance, color and brightness to see their effects. Use the color picker to set the Brightness property numbers, if you like. If everything's dark when you run the map, bump up the 4th number in the brightness property or run up the scale on the right of the color picker to make the light brighter. Depending on your monitor's settings, you may need a brightness of 150 or more to see the effect.
Now, set the Brightness and Appearance properties back to their defaults: Brightness = 255 255 128 200, and a 'Normal' Appearance. Enter a Name of 'light1' (without the quotation marks). If you were to compile and run the map now, you'll just have the old vanilla normal light in a room thing. So click on the Custom Appearance property and enter the string abcdefghijklmnopqrstuvwxyzyxwvutsrqponmlkjihgfedcb. You can highlight the string in the tutorial, hit ctrl-C to copy it, and hit ctrl-v to paste in the Custom Appearance field. When you run it, you should get light that varies from dark to bright and back to dark over about a 5 second period (50 characters in the string at 1/10 of a second apiece). Note that once you have the Custom Appearance that you want, you can change the color and the brightness to get the overall effect you want.
If you're not interested in the ZHLT flags, more of an advanced application anyway, you can skip the next couple of exercises. Make sure your light is near the center of the room and near (but not IN) the ceiling brush. Set the Brightness of your light to 255 255 128 150 (not too bright), set Appearance to Normal, and erase anything you have in Custom Appearance. Compile it, run it and take note of how the room is illuminated. The corners of the room should be a bit darker than the center of the room. Now change the ZHLT Fade property of your light to 2.0. Compile it, run it and note that the center of the room is at just about the same brightness as before but the corners of the room are darker. If you had decreased the brightness to get dark corners instead, the center of the room would be darker also. Change the ZHLT Fade to 0.5, compile and run. Once again, the center of the room is about the same but the corners are lighter. Increasing the brightness to get light in the corners would increase the light in the center of the room as well as the corners. You don't want light in the corners of a room in Half-Life, anyway! The Fade property actually does effect the light in the center of the room. But, by using the Fade property this way, you can more easily maintain the general brightness of a room consistent with other rooms in your map, while still adding some dark corners.
Now move your light to one end of the room. Keep it near the ceiling (but not IN the ceiling brush). Change the ZHLT Fade back to 1.0 and set the ZHLT Falloff to Inverse Linear. Keep the brightness at 150. Compile and run. One bright room, huh? The light drops off much less dramatically using this setting. In fact, you'd have to set up a very long hallway to see much dropoff at all at a brightness of 150. In addition, this setting tends to illuminate brushes a long way off in ways that definitely do not make sense to the eye. With the room setup for this tutorial, you'll probably have to drop the brightness down to 50 or less to see much affect. Even then, the far wall seems unusually bright compared to the adjacent floor.
Enough about plain old lights. Let's look at the...
Light_spot entity
Light_spot entities, "spotlights," are more fun that regular lights. There are more properties to play with and, in general, the lighting effects are more dramatic. So it's important to understand what the various properties of a light_spot entity. A light_spot projects a cone of light, like a spotlight. Like a spotlight, a light_spot entity can be given a direction along which to point the cone or you can give it a target to aim at. [Reviewers: MORE EXPLANATION? inner angle, outer angle and a picture? ] So, let's look at the Properties. If you haven't modified your fgd file, the properties for light_spot appear in a slightly different order in the Properites box than for the light entity. The order they appear in the menu is not important. You can edit your fgd file to put them in a more convenient order if you like.Properties
Name
Same as described in 'light' entity above. A named light_spot can only have a Normal Appearance or a Custom Appearance but can be triggered on and off. A light_spot with a Custom Appearance must have a name.Target
You don't have to use a target to aim the light_spot. You can set the pitch and yaw properties instead. However, if you want to set a target, like an info_target entity, for the light_spot, then, if you later need to move the light_spot around in your map, it will still be aimed at the desired spot in the map and you don't have to manually readjust the direction of the light_spot. To set the target, fill in the name of the entity on which the light_spot will be centered. That entity is usually an info_target or an info_null. Place the info_target or info_null in the map where you want the center of the spot to be aimed. Give the info_target or info_null the same name that you filled in for the light_spot target. Done. NOTE: Lighting is determined during compilation, not during gameplay. That means, unfortunately, that you can't move the target of the light_spot and have a "spotlight" follow it. You can set the target of a light_spot to a named entity, but the light will remain centered on the spot where the entity was at the start of the map, even if the targeted entity later moves. So it can't be set to follow a func_train or a monster. Bummer.Pitch roll yaw (Y Z X)
Because roll has no meaning for a symetrical beam, use the Pitch and Yaw properties explained below instead. Note: if the Is sky property (see below) is set to Yes, the ZHLT fade and falloff properties are ignored.ZHLT fade
See the discussion in the light entity properties above.ZHLT falloff
See the discussion in the light entity properties above.Inner (bright) angle
This property determines the size of the inner, uniformly lit cone. This cone forms the brighter center cone of light. Useful values for the inner angle are in the range of 15 to 90 degrees. At angles of 135 and above, it loses the affect of being a spotlight. Outer (fading) angle: This property determines the size of the outer, fading cone of light. From the edge of the inner angle on out to the outer angle, the light drops off from the more brightly lit center to darkness. Values for the outer angle, to keep it looking like a spotlight, are normally about 15 to 30 degrees wider than the inner angle.Inner and outer angles.Pitch
This is the angle above or below the horizontal for the light_spot direction. Angles above the horizontal are postive (+45 points up at an angle of 45 degrees) and angles below the horizontal are negative (-90 points straight down).Yaw
Yaw is the compass direction for the light as viewed from directly above. You won't see this property in the Smartedit list. You can set it by typing in the desired angle in the Angle box, or by dragging the little white line around in the black compass to the right of the Angle box.Brightness
See the discussion in the light entity properties above.Is sky
You have a choice of No or Yes. 'No' means the light_spot will cast light onto your map from where you've placed it. 'Yes' means that any point on the map visible from any 'sky' brush will be lit as if the light_spot were pointing directly at that spot. That is, if you set the direction of a 'sky' light_spot pointing down at a 45 degree angle (pitch= -45), areas which can be seen from any sky brush will be lit as if light were coming down at a 45 degree angle. That angle will be constant throughout any 'sky' illuminated areas, regardless of the location of the light_spot and regardless of where the sky texture is located. Strangely enough, when used as sky illumination, it can still be turned on and off and given a custom appearance! I don't know whether that's a feature or a bug. Also, if you have a window in one room with a sky texture and another window in another room with a sky texture, light will shine in both windows in the same direction. That's.. pretty much.. realistic, hmm? If you want, you can set a target for the light_spot used as sky lighting. The overall lighting from the sky will then be from the direction from the light_spot to the target entity (e.g., info_null or info_target).Appearance
See the discussion in the light entity properties above.Custom Appearance
See the discussion in the light entity properties above.Flags
See the discussion in the light entity properties above.The third light entity to discuss is the...
Light_environment entity
The light_environment entity is used (as can the light_spot entity) to control the angle, pitch, color and brightness of any areas that are visible from sky brushes in your map, i.e., the "outdoors." You can use other lights "outside," also, for effect if you wish. And, like the light_spot with its Is sky property set to Yes, a light_environment can be placed anywhere in your map. It does not need to be located near a sky brush nor, for that matter, does it need to be in the "outdoors" area of your map.Properties
Name
Similar to the light and light_spot entities, you can give the light_environment entity a name. Strangely enough, considering its purpose, if you give it a name you can turn it on and off by using its name as the target for a trigger entity (e.g., func_button, trigger_once). Like the other two light entities, its default state is 'on' when the map starts. Unlike the other two, it does not have an 'Initially dark' flag.Pitch roll yaw (YZX)
Like light_spot entity, roll isn't applicable to the light_environment entity. Use Pitch and Angle to set the direction of your "outdoors" light. Note: I'm not sure why the fgd includes the ZHLT properties for light_environment. They are ignored.ZHLT Fade
ZHLT Falloff
Pitch
See the discussion in the light_spot entity properties above.Angle
See the discussion in the light_spot entity properties above.Brightness
Yes, you can set the color of your outdoor lighting. Might prove useful for early morning, late evening or xeno effects. See the discussion in the light entity properties above for setting color and brightness.Flags
noneTexture Lighting (Texlights)
Having discussed the three light entities, that brings us to a discussion on the use of textures to light your map.Texture lighting is the use of textures to provide lighting. Once your editor has been set up to use them, basic texlights are quick and simple to apply. Texture lights, or texlights for short, can be used for lighting by themselves (quite effectively) or you can 'group' them with light entities to achieve more specialized effects. The basic form of texlight is simple to use. By applying more advanced principles, you can switch texlights on and off and give them varying appearances (as described in the Appearance property in the light entity discussion above) and even custom appearances as described in Custom Appearance above).
Setting up to use texlights
To use texture lighting as described in this tutorial, you'll need:- The ZHLT Tools 2.5.3 Custom Build 1.7. These tools are recommended for general Half-Life mapping in any case.
- A modified halflife.fgd which lets you insert the info_texlights entity into your map. If you want to use the advanced features of texlights (turning them on and off and using various appearances), the halflife.fgd file must also be modified to add 'texlight styles' to at least one entity, usually func_wall.
- This allows you to change your texlight color and brightness settings without leaving the editor. If you use a lights.rad file to define your texlights, you either have to use that same lighting for every map you make or you have to edit the lights.rad file uniquely for every map.
- By defining your texlights in an info_texlights entity in your map, those settings are applied only to that map, are included in that map if you distribute it and don't affect the texture lighting in any other map. If you put your map in the TWHL map vault, you don't need to upload the lights.rad file with it or include a text file describing what texture lighting you've defined in your map. It's all in the info_texlights entity inserted into your map file.
Modifying your halflife.fgd file
Note: Modifying your halflife.fgd file as described below will not affect the way any of your existing maps work. It extends the capabilities of your editor, not change them. Your halflife.fgd file can be found in the fgd subfolder under your Hammer editor folder. It'll be something like C:\Program Files\Valve Hammer Editor\fgd\Half-Life\halflife.fgd.1. Save a copy of your existing halflife.fgd file in case you screw up.
2. Make sure Hammer is closed and open your halflife.fgd file in Notepad or some simple text editor.
3. Copy the following single line and insert it into the file anywhere. I recommend putting it right after info_teleport_destination so it'll appear in alphabetical order in your entities dropdown list.
@PointClass color(255 128 0) = info_texlights : "Texture Light Config"...
@PointClass size(-8 -8 0, 8 8 16) base(PlayerClass, Targetname) = info_teleport_destination : "Teleport destination"
@PointClass color(255 128 0) = info_texlights : "Texture Light Config"
...@SolidClass base(Targetname, Appearflags, RenderFields, Global, ZHLT) = func_wall : "Wall" [
_minlight(string) : "Minimum light level"
]style(choices) : "Texlight style" : 0 =
[
0 : "Normal"
-3: "Grouped"
10: "Fluorescent flicker"
2 : "Slow, strong pulse"
11: "Slow pulse, noblack"
5 : "Gentle pulse"
1 : "Flicker A"
6 : "Flicker B"
3 : "Candle A"
7 : "Candle B"
8 : "Candle C"
4 : "Fast strobe"
9 : "Slow strobe"
12: "Underwater"
]@SolidClass base(Targetname, Appearflags, RenderFields, Global, ZHLT) = func_wall : "Wall" [
style(choices) : "Texlight style" : 0 =
[
    0 : "Normal"
    -3: "Grouped"
    10: "Fluorescent flicker"
    2 : "Slow, strong pulse"
    11: "Slow pulse, noblack"
    5 : "Gentle pulse"
    1 : "Flicker A"
    6 : "Flicker B"
    3 : "Candle A"
    7 : "Candle B"
    8 : "Candle C"
    4 : "Fast strobe"
    9 : "Slow strobe"
    12: "Underwater"
]
_minlight(string) : "Minimum light level"
]9. Restart Hammer for the modifications to take effect.
10. Select the entity tool, drop the entity list down and check that info_texlights appears somewhere in the list. If you've done it correctly, it will follow info_teleport_destination.
11. Create a brush, tie it to a func_wall entity and check that Texlight style appears as a Property of the func_wall.
Now that we have a newly modified fgd to play with, let's work through a quick example so you can get an idea how the info_texlights entity works.
- Open a New map in Hammer.
- Browse for and select the texture FIFTIES_WALL13 in the Texture Bar.
- Select the Block Creation tool and make a block 512w x 512l x 256h.
- Hollow it out. 32 unit walls are fine.
- Bring up the Texture Application tool (Shift-A) and select the downward facing face of the ceiling brush. Which brush you actually select isn't real important as this is just to demonstrate a very simple texlight. But the face you choose must be facing the inside of your map.
- In the Texture Application tool, the FIFTIES_WALL13 texture should be shown. Select Browse in the Texture Application tool and select the FIFTIES_WALL14V texture.
- Click Apply and ensure that just the texture of just one brushface has changed.
- Close the tool.
- Insert an info_player_start entity somewhere inside your map.
- Insert an info_texlights entity somewhere in your map. The location doesn't matter as long as it's inside the map somewhere.
- Select the info_texlights entity and open up Properties.
- Click on Smartedit to open up the Add/Delete dialog.
- Click Add.
- For the Key, enter FIFTIES_WALL14V.
- For the Value, enter 255 255 128 50.
- Close the Object Properties dialog, compile and run the map.
- You should appear in an ugly green cinderblock room with a fairly plain lit ceiling. The light in the room is being provided by the texlight. Remember? You didn't add a light entity to the room.
- Simple texlight (lighted texture) - a texture defined in info_texlights applied to a brush-face. Shines with a Normal appearance.
- Texlight tied to an entity - a texture defined in info_texlights applied to a brush-face. The brush is tied to an entity (normally a func_wall). Shines with a Texlight style selected in the func_wall properties.
- Texlight grouped with a light entity - a texture defined in info_texlights applied to a brush-face. The brush is tied to an entity (normally a func_wall). A light entity is grouped with the texlight by giving both the light entity and the func_wall entity the same name. Shines with a Normal appearance or a Custom Appearance set in the light entity properties. Can be turned on and off by triggering the group name.
Simple Lighted Textures
If you completed the example above, you have an idea what a simple lighted texture is. It's a texture applied to a brush (that doesn't have to be an entity! it's applied to a world brush) and defined as a light emitting texture in an info_texlights entity. That's it. You can't switch it on and off or give any appearance other than Normal because it's not tied to an entity. It's plain and simply a texture that emits light. To create a simple texlight:- Insert an info_texlights into your map.
- In the info_texlights properties, Add the name of the texture which is to be used for the texlight and the color and brightness of the light that you want the texture to emit.
- Apply that texture to brushfaces whereever you want.
Note: a texlight, unlike a light entity, gives off light in proportion to the size of the texlight. If the texlight brush is small, you get a small amount of light. If you make the texlight big, it will give off more light. I suggest making the texlight the size and shape you want and then adjust the luminosity, the 4th number in the Brightness of the texture in the info_texlights list, to get the desired level of lighting. You can also increase the number of texlights to brighten the area.
Quite a bit can be accomplished with simple texlights and they can simplify the construction of portions of your map. Rather than add multiple light entities to light a hallway, for instance, you can add texlights directly to world brush faces as shown in the picture below.
Light with no light.The Hammer editor and accompanying compiler simplify life by letting you define lights and texlights and assume they emit light that casts shadows and bounces off other surfaces. Note, however, that, with just a couple of exceptions, Half-Life maps are not dynamically lighted. That is, the compiler determines lighting before the map is created. When you actually play Half-Life maps, the "lighting" you see are just textures with bright pixels where there is supposed to be light and darker pixels where there is supposed to be shadows. Differently shaded textures are rendered in a view when a light is turned on or off to make it appear that light is being cast. The few exceptions I know of are the flashlight and, perhaps, the light that an alien slave gives off when it charges up.
Texlight Tied to an Entity
To use a texlight that has something other than a Normal (steady) light appearance, you can tie the brush to which the texlight texture has been applied to a func_wall entity. Now you can select a Texlight style in the func_wall properties and have the texlight flicker with various styles.To create a texlight with a Texlight style:
- Open the Properties of your info_texlights entity and turn off Smartedit.
- Click Add, enter the name of the texture to be used as a texlight as the Key.
- Enter the Brightness (3 RGB values and a luminosity number) that you want as the Value. In general, texlights need to have much greater luminosities (the 4th number) than light entities. You'll have to give it a value up in the range of 250 or more, maybe up to 2000 or more, to get it to "shine" much, to cast shadows, etc.
- Create the brush that is to be your texlight. Note: the brush you use for your texlight cannot be a hull brush. All hull brushes must be world brushes or you'll have a leak in your map.
- Tie the brush to a func_wall entity (other entities can be used if you've edited your fgd file to allow selection of Texlight styles).
- Open the Texture Application tool and apply the texlight texture to a face of the brush.
- Open the func_wall Properties of your brush and select a Texlight style, such as Fluorescent flicker or Underwater.
- Compile and run your map and you've got a texlight with other than Normal style.
Texlight Grouped with a Light Entity
This application is a bit more complicated but it gives you the capability to turn your texlight on and off and/or give it a Custom Appearance. The "grouped" texlight is a texture applied to a brush and the brush is tied to an entity, most commonly a func_wall. A light entity is then added to the map and "grouped" together with the func_wall by giving both the light and the func_wall the same Name property. The texlight can now be turned on and off by triggering the group name and the texlight can be given a Custom Appearance by setting the Custom Appearance property in the light entity.Like the simple texlight, the texture that is to emit light is defined in the info_texlights entity with the desired color and luminosity. The principle behind this type of texlight is that the map compiler uses information from the info_texlights entity to set the Brightness of the texlight. The map compiler also uses the Name of the light entity and its Custom Appearance (if it's set) to allow the texlight to be turned on and off and/or give it the Custom Appearance defined in the light entity.
First, here's how to create a grouped texlight:
- Open the Properties of your info_texlights entity and turn off Smartedit.
- Click Add, enter the name of the texture to be used as a texlight as the Key.
- Enter the Brightness (3 RGB values and a luminosity number) that you want as the Value.
- Create the brush that is to be your texlight.
- Tie the brush to a func_wall entity (other entities can be used if you've edited your fgd file to allow selection of Texlight styles).
- Open the Texture Application tool and apply the texlight texture to a face of the brush. Close the Texture app tool.
- Open the Properties of the func_wall and selected Grouped from the Texlight styles.
- Give the func_wall a name, like 'texlight1' (without the quotation marks).
- Add a light entity to your map (anywhere). Be sure it's inside the map somewhere and not outside the hull.
- Open the Properties of the light entity and give it the same name (like 'texlight1') as the func_wall. This 'groups' it with the func_wall.
- Change the luminosity, the 4th number of the Brightness property, to something small, like 0.01 (e.g., Brightness=255 255 128 0.01).
So what's the point?
- You can set a Custom Appearance (see the Properties of the Light entity at the beginning of the tutorial) in the light entity and the texlight will take on that Custom Appearance. Note, however, that you can't change the Appearance property of the light entity to achieve this, only the Custom Appearance.
- Since the texlight and the light have a name, you can trigger the texlight on and off. If you want the texlight light to be initially dark, set the Initially dark flag in the grouped light entity.
- You can have multiple texlights all grouped with one light entity and switch them all on and off, as you would expect to be able to do in a large room with one switch and several light fixtures. You don't have to set the properties of several light entities, just one info_texlights Brightness. If you want to change the light level in an area like that, you can edit just the texture Brightness in the info_texlights list.
- You don't have to use the same texture for every texlight in a group. As long as the texture is listed in the info_texlights and the func_wall to which the texture's been applied has the same group name, it will behave (have the same appearance and be turned on and off) like the rest of the group. You can give each texlight texture a different color and/or luminosity. Using a multimanager and several groups of texlights, you can create a circus lighting effect.. if you want.
Tips for Using info_texlights
As mentioned above, the advantages of using an info_texlights entity in your map are: you don't have to edit or distribute a lights.rad file, and the texlights you define in one map don't affect the lighting in any other map. In some cases, you may want to use the same texture as both a texlight and as a normal texture. Well, you can't actually do that.However, you can use two textures that look identical but have different names. What I've done is to create a separate wad file and copied textures from halflife.wad (for instance) into my special wad file (using Wally) but given them a different name. For instance, I copied the texture +0~FIFTS_LGHT06 into my special wad file and gave it the name FIFTS_LGHT06x. Where I want a regular looking light fixture, I use the +0~FIFTS_LGHT06 texture. Where I want the same looking texture as a texlight, I use FIFTS_LGHT06x and define its Brightness in an info_texlights entity in my map. I added my special wad to the Textures tab I have set up in my Configuration. That ensures I have those "special" textures available when I build a map. I also added "-wadinclude <Specialwadname>" to the command line for my csg compiler ("Expert" option in the compile dialog). This results in any textures I've used from my special wad to be included directly in the bsp file.
There are advantages and disadvantages to this setup. On the plus side, I can distribute a bsp file without hassling anyone with an extra wad file. No special instructions on where to copy an extra wad file, etc. Just load and run the bsp as you would any bsp. On the negative side, the bsp file size is increased by the size of a texture that the user already has in his/her halflife.wad file. If the texture isn't too big, no big deal. If I use lots of special textures, the bsp size can be dominated by the size of the extra textures. In the neutral area, if I wanted to distribute the .rmf file, I'd have to include the special wad file. The info_texlights entity included in the .rmf would, however, have the Brightness for any texlights already set. There'd be no need to provide instructions on how to edit the user's lights.rad file which, as a mapper, I would find a pain in the backside.
I made lots and lots of test maps to prepare this tutorial. I got into the habit of inserting a func_button + info_texlights + info_player_start prefab, just to make sure I had a lit button with a defined texlight texture where I could find it in the dark. I did a lot of turning lights on and off and it didn't take long to get into that habit.
Little Oddities
If you compile and run a map with a grouped texlight applied to a fairly small brush, you'll notice something odd. The texlight now casts light as if it were coming from a spotlight with a 90 degree cone somewhere near the back of the texlight brush instead of taking on the shape of the texlight brush itself! That, fortunately or unfortunately, is the nature of Zoner's compiler. It treats the texlight more like a light entity instead of an 'area' of light-emitting texture. That feature (or bug) can be used to make a desklamp look pretty realistic as one would expect a desklamp to cast a cone of light anyway. It's a little less convenient when you want to make a fluorescent fixture in a room or hallway, although, in general, it's not very noticeable.4 Comments
You must log in to post a comment. You can login or register a new account.
@PointClass color(255 128 0) = info_texlights : "Texture Light Config"
you need a [] at the end, doesn't show up in the entities list otherwise
"info_lights_rad"
instead of
"info_textlight" in entity's drop down list...It works fine for me
I uncompiled cs_industrywest, and the data is :
240 240 240 40
and some different value for shade (a color near yellow with 200 brightness).