Vlatitude: Custom Menu Art for your MOD Last edited 4 years ago2019-04-25 11:47:27 UTC
You are viewing an older revision of this wiki page. The current revision may be more detailed and up-to-date.
Click here to see the current revision of this page.
New information added:
- New color strings that can be used in the colors.lst file
- Customizing menu and pop-up text. This is how Gearbox Software changed "Are you sure you want to quit Half-Life?" to "Are you going AWOL on me, son?" as seen in Opposing Force
- Changing the default key bindings set for you MOD. This is important if you are creating a MOD that has new in-game features
- Creating a liblist.gam file (making Alien Dance MOD appear in the custom game menu)
- Creating a background image
- Changing or replacing logos and menu option text (i.e. New Game, Quit, Advance Options, etc.)
- Altering or replacing secondary decals (i.e. the little "X" in the top right corner of the screen or little scroll arrows when viewing the readme.txt)
- Creating a new AVI title logo
- Adding your own console background for the console menu
- Changing the color of the help text (i.e. gray text appearing next to "New Game" and "Previews") as well as text colors in the pop-ups NEW
- NEW Customizing the help text and pop-up text
- NEW Changing the default key bindings in your MOD
First Things First
You'll need all of the original menu art files to use as templates. These are included in the full SDK, in a folder called "splash". While the SDK includes the general menu art files, it omits many image files such as the arrow images or the checkboxes. That's why I've assemble a ZiP file containing all of the files you will need to make detailed menu art and it is available right here on Vlatitude.- Download splash files
- Download Half-Life SDK here
- Download my example menu art
Okay, now I think we can go ahead and get started.
1) Creating a liblist.gam file
(making Alien Dance MOD appear in the custom game menu)First thing you need to do here is create a liblist.gam file. If you've never done this before go back and read my tutorial on how to "Exploit the Custom Game" menu here. This will teach you how to create a liblist.gam file. Follow those instructions. I'd recommend following the tutorial step-by-step if it's your first time creating a liblist.gam file. Once you are comfortable with the process of exploiting the game menu, go ahead and make the proper changes.
For this example, since our menu is for Alien Dance, we'll want to set it up for the game Alien Dance. Yes, even though we don't actually have a game, but this is just an example. I'd assume that if you spend all of that time creating menu art, you would at least have a MOD that it is tied to.
Okay, so create a directory for the menu art to go into. Treat this like a MOD, so you should have something like this set up for you're directory structure:
\Half-Life
    |
    +--- Aliendance
    |       |
    |       +-- liblist.gam
    |       |
    |       |
    |       +-- DLLS
    |       |      |
    |       |      +-- hl.dll
    |       |
    |       +-- CL_DLLS
    |       |       |
    |       |       +-- client.dll
    |       |
    |       +-- GFX
    |       |       |
    |       |       +-- SHELL
    |       +---MAPS
    |       |
    |       +-- MEDIA
    |
+--- VALVEThe gfx and shell directory is where you will put the .bmp files of your static (non-moving) graphics. The media directory is where you will put your logo (like the moving Half-Life logo in the original game). The logo will be an uncompressed .avi file. We'll get more into that later.
So if you grasp the concept of creating liblist files, then you can go ahead and create it now. This is what mine looks like, and you can use it as well if you like:
// Many of these options aren't important for the game menu, but are if
// you're creating an actual MOD and the liblist file
//
game "Alien Dance"
startmap "AD1" // There isn't really a map, so obviously you'll get an error
// if you try to start a new game.
url_info "http://www.vlatitude.com"
url_dl ""
version "1.2"
size "10.4"
svonly "0"
cldll "0"
type "SinglePlayer_only"
nomodels "1" // Don't show models in browser, since you don't pick them
// there anyway.
mpentity "info_tfdetect"
gamedll "dlls\tfc.dll"
gamedll_linux "dlls/tfc_i386.so"2) Creating a background image
Okay, I'm afraid I can't help you terribly on actually painting the background image. For this, I just made my own by piecing a bunch of graphics together that I found at Christopher Buecheler's website, who is a very talented texture artist who has done custom artwork for Unreal and Half-Life. What I can tell you is that the background image must be 640 x 480 in size and can be in either 8-bit or 24-bit color. The file must also be named splash.bmp. Personally, I'd download the splash.zip file I have linked above and then unzip it straight into the gfx/shell directory. I find it easier to just copy the files in, open them individually in a paint program and just edit them and save over them (make sure you keep the originals backed up though).Incidentally Chris Buecheler also has some background tutorials on his site that may be rather useful for Photoshop users, but even Paint Shop users may find some useful info there as well.
Okay, so now I've made a background using some stolen graphics by opening the original splash.bmp file in my shell directory and piecing them in. It's really that simple. Just save over the original file and the background is done. On to the next section.

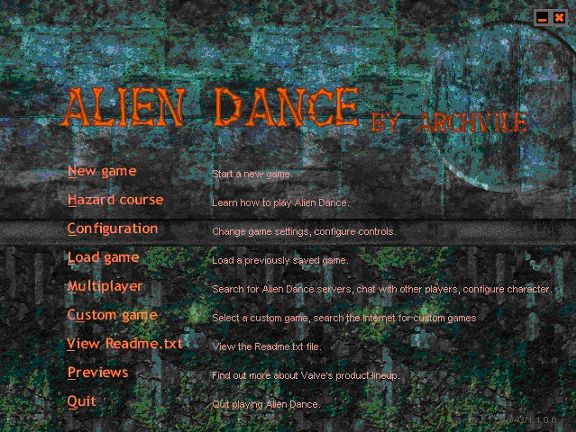
3) Changing or replacing logos and menu option text
(i.e. New Game, Quit, Advance Options, etc.)This is where it gets a little tricky if you plan of changing all of the menu buttons into something completely different. Open up the btns_main.bmp file in the shell directory. As you'll see, everything is thrown into one big file, rather than a bunch of individual files for each line of text. You'll have to zoom in a little bit to see anything. Here's how it works: Each individual option has three different states. The first one is normal, the second is a mouseover effect, and the third is a depressed (click) effect. I took the easy way out on this one, and just colorized them into an orangish color in Paint Shop Pro (Colors>Colorize) rather than create entirely new buttons. You may do the same if you wish. If you wish to replace every button here, then good luck. You'll have a long night ahead of you, but it can of course be done. There are 69 different buttons in here to change. If you wish to change all of the text, then you'll definitely need to use the original as a template. Create a new layer in your paint program and keep referring to the original. Each line of text is split at exactly 26 pixels, so turn on your grid and set it to space at 26 pixels to help you out. Trust me, it will help a whole lot. When you're all done, save over the original file.
Then there are also the title (header) graphics. These are the little blurry titles that pop up when you click an option like, New Game, Configure, Advanced Options, etc. These files are named with head in the front like head_audio.bmp or head_newgame.bmp. Edit these too if you wish. They aren't nearly as big a deal as editing the mouseovers from before. As before, I just colorized these a different color to save time. You may do the same.

4) Altering or replacing secondary decals
(i.e. the little "X" in the top right corner of the screen or little scroll arrows when viewing the readme.txt)This step is purely optional and just if you want to get really thorough with your art. These are just the little things in the menu, like the little scroll arrows or the checkboxes or even the little Linux symbol. All I can tell you is that these little files are a pain in the ass to edit. Why? Because I believe that can only be save in 256 color mode. I'm not totally sure about this, but I'm assuming that, since the originals are save that way. The other thing is, that the full SDK doesn't include these little files in the splash directory, so if you copied the files from the SDK, you won't find them. I included them into the spash.zip file that you may download. If you want to edit these, good luck! Once again, for this, I took the easy way out and just colorized them a different color.
5) Creating a new AVI title logo
Now on to the title logo. This is where the original animated Half-Life logo used to be. For this we'll have to use a different technique. For this, you're going to have to create an AVI file, even if you just plan on making a still image. If you've never made an AVI before, this may be rather difficult for you. Hopefully, I'll be able to take you through it.You'll need something to make this AVI file. If you are a Paint Shop Pro user, you can open up Animation Shop to and do this very easily. Animation Shop is the one I personally use. There are others out there, but Animation Shop is a good program and since that's the program I'm experienced with, we'll use that one.
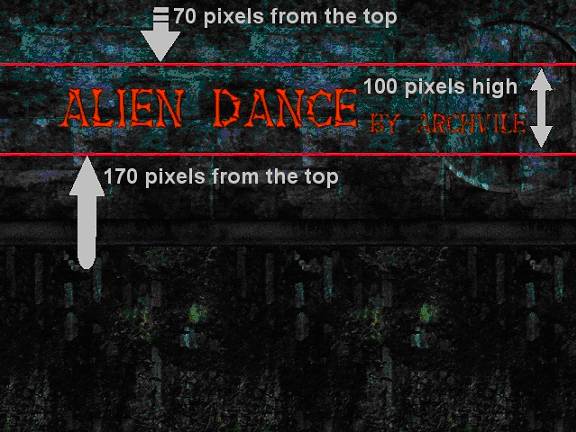
Here's where it gets tricky. You'll need to know, that there are no transparent colors in an AVI file. With the buttons before, you notice that the black background was just rendered as transparent in Half-Life. Not here. That means that you will actually have to copy a piece of the background splash image into your AVI file and try to blend the scene in. It actually shouldn't be as hard as it sounds once I explain how you can do this without flaw. First of all, let me explain where the logo will be. Open up the splash.bmp file in your paint program. The AVI file is exactly 640w x 100h and must be 8 bits per pixel. 24 bit is not allowed for the logo I'm afraid. The top of the AVI file starts at 70 pixels from the top of the splash screen and the bottom will be at 170 pixels. So to make sure that your logo blends in, use the coordinates in your paint program to select an area between the 70 and 170 pixels in height and make sure it's going all the way from left to right. Once you get it just right, copy the area. Now make a new 24-bit image that is 640w x 100h and paste it in (in PSP you can just right click and click on paste as new image to save time).
When in Animation Shop Go into File and click New Animation Wizard.
For the first box, check "Same size as first image". Leave the next two dialogues as the default, but for the looping box, check "Yes, repeat the animation indefinitely" One the next box, add in your images in the incremental order. If you aren't making an animated logo, then just add the one bmp file you made and click next and finish when you're all ready. When it's finished pieceing them all together, and everything is how you want it, go to file>save as and save your new animation as logo.avi (select AVI in the format pulldown) and make sure it goes into the media folder. Go through the default for the first menus and for the resolution option on the second screen, make sure, 8 bits per pixel is selected. When you get to choose selector you'll want to make sure that you are set on Full Frames (uncompressed) because compressed AVIs aren't allowed in Half-Life. Now let the rest just ride on through and let it compile your logo. And you should be all set with the logo. Not too bad eh? Well, it'll get easier as you get used to it.
6) Adding your own console background
This is also a little different as far as the method goes, though I don't think it's nearly as hard as creating a custom logo. Again, this step is purely optional, but if you're interested, here's how you do it:The console is noting but a regular old bitmap file. However, this bitmap file will have to be compiled into a file called cached.wad. As far as I understand it, the reason for this is, that because this is rendered as 3D, rather than a 2D splash (remember, that the console background is often accessed in-game), then the image is treated like a texture. Although I still can't exactly figure out why images can't be opened up in wad editors like Wally. So on that note, we'll have to compile that stupid wad file manually. Don't worry, it's straightforward. Make your bitmap image at 320x200. This file has to be saved as an 8-bit 256 color BMP (qlumpy won't accept 16-bit). It doesn't really matter what you name it when you save it. I'd just name it console.bmp. Now you'll need a file called qlumpy.exe to compile it. This file is included in the Full SDK (not sure about the light SDK). If you don't have the SDK, I suggest you download it.
Now we'll make a new empty directory. For the example, just follow along with me. Once you've done it, you can go ahead and make changes or do it in different directories. Make a directory on you C: drive called console. So now you have C:\console (obviously). Now copy your console.bmp file and qlumpy.exe file into c:\console. Now for the fun part; we have to make scripting instructions, kind of like a liblist file. Don't panic though, it's simple enough. Open Wordpad (Yes, just Wordpad. That's all you need). Copy and paste this in there:
$DEST "cached.WAD"

$loadbmp "c:\console\console.BMP"
conback qpic 0 0 320 200

$loadbmp "c:\console\console.BMP"
loading qpic 0 0 320 2007) Changing the color of the help text
(i.e. gray text appearing next to "New Game" and "Previews") as well as text colors in the pop-upsHere's a neat little trick, that I haven't seen any other menu tutorials or guides give. This will change that description text from that lousy gray to something a little more fun. And it's quite a simple trick too. Make a file in Wordpad and type in "HELP_COLOR 255 255 255" (the numbers represent Red Green and Blue). I personally use PSP's color chooser to choose what color I want, write down the RGB numbers of my desired color and plug them in here. You can do that using any Paint program. Save the file as colors.lst in your gfx\shell directory and you're done.
But wait, there are also several other strings that can be added into your colors.lst file that will change other colors as well. This includes the text in the exit prompt when you try to exit the game. Since these work exactly the same as the "HELP_COLOR 255 255 255" string, I'll just list the valid strings below and give an example of what each does. I've also just recently found out that the latest version of Half-Life places a colors.lst file into your valve/gfx/shell with some of these new strings added. You should back up this file and play around with some of these color values. No harm ever came from that.
(Where XXX = an RGB value)
- PROMPT_TEXT_COLOR XXX XXX XXX - This changes the color of the text that prompts you for things like "Are you sure you want to quit Half-Life?" or in OP4, "Are you going AWOL on me son?"
- PROMPT_BG_COLOR XXX XXX XXX - Contrary to what you may assume about this one, it will not change the background color of the box that prompts you questions for qutting half-Life and such. That is one of those gray boxes. Instead what it will do is create an odd (and personally I find to be a very hideous) effect of creating a colored box around the text where it says "Ok" and "Cancel", but does not change the entire box. You'll have to try it for yourself to see what I mean, but I honestly can't see any use for changing this.
- PROMPT_TITLE_COLOR XXX XXX XXX - I have no clue about this one. It's a valid string, but I haven't been able to find out what it does. if someone has any ideas, they're certianly free to E-mail me and grace me with their knowledge.
- INPUT_TEXT_COLOR XXX XXX XXX - Like where it asks for you to "Input IP address" when adding a server IP into a multiplayer game. This is different from the pop-up that asks if you wish to quit. It should also be noted, that this is the same strings for the box that prompts you to enter your Half-Life CD key when you first install Half-Life
- INPUT_BG_COLOR XXX XXX XXX - Same as for PROMPT_BG_COLOR, but this is for the IP Input box instead.
- REFRESH_TITLE_COLOR XXX XXX XXX - Like where it says "Getting server info" when starting a multiplayer game
- REFRESH_TEXT_COLOR XXX XXX XXX - Like where it says "### servers remaining"
- REFRESH_BG_COLOR XXX XXX XXX - Of course, this is another background color. You should get the idea by now. if not, it's the same as PROMPT_BG_COLOR and INPUT_BG_COLOR, but only for the refresh server text.
8) Customizing the help text and pop-up text
This will allow you to change that text you see in your menu. This includes the help text and the text that appears when you try to quit the game.Now this is a bit more complex, because there aren't too many examples or pre-made files to work from. As you know, Half-Life contains a lot of text in it, and it's my belief that all of it can be changed using the strings.lst file. Unfortunately, Valve has not provided us with a complete strings.lst file, so we'll only be able to rely of examples gives from Gearbox's Opposing Force and Counter-Strike. Fortunately, I don't think too many people will want to change any more than the examples will give, so lemme just get to it.
The strings.lst file will contain new lines to text that will be added into your menu. How it works is, you will tell it which line to change and then next to that line you will give the new text that will be replacing it. Here's an example:
Where the original Half-Life had a string that said:
236 "Are you sure you want to quit Half-Life?"
Gearbox added a new line into Opposing Force that says:
236 "You going AWOL on me, son?"
The 236 is the line number that you are changing. Simple huh? Here are two examples to strings.lst files from Opposing Force and Counter-Strike
Counter-Strike
189    " "
190    " "
191    " "
192    " "
193    "Change Counter-Strike's video, audio, and control settings."
194    "Read Half-Life's readme.txt."
196    "Quit Counter-Strike."
198    "Get online and play Counter-Strike with others from around the world."
323    "Disable graphic visuals. If this is turned on Counter-Strike will not be playable."
324    "Download the latest version of Half-Life."
398    "If the server allows it, this option will help you aim at enemies."
391    "Check this box and enter password to disable visuals inappropriate for younger players and multiplayer. Anyone wishing to change this setting will need to use this password. IMPORTANT NOTE: If this is turned on Counter-Strike will not be playable."
400    "Read the official Counter-Strike Manual, learn how to play."
402    "cstrike\manual\manual.htm"
416    "Visit Counter-Strike.net"
417    "www.counter-strike.net"
426    "Get the latest updates, official news, and see the entire CS Network!"
503    "Disabled."
530    "Play/download other mods, or go back to Half-Life."
Opposing Force
// String patches

// #define IDS_MAIN_PREVIEWSHELP 400
// #define IDS_MAIN_CUSTOMHELP 530
// #define IDS_MAIN_RETURNHELP 188
// #define IDS_MAIN_NEWGAMEHELP 189
// #define IDS_MAIN_TRAININGHELP 190
// #define IDS_MAIN_LOADHELP 191
// #define IDS_MAIN_LOADSAVEHELP 192
// #define IDS_MAIN_CONFIGUREHELP 193
// #define IDS_MAIN_READMEHELP 194
// #define IDS_MAIN_ORDERHELP 195
// #define IDS_MAIN_QUITHELP 196
// #define IDS_MAIN_QUICKHELP 197
// #define IDS_MAIN_MULTIPLAYERHELP 198
// #define IDS_MAIN_QUITPROMPTINGAME 235
// #define IDS_MAIN_QUITPROMPT 236

402 "www.gearboxsoftware.com/projects.html"
400 "Find out more about Gearbox Software's product line-up."
530 "Select a custom game, maggot."
188 "Back to the current mission."
189 "Begin a new mission, soldier."
190 "Off for a little basic training."
191 "Load a saved mission."
192 "Load/Save a mission in progress."
193 "You looking to tweak out your setup, dirtbag?"
194 "Brief yourself on the current situation, son."
196 "A good soldier never leaves his squad behind."
198 "Prepare for combat. This is not an exercise!"
235 "You going AWOL on me, son? This will abandon the current misson!"
236 "You going AWOL on me, son?"
234 "Leaving for Boot Camp will end your current mission."
338 "Could not validate Opposing Force"
340 "Please Insert the Opposing Force CD"9) Changing the default key bindings
This may or may not be of interest to most Menu Artists or MOD authors, since it technically doesn't fall under the catagory of "Menu Art", but since it does however involve the menu, I'll mention it anyway. Many of you could probably stand to skip this section if you aren't interested. I won't hold it against you. This is mostly for complex and advanced MODs like Counter-Strike or Day of Defeat.This, quite simply, changes the default keyboard bindings of your MOD. You know how Valve had set up certian keys for "jump", "duck", "run", "use", and all that stuff that you always go in and change because the configuration just doesn't work for you? Well the kb_act.lst, kb_def.lst and kb_keys do exactly that. i won't go into too much detail on these, since they are, more or less, fairly self-explanitory, but the kb_act.lst is the file that contains the action descriptions and the kb_def.lst file contains the set key defaults. I really haven't entirely discovered the importance of the kb_keys file, but it doesn't appear to be important anyhow. These files are located in almost all major MODs, as well as the valve/gfx/shell directory.
This is mostly for very thorough and advanced MODs like Counter-Strike and such, and useful if you have added new actions into the game. Most MOD authors probably should bother too much with this. Probably not completely worth the time, but the information is there if you need it.
Wrapping it up!
Actually, if you've followed every step here, you've done it all. Fire up Half-Life, activate Alien Dance (or whatever you name it) and enjoy your finished work. You've just made your own custom menu art. Here's what I've got: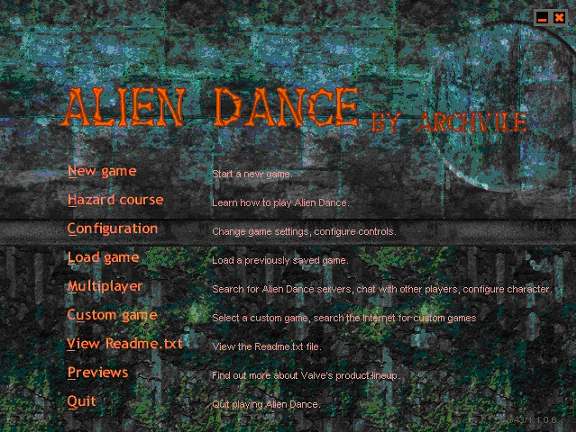
I certainly hope this tutorial has helped you and has made you understand menu art just a little better. Remember that you'll understand it better the first time you go through all of the steps, like I hope you did here if you are new at this. Hopefully, this tutorial here will help to through that art into a menu and make your MOD just a little cooler.
Now turn off your computer and go to bed!! It is way past your bedtime!
- Categories
- Archived Articles
- Vlatitude Archive
- Tutorials
- Goldsource Tutorials
- Mapping
- Examples Required
Comments
You must log in to post a comment. You can login or register a new account.