Vlatitude Archive: Modeling for Half-Life - Part 4 Last edited 4 years ago2019-04-25 08:52:41 UTC
You are viewing an older revision of this wiki page. The current revision may be more detailed and up-to-date.
Click here to see the current revision of this page.
Hey all. In this, the fourth and final part of the Modelling in Milkshape Basics Series, I will be going through the final main tab of the milkshape interface. It's lengthy, so bare with me. Joints. I have to admit, you do not have to use any of the lessons applied if you are only going to be building the mesh for your weapon or character model. But if you plan to animate it (which you will need to if you want to get it ingame) then I advise you to read through this tutorial carefully.
So, open up milkshape, then click on the "joints" tab to the right and you'll see the following: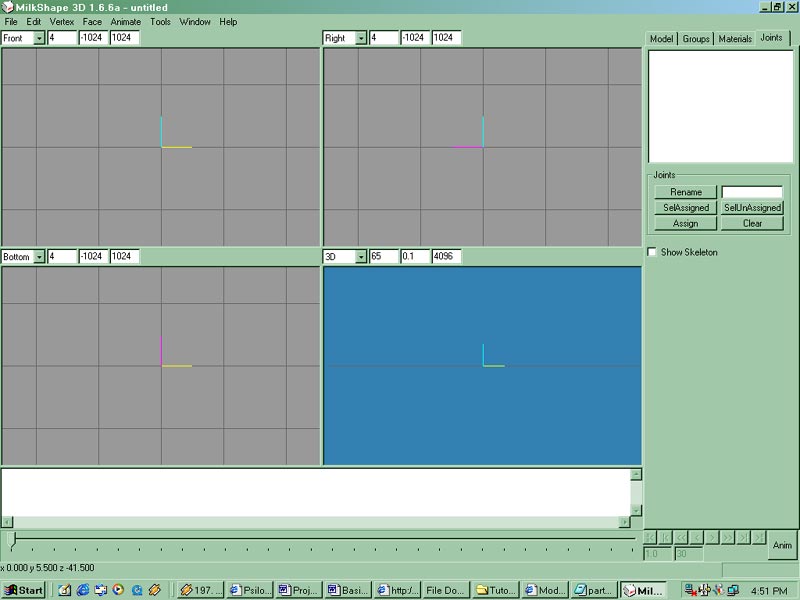 Great work! Now, as you can see, there isnt too many buttons! Then joints and animating are easy!! No, unfortunately. Once you practice a bit, its simple, but tedious and arduous work. Before you practice a bit, animating is a pain in the 455. Im too 1337... Anyway, first I'll explain some of the terms, then ill go through the functions! Alright, a joint! What is it? Its a focus point around which the tied vertices will move and rotate... The skeletal system in Half Life is Hierarchial. What does that mean? It means that a joint in a part of the skeleton controls everything under it. So if you moved the highest joint in the skeleton, everything would move, but if you moved the lowest point in the skeleton, only it would move, nothing above it. If this has confused you a little bit, fear not. I have created a (bad) diagram!! The dots represent Joints, and the lines represent bones connecting the joints
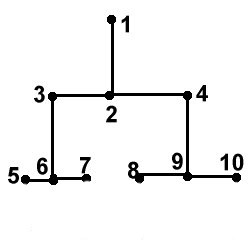 As you can see, the uppermost joint in the Hierarchy of this skeleton is number 1. If you move number 1, joints (and obviously the bones connecting them) 1-10 would move along with it. If you moved number 2, numbers 2-10 would move. If you moved Joint no.3, joints 3,5,6 and 7 would move. But if you moved number 5,7,8 or 10. Only those joints would move, nothing else. Another example is lifting up your arm. Go ahead and do it! See how when you rotated your shoulder joint, the other joints below it (wrist, fingers and elbow bones) rotated and moved along with it? This is what I'm talking about with hierarchy, and it is important you remember the basic rules when animating, or you'll get some whacky ass animations.
Now that I've gone through the basic animating and joint terminology, ill actually go through the tab - from the ground up. The first thing - Show Skeleton. This basically means whether in both the 2d and 3d views whether you can see the bones and joints. If you're animating or creating the skeleton for a model, you'll want this on. If you're skinning or creating other parts of the model, this will just get in the way. Since I'm going through an animating tut with you guys, make sure it is checked.
Alright, next section follows the basic interface of every other tab. You have a window up the top for the joints you have created (like the materials you have created, or the groups you have created). But first! You may have noticed there is no create joints button.. But if you remembered from my first tutorial, you create the joints through use of the Model Tab. Go ahead and click on the Model Tab. Below Cylinder Button, there is a Joint Button. Click on it. Now, if you click in one of the 2d views, you will see a red crosshair-like circle pop up. This is a joint. Joints are red when they are selected. And blue when they are unselected. Start a new file, or undo, until you have a clear working area with nothing created. Click the joint button in the Models Tab then click three times in a row. You should have something that looks like this: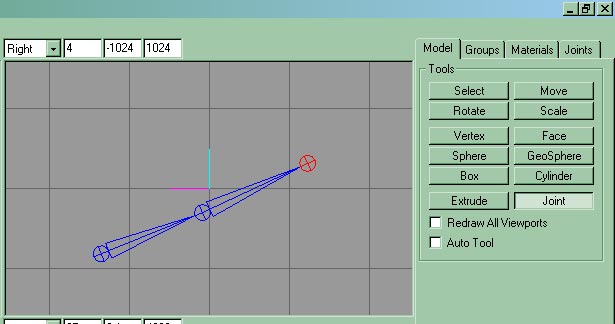 The three crosshair lookalike circles are joints. The bones are the triangles connecting the joints. See how they are pointing in one direction? This displays the hierarchy. This heirarchy is a simple one and can be displayed in a diagram:
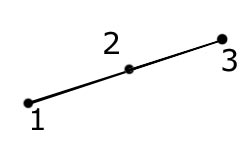 The first joint you created - number 1, controls everything under it - 2 and 3 in this case. 2 also controls three. I can show you this by moving the joints. Click Select in the Models Tab. Then click Joints down the bottom. This will allow you to select joints instead of groups, or vertexes. Now select the first joint you created, in my case, Joint Number 1. You should see the following:
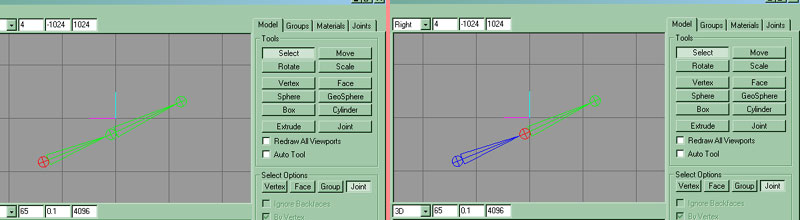 Looking at the above-left picture, the red joint is the selected one. As you can see, the joints and bones below joint number 1 in the Hierarchy are highlighted green. This is a handy way of showing what bones and joints will be effected if you move a selected joint. To further this explanation, select the middle joint and you should see something like the above-right picture.
It may not yet be clear to you what is happening. How do you control the hierarchy and what bones are above what? To explain this, we have to go back to the Joints Tab. Go there, and you should see something like the following: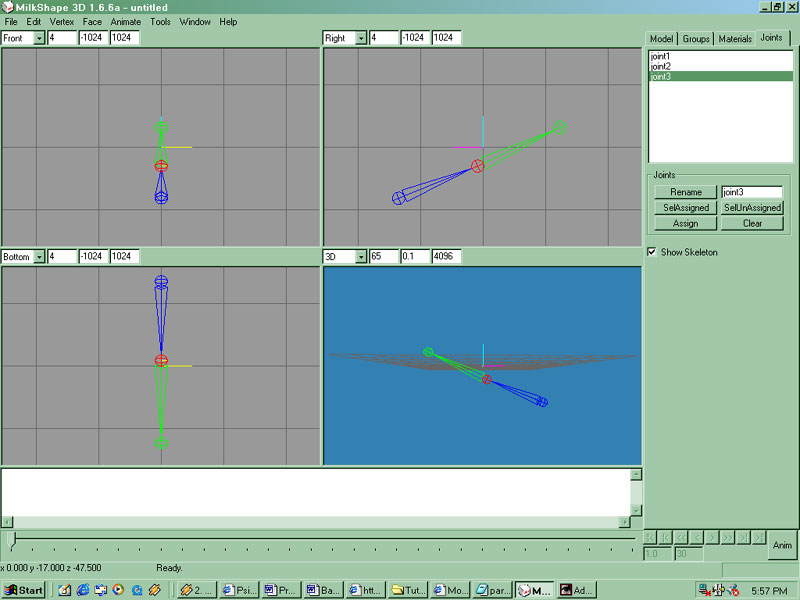 In the white window at the top of the Joints Tab, you have your three joints listed. The last is selected because that was the last joint you created. Notice if you click on the different joints in the whitefield of the Joints Tab, that joint is selected. Now, click on Joint 2. Go into the Models Tab, click Joint and then click somewhere in a 2d window. See how the joint created bridges from Joint 2? This was because you had it selected. The best way to get a good feel of it is to play around with it a bit, but thats the basics of the Hierarchy system explained
There is something else you need to know about Hierarchy. You should have something like the picture below: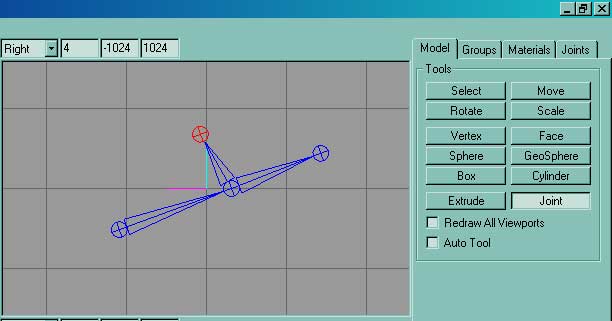
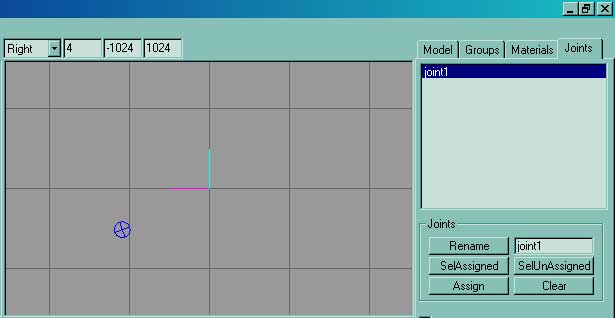 Now, click on Joint 2. See how the joint going off two and the final joint and the bones connecting them are highlighted green? I explained this before, but I'll say it again. Highlighted green means its under it in the Hierarchy of the skeleton. Basically anything green will be affected by what you do to the selected joint. That includes deleting it. Go ahead and click delete on your keyboard. You should be left with only the Joint 1 (See above picture). Because everything besides Joint 1 was under Joint 2 in the Hierarchy, when you deleted Joint 2, they had no connection, and were thus deleted.
Now im going to explain how to assign a model (as in the cubes and cylinders) to the skeleton (the joints). This is the necessary to animate the model, and thus compile the model and get it ingame. First off, we are going to start a new file. Go ahead and do that. Now create one joint. Now create one box around that joint. Now, to assign the vertices of that box, we need to use the Joints Tab. Go into it and you'll see the new joint in the white field at the top. Click on the joint. Now click Select, then click Vertex. Now select the vertices of the box. Go back into the Joints tab, and click Assign. Voila! The vertices of the cube or box are now assigned to that joint. That means that when you are animating, when that joint is moved, the box will move along with it.
Now click on the joint, then click the button SelAssigned. This stands for Select Assigned and what it will do is select the vertices that have been assigned to the particular join you have selected NOT all the vertices that are assigned to a number of joints. Now, create another box, then go into the Joints tab. Click SelUnAssigned. This stands for Select Un-Assigned and what it will do is select ANY vertices that are not assigned to joints. Last of all, the Clear button will clear any ties vertices have with a joint. So, select the vertices of the orignal box we assigned to our joint and click clear. Now select the joint and click SelAssigned. See? It does not select any vertices, so none are assigned to it and clearing the vertices works
 ). As always email me if you ave any troubles or if I screwed something up in the tutorial
  . Look out for Series 2 of Modelling in Milkshape, coming soon! We will finally apply all our knowledge gained through Modelling in Milkshape Series 1 into creating something cool - A Gun!!
So, open up milkshape, then click on the "joints" tab to the right and you'll see the following:
Now that I've gone through the basic animating and joint terminology, ill actually go through the tab - from the ground up. The first thing - Show Skeleton. This basically means whether in both the 2d and 3d views whether you can see the bones and joints. If you're animating or creating the skeleton for a model, you'll want this on. If you're skinning or creating other parts of the model, this will just get in the way. Since I'm going through an animating tut with you guys, make sure it is checked.
Alright, next section follows the basic interface of every other tab. You have a window up the top for the joints you have created (like the materials you have created, or the groups you have created). But first! You may have noticed there is no create joints button.. But if you remembered from my first tutorial, you create the joints through use of the Model Tab. Go ahead and click on the Model Tab. Below Cylinder Button, there is a Joint Button. Click on it. Now, if you click in one of the 2d views, you will see a red crosshair-like circle pop up. This is a joint. Joints are red when they are selected. And blue when they are unselected. Start a new file, or undo, until you have a clear working area with nothing created. Click the joint button in the Models Tab then click three times in a row. You should have something that looks like this:
It may not yet be clear to you what is happening. How do you control the hierarchy and what bones are above what? To explain this, we have to go back to the Joints Tab. Go there, and you should see something like the following:
There is something else you need to know about Hierarchy. You should have something like the picture below:
Now im going to explain how to assign a model (as in the cubes and cylinders) to the skeleton (the joints). This is the necessary to animate the model, and thus compile the model and get it ingame. First off, we are going to start a new file. Go ahead and do that. Now create one joint. Now create one box around that joint. Now, to assign the vertices of that box, we need to use the Joints Tab. Go into it and you'll see the new joint in the white field at the top. Click on the joint. Now click Select, then click Vertex. Now select the vertices of the box. Go back into the Joints tab, and click Assign. Voila! The vertices of the cube or box are now assigned to that joint. That means that when you are animating, when that joint is moved, the box will move along with it.
Now click on the joint, then click the button SelAssigned. This stands for Select Assigned and what it will do is select the vertices that have been assigned to the particular join you have selected NOT all the vertices that are assigned to a number of joints. Now, create another box, then go into the Joints tab. Click SelUnAssigned. This stands for Select Un-Assigned and what it will do is select ANY vertices that are not assigned to joints. Last of all, the Clear button will clear any ties vertices have with a joint. So, select the vertices of the orignal box we assigned to our joint and click clear. Now select the joint and click SelAssigned. See? It does not select any vertices, so none are assigned to it and clearing the vertices works
Final Words from BB
Thanks for going through that with me. I'd like to thank all the people that have taken the time to thank me for the tutorials so far, I appreciate it (I also appreciate generous donations ). As always email me if you ave any troubles or if I screwed something up in the tutorial . Look out for Series 2 of Modelling in Milkshape, coming soon! We will finally apply all our knowledge gained through Modelling in Milkshape Series 1 into creating something cool - A Gun!!
Comments
You must log in to post a comment. You can login or register a new account.