Weapons Programming - Custom Ammo Types Last edited 4 years ago2020-02-05 08:19:52 UTC
You are viewing an older revision of this wiki page. The current revision may be more detailed and up-to-date.
Click here to see the current revision of this page.
Half-Life Programming
- Weapons Programming - High-Level Overview
- Weapons Programming - Custom Ammo Types
- Weapons Programming - Standard Weapons
This article will explain, in depth, how to add a new type of ammo to Half-Life. Since this isn't focused on adding a new weapon, we'll be modifying an existing weapon instead. Since the MP5 and the Glock both use 9mm bullets, let's change the Glock to use a different ammo type instead. This guide assumes that you have experience programming in C++, and a programming environment and your custom mod already set up.
You can view the commit containing all the code changes in this tutorial on GitHub by clicking here.
A quick online search shows that several Glock pistols use ammo other than 9mm - I'm going to use the Glock 21, which shoots .45 ACP bullets, with a clip size of 13 bullets. Wikipedia seems to indicate that they do about the same amount of damage as 9mm, but for the purposes of this guide, we'll pretend that they're slightly stronger than 9mm ammo.
Continue searching this file and you'll find more references with
The
That covers all the skill-related changes we need to make. If you compile and run your mod now, you'll find that nothing much has changed, except that the pistol does a bit more damage. Let's move on to the next step: making the pistol use a different ammo type.
First, the
I chose 78, since that ends up being six 13-bullet clips, which seems like an ok number to use. Changing that clip size is next:
That's all in here - you don't need to change
One thing I would do is to make sure that
Go into multiplay_gamerules.cpp and make this change in the
In this method, you'll see a whole bunch of variables being set. Essentially, if a variable in
For now, we'll simply use
It's ugly, but a lot of Half-Life programming is ugly, so don't worry too much about it.
Scroll down a bit more to find a second, similar block - except it's doing the reverse of the first. Make the same change:
And we're done!
For the 640 HUD sprite, I found a spare bit of space in the sprite image, and since I'm no artist, I just added the text ".45 ACP" as the ammo icon: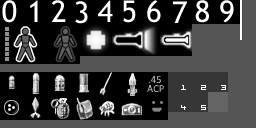 And then updated the corresponding line in the sprite text file:
You can view the commit containing all the code changes in this tutorial on GitHub by clicking here.
A quick online search shows that several Glock pistols use ammo other than 9mm - I'm going to use the Glock 21, which shoots .45 ACP bullets, with a clip size of 13 bullets. Wikipedia seems to indicate that they do about the same amount of damage as 9mm, but for the purposes of this guide, we'll pretend that they're slightly stronger than 9mm ammo.
Add new skill cvars
Let's start by adding the new skill cvars to define how much damage the new ammo type will do. For player weapons, the damage typically doesn't change between difficulty levels, but we'll do it anyway to match the other ammo types.game.cpp changes
First, got to game.cpp. The cvars are declared in the top half of this file, and registered in the bottom half. Search the file forplr_9mm_bullet. You'll find the references to the "9mm" glock cvars - let's change them to "45acp" cvars:
Before:
// Glock Round
cvar_t    sk_plr_9mm_bullet1 = {"sk_plr_9mm_bullet1","0"};
cvar_t    sk_plr_9mm_bullet2 = {"sk_plr_9mm_bullet2","0"};
cvar_t    sk_plr_9mm_bullet3 = {"sk_plr_9mm_bullet3","0"};
After:
// Glock Round
cvar_t    sk_plr_45acp_bullet1 = {"sk_plr_45acp_bullet1","0"};
cvar_t    sk_plr_45acp_bullet2 = {"sk_plr_45acp_bullet2","0"};
cvar_t sk_plr_45acp_bullet3 = {"sk_plr_45acp_bullet3","0"};CVAR_REGISTER calls. Change these too:
Before:
// Glock Round
CVAR_REGISTER ( &sk_plr_9mm_bullet1 );// {"sk_plr_9mm_bullet1","0"};
CVAR_REGISTER ( &sk_plr_9mm_bullet2 );// {"sk_plr_9mm_bullet2","0"};
CVAR_REGISTER ( &sk_plr_9mm_bullet3 );// {"sk_plr_9mm_bullet3","0"};
After:
// Glock Round
CVAR_REGISTER ( &sk_plr_45acp_bullet1 );// {"sk_plr_45acp_bullet1","0"};
CVAR_REGISTER ( &sk_plr_45acp_bullet2 );// {"sk_plr_45acp_bullet2","0"};
CVAR_REGISTER ( &sk_plr_45acp_bullet3 );// {"sk_plr_45acp_bullet3","0"};
gamerules.cpp changes
The only other place you'll find this cvar is in gamerules.cpp, when the cvars are loaded into thegSkillData struct. There's only a one-line change you need to do here:
Before:
// Glock Round
gSkillData.plrDmg9MM = GetSkillCvar( "sk_plr_45acp_bullet");
After:
// Glock Round
gSkillData.plrDmg45Acp = GetSkillCvar( "sk_plr_45acp_bullet");
multiplay_gamerules.cpp changes
The cvar isn't used in multiplay_gamerules.cpp, but thegSkillData struct is. Change the variable name here as well. While we're at it, we'll bump up the damage from 12 to, say, 18.
Before:
// Glock Round
gSkillData.plrDmg9MM = 12;
After:
// Glock Round
gSkillData.plrDmg45Acp = 18;plrDmg45Acp field doesn't exist in gSkillData yet, so that's next.
skill.h changes
Now to skill.h. Inside theskilldata_t struct, you'll find the plrDmg9MM field. Just update the field name here:
Before:
// Player Weapons
float plrDmgCrowbar;
float plrDmg9MM;
float plrDmg357;
After:
// Player Weapons
float plrDmgCrowbar;
float plrDmg45Acp;
float plrDmg357;
combat.cpp changes
TheplrDmg9MM value is only used in one other place: combat.cpp, in the FireBulletsPlayer method. Find it, and rename it:
Before:
case BULLET_PLAYER_9MM:
    pEntity->TraceAttack(pevAttacker, gSkillData.plrDmg9MM, vecDir, &tr, DMG_BULLET);
    break;
After:
case BULLET_PLAYER_9MM:
    pEntity->TraceAttack(pevAttacker, gSkillData.plrDmg45Acp, vecDir, &tr, DMG_BULLET);
    break;
Update the bullet type enum
But, what about thatBULLET_PLAYER_9MM label? We should change that as well. You'll find references to it in the following files, just change it to BULLET_PLAYER_45ACP in each case:
- ev_hldm.cpp - in 4 places
- ev_hldm.h - in 1 place
- combat.cpp - in 1 place
- weapons.cpp - in 1 place
- weapons.h - in 1 place
- hl_wpn_glock.cpp - in 1 place
skill.cfg changes
Finally, you'll need to update the cvar values in skill.cfg. If your mod doesn't already have one, copy the one from the valve folder into your mod. Then, make the following changes:Before:
// 9mmhandgun Round
sk_plr_9mm_bullet1    "8"
sk_plr_9mm_bullet2    "8"
sk_plr_9mm_bullet3    "8"
After:
// 45acphandgun Round
sk_plr_45acp_bullet1    "12"
sk_plr_45acp_bullet2    "12"
sk_plr_45acp_bullet3 "12"Updating the weapon's ammo type
weapons.h changes
Open up weapons.h and find the#define blocks near the top. We'll be defining a new ammo type, so we'll need some new ammo constants to match.First, the
MAX_CARRY value:
Before:
// weapon clip/carry ammo capacities
#define URANIUM_MAX_CARRY       100
#define    _9MM_MAX_CARRY          250
#define _357_MAX_CARRY          36
After:
// weapon clip/carry ammo capacities
#define URANIUM_MAX_CARRY       100
#define    _9MM_MAX_CARRY          250
#define    _45ACP_MAX_CARRY        78
#define _357_MAX_CARRY 36Before:
#define GLOCK_MAX_CLIP          17
// ... several lines
#define GLOCK_DEFAULT_GIVE          17
After:
#define GLOCK_MAX_CLIP          13
// ... several lines
#define GLOCK_DEFAULT_GIVE 13AMMO_GLOCKCLIP_GIVE, because it's already defined to be the same as GLOCK_MAX_CLIP. Depending on your use case, you might want to change this, or add a new one, for your new ammo type.
hl_wpn_glock.cpp changes
Now we're ready to actually change the weapon's code. Let's go through the areas that must be considered in this file.Entity class names
Towards the top of the file, you'll see the following two lines:LINK_ENTITY_TO_CLASS( weapon_glock, CGlock );
LINK_ENTITY_TO_CLASS( weapon_9mmhandgun, CGlock );weapon_glock and weapon_9mmhandgun classnames to the CGlock class. There's a couple of things you can choose to do here:
- Make no change and accept that the classname of
weapon_9mmhandgunwill be inaccurate - Remove the classname of
weapon_9mmhandgunand only useweapon_glockin your mod - Leave
weapon_9mmhandgunin there for compatibility reasons, and also add aweapon_45acphandgunclassname
weapon_9mmhandgun is actually used in a number of other files and would require a bunch of changes that aren't particularly important. (For example, barney drops one on death, it can be included in a func_breakable, the player is given one on spawn in HLDM, and so on.)One thing I would do is to make sure that
weapon_glock is the classname that gets exposed in the FGD, so mappers don't get confused. Changing classnames is not the focus of this article, so it won't be mentioned again.
Spawn function
You'll see this line in theSpawn function:
m_iDefaultAmmo = GLOCK_DEFAULT_GIVE;GLOCK_DEFAULT_GIVE constant, you don't need to change anything here.
GetItemInfo function
Here's the first real change we need to make. InGetItemInfo, you need to update the ammo name and maximum carry values.
Before:
p->pszAmmo1 = "9mm";
p->iMaxAmmo1 = _9MM_MAX_CARRY;
After:
p->pszAmmo1 = "45acp";
p->iMaxAmmo1 = _45ACP_MAX_CARRY;
Reload function
If Valve coded this function correctly, you wouldn't need to make any changes. Unfortunately, they hard-coded the number 17 here as the clip size, instead of using theGLOCK_MAX_CLIP constant. So you need to make a small change to this method:
Before:
if (m_iClip == 0)
    iResult = DefaultReload( 17, GLOCK_RELOAD, 1.5 );
else
    iResult = DefaultReload( 17, GLOCK_RELOAD_NOT_EMPTY, 1.5 );
After:
if (m_iClip == 0)
    iResult = DefaultReload( GLOCK_MAX_CLIP, GLOCK_RELOAD, 1.5 );
else
    iResult = DefaultReload( GLOCK_MAX_CLIP, GLOCK_RELOAD_NOT_EMPTY, 1.5 );
CGlockAmmo changes
The last change you need to make in this file is theCGlockAmmo class. Simply change the ammo type given by the AddAmmo function to our new ammo type:
Before:
BOOL AddAmmo( CBaseEntity *pOther )
{
    if (pOther->GiveAmmo( AMMO_GLOCKCLIP_GIVE, "9mm", _9MM_MAX_CARRY ) != -1)
    {
        EMIT_SOUND(ENT(pev), CHAN_ITEM, "items/9mmclip1.wav", 1, ATTN_NORM);
        return TRUE;
    }
    return FALSE;
}
After:
BOOL AddAmmo( CBaseEntity *pOther )
{
    if (pOther->GiveAmmo( AMMO_GLOCKCLIP_GIVE, "45acp", _45ACP_MAX_CARRY ) != -1)
    {
        EMIT_SOUND(ENT(pev), CHAN_ITEM, "items/9mmclip1.wav", 1, ATTN_NORM);
        return TRUE;
    }
    return FALSE;
}
multiplay_gamerules.cpp changes
Something to note for the glock is that it's given to the player when they spawn in HLDM. 9mm ammo is also given to them on spawn, but this isn't very useful now that we've changed the glock's ammo type. Note that this is specific to the glock only, so in other cases you won't need to worry about this change.Go into multiplay_gamerules.cpp and make this change in the
PlayerSpawn function:
Before:
if ( addDefault )
{
    pPlayer->GiveNamedItem( "weapon_crowbar" );
    pPlayer->GiveNamedItem( "weapon_9mmhandgun" );
    pPlayer->GiveAmmo( 68, "9mm", _9MM_MAX_CARRY );// 4 full reloads
}
After:
if ( addDefault )
{
    pPlayer->GiveNamedItem( "weapon_crowbar" );
    pPlayer->GiveNamedItem( "weapon_9mmhandgun" );
    pPlayer->GiveAmmo( GLOCK_MAX_CLIP * 4, "45acp", _45ACP_MAX_CARRY );// 4 full reloads
}
Client changes
This section is optional, but for the sake of completion, you want to be able to send the count of your ammo values to the client for prediction purposes. For a single player mod, you can probably not worry about it. But let's make those changes anyway.cbase.h changes
First go to cbase.h and add a new field to theCBaseEntity class for your new ammo count:
Before:
//We use this variables to store each ammo count.
int ammo_9mm;
int ammo_357;
After:
//We use this variables to store each ammo count.
int ammo_9mm;
int ammo_45acp;
int ammo_357;
player.cpp changes
Next, open player.cpp and find theTabulateAmmo function. Add a new line to populate the new ammo value using the AmmoInventory method:
Before:
ammo_9mm = AmmoInventory( GetAmmoIndex( "9mm" ) );
ammo_357 = AmmoInventory( GetAmmoIndex( "357" ) );
After:
ammo_9mm = AmmoInventory( GetAmmoIndex( "9mm" ) );
ammo_45acp = AmmoInventory( GetAmmoIndex( "45acp" ) );
ammo_357 = AmmoInventory( GetAmmoIndex( "357" ) );
client.cpp changes
These last two changes are a little obscure, because we're not allowed to add new variables to theclientdata_s structure. We have to make do with using one of the unused variables in order to get our new ammo counter sent across the network. In client.cpp, find the UpdateClientData function and scroll down to the section marked out by a #if defined( CLIENT_WEAPONS ) block.In this method, you'll see a whole bunch of variables being set. Essentially, if a variable in
clientdata_s isn't being used here, you're free to use it yourself. As you might expect, this could be quite problematic if you want to add a lot of new ammo types, or other bits of data that need to be sent here. You'll need to be very careful about how you use these values. The "safe" variables in the unmodified SDK that aren't used elsewhere in UpdateClientData are:
- iuser3
- iuser4
- fuser1
- fuser4
- vuser3.x
- vuser3.y
For now, we'll simply use
vuser3.x to transfer the .45 ACP ammo value:
Before:
cd->ammo_cells = pl->ammo_uranium;
cd->vuser2.x = pl->ammo_hornets;
After:
cd->ammo_cells = pl->ammo_uranium;
cd->vuser2.x = pl->ammo_hornets;
cd->vuser3.x = pl->ammo_45acp;hl_weapons.cpp changes
We're almost done! We just have to do the same work on the client side now. Open hl_weapons.cpp and find theHUD_WeaponsPostThink method. Search for a reference to ammo_rockets, and add some code after it:
Before:
player.ammo_hornets = (int)from->client.vuser2[0];
player.ammo_rockets = (int)from->client.ammo_rockets;
After:
player.ammo_hornets = (int)from->client.vuser2[0];
player.ammo_rockets = (int)from->client.ammo_rockets;
player.ammo_45acp = (int)from->client.vuser3[0];Before:
to->client.vuser2[0] = player.ammo_hornets;
to->client.ammo_rockets = player.ammo_rockets;
After:
to->client.vuser2[0] = player.ammo_hornets;
to->client.ammo_rockets = player.ammo_rockets;
to->client.vuser3[0] = player.ammo_45acp;Adding a HUD sprite
You might also want to add a new HUD sprite to represent your new ammo type. Each weapon will have a sprite file - for the glock, the file you want is sprites/weapon_9mmhandgun.txt. Simply copy (or for a new weapon, create) this file into your mod. Take a look inside:10
weapon 320 320hud1 0 40 80 20
weapon_s 320 320hud1 0 60 80 20
ammo 320 320hud2 0 16 18 18
crosshair 320 crosshairs 24 0 24 24
autoaim 320 crosshairs 0 72 24 24
weapon 640 640hud1 0 45 170 45
weapon_s 640 640hud4 0 45 170 45
ammo 640 640hud7 144 72 24 24
crosshair 640 crosshairs 24 0 24 24
autoaim 640 crosshairs 0 72 24 24ammo. You can either edit the existing sprites (320hud2 and 640hud7) to add your new icons, or simply create new sprites and update this text file. Either way, you'll need to also update the X and Y coordinates in the text file as well, to point to the new images.For the 640 HUD sprite, I found a spare bit of space in the sprite image, and since I'm no artist, I just added the text ".45 ACP" as the ammo icon:
ammo 640 640hud7 144 72 24 24Finished!
And that's it! Hopefully this guide has covered everything you need to know to start adding your own ammo types to your mod. Good luck!- Categories
- Tutorials
- Programming
- Goldsource Tutorials
- Article Credits
-
 Penguinboy
–
Original author
Penguinboy
–
Original author
Comments
You must log in to post a comment. You can login or register a new account.