Tutorial: Adding Glass to Doors Last edited 22 years ago2002-10-24 04:00:00 UTC
You are viewing an older revision of this wiki page. The current revision may be more detailed and up-to-date.
Click here to see the current revision of this page.
Download attachment
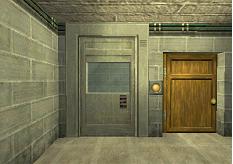
Ok so you managed to follow the Doors tutorial and make your doors move! What about doors with glass panels that move - it's easier than it looks.Steel Door
Let's start with the metal looking door on the left in the Doors tutorial. Open up the example map and remove the door from the frame to give yourself some room to work. With the door highlighted select Properties and write them down (or click Copy), if you are not familiar with how they work, then in your Object Bar click To World. This will save confusion later, as carving an entity will cause it to revert to World properties, even though the entity list will show it as still being somewhere, in reality it doesn't exist.Create a brush approximately the size you want your 'see through' glass panel to be. Size it against the door and position it so that it passes through the door. Things to consider are that the look ahead height is 50 units, so you want your glass to be positioned in the door with the center around that height. I have positioned it just above the texture's buttons, and fitted it so that it looks as though it should be there. When you have your brush positioned correctly select the Carve tool and create a hole for the glass. Remove the glass piece. Select all the parts of your door and assign them to the func_door entity. While you have the door properties open, it might pay to assign these attributes to it (click Paste). The angle you want the door to move is 270 on the little compass, as it was with the original door. You have to name your door (as it requires a trigger) and if this is a new map, it might be a good time to start some sort of traceable naming convention. I have named this door door1. Set the speed to 50 (or whatever you want, but 50 will let you watch the whole door move as one unit once it's finished). Now, in the flag properties make sure that the Use Only is NOT checked. If you want it to be a use only door, the glass must be part of the door and won't be 'see through'. Put the door back where it came from.
The Glass
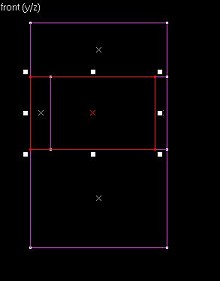
The piece you used to carve the hole in the door only needs a few modifications. Firstly assign it to the func_door entity and give it exactly the same attributes as the door, including the name door1. Don't forget the angle you want it to move (270). To make the glass see through set the Render Mode to Texture and the Render FX to about 90 (a setting of 0 is totally transparent and 255 is solid). Set the lip value to -6 because this makes the glass function exactly the same way you would set up a normal door within a frame - the door is in essence a frame. There are other ways to achieve this but this works. When you place the glass in the door, make sure that you stretch it to match up with the edge of thedoor on the left hand side. To assist in this you will want to make the glass a few units thinner than the door. See Fig1 Front view (glass is red). [You could also make the glass exactly the size of the hole and make the lip -16 - add the right-hand frame thickness to the left].
Making it Work
To get everything going, highlight the button in the wall, and in its properties set the Target to door1. That's about all there is too it. You can set the properties of the door to toggle and button if that's the effect you want to achieve. Just don't forget that whatever you use as door properties must be set for the glass as well.On a final note, adjusting the texture inside the hole you cut for the glass is a good idea, as the area is now visible. Also if you get locked inside, just press the Use key near where the button is located, and it will function. This is because there is a large area covered by the button that is not visible... Something to remember for later.
Next we will put some glass panels in the Wooden Door.
Wooden (rotating) Door Glass
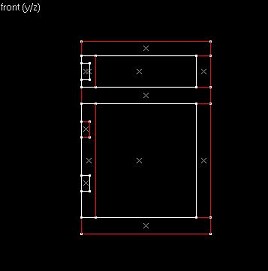
Following the same instructions above, remove the door from the frame. The difference is that we need to add two glass panels as well as two new origin brushes. The best way to do this is to remove the door from its frame and do the same to it as you did for the steel door. Reduce the height of the origin brush that's already there so that it is central to the door. Create two new glass panels and fit them so that they are thinner than the door but extend to the hinged side of the door.Copy the door's resized origin brush and paste it twice, once to each new panel so that in Top View they are all in line and reasonably centered on the edge of the panels. Group the panel and the origin brush and assign them to a func_door_rotating entity. Set the properties to the same as the original wooden door with the exception of the Render Mode (Texture) and Render FX (90). Do the same for the second (larger) panel. Once again group the door's original origin brush with all parts of the doorframe and assign them with the func_door_rotating entity. Make sure the panels and the door have the same properties, and a name, which in this case is door2. To trigger the door open I have used a simple trigger_multiple that runs through the door. Just set its Target to door2 That is about it, but just a few things to consider: if you are going to assign locked or moving sounds to this door it is a good idea to make sure the doorframe and the large glass panel have the same properties selected. As for the flag properties of the door and the glass panels, well it depends on what you want your door to look like and how you want it to behave. Just remember to set the flags for all three items.The Front shot of the door shows the two glass panels (white) grouped with their resized origin brushes. It also shows the position of the original door origin brush after resizing.
3 Comments
TheAngel
Commented 14 years ago2010-06-09 23:08:56 UTC
Comment #100507
What if I don't want to use a button? If I just want to make a door that opens when I touch it and contains glass, how do I make it?
pimpedz
Commented 14 years ago2010-06-10 06:45:06 UTC
Comment #100508
Then you would to trigger the door with a func_trigger.
rjtrains
Commented 13 years ago2011-08-10 11:17:47 UTC
Comment #100509
Or use Spirit of Half-Life.
You must log in to post a comment. You can login or register a new account.


