Tutorial: Making Custom Sounds Last edited 19 years ago2005-10-26 04:00:00 UTC
You are viewing an older revision of this wiki page. The current revision may be more detailed and up-to-date.
Click here to see the current revision of this page.
Download attachment
Custom Sounds: we all love them, we all try them, but most of us fail miserably. The reason? Most of the sounds in HL are looped. This means one short sound that has been created so that the end of it will fluently run into the beginning, as with textures. A badly looped sound is just as bad as a badly tiled texture.Previously, there has been some confusion over what format a sound must have to be accepted into the game. However, after much investigation and several heated arguments in forums, I can reveal that all sounds must be:
- 11 or 22 kHz frequency (22 kHz is better quality)
- Recorded in WAV format, uncompressed
- 8-bit, (newer versions of HL may accept 16-bit)
- Mono
- Saved with cue points (don't worry, this will be explained!)
Obtaining a sound using a microphone
What you're gonna need:
- A decent mike; I'm using a Technica ATW1452, but it depends on how good a quality a recording you want, and how much you're willing to pay.
- A good Audio Editing Program. I used Cubase SX2, but programs such as Cool Edit and Goldwave will work, as long as they have the ability to create cue points (and they're free).
- Hammer
- Use a mike cable extension lead
- Use a radio mike (probably easiest option, but usually most expensive)
- Bring computer to object (necessary if recording a car engine for example)
- Bring object to computer (possible for things such as microwaves, etc!)
When recording your sound, make sure you have no disturbances. The last thing you want is a computer buzz with your bro screaming "MUM!!!!" in the background! No, seriously, what I mean is microphones can be extremely sensitive, so unless you are using good software with cancellation abilities, chances are you'll pick up something else as well.
When positioning a mike, it's always good to use a stand where possible, as laying a mike on a smooth / hard surface while recording will result in unwanted vibrations being picked up. You also want to place your microphone about 2 inches away from the source. This will mean a good pick-up, but no unwanted sound.
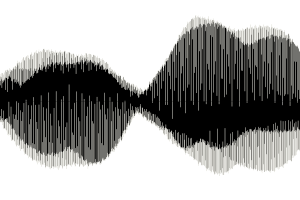
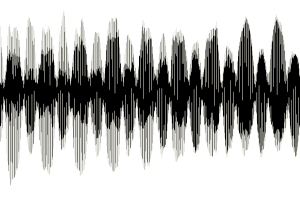
Finally, listen to your sound before recording. Why? Tremolo. All sounds have tremolo, an audio characteristic that, if strong, gives the sound a pulsing effect. The stronger the tremolo, the faster the sound will pulse, giving it a natural cycle. A weak tremolo is either unnoticeable, or will pulse very slowly. If the tremolo is noticeable in your sound, it is vital that you record at least one cycle of it. The example map download includes a sound with strong tremolo and one with weak tremolo so you know what I'm talking about! Below are two examples of weak (top) tremolo, and strong (bottom) tremolo. You can clearly see that stronger tremolo has much shorter waves than the weaker tremolo: about eight oscillations of the strong tremolo fit into one cycle of the weak tremolo. The horizontal scales are equal. These sounds are provided in the example ZIP at the end of this tutorial for your listening pleasure.Recording your sound
Once your mike is ready, load up a new session in your editing program and change its attributes to those at the beginning of this tutorial. THIS IS ESSENTIAL! Start your sound 'emitter' if necessary, and then start the recording. Only stop it when you are sure that it has passed through at least one natural cycle. Now, save your sound, and remember, WAV format only!
Preparing your sound for HL
Now here's the tricky part - making the sound smoothly repeatable. Although I can guide you through this section, in the end, it is down to human skill and patience. It also helps having a good ear for music! I mainly only create 'single-play' custom sounds because it is so much easier to make it sound professional! If you've followed this tutorial so far, you should now have a rough sound that includes one full natural cycle. We now want to take that down to just the cycle. This will mean endless playback of the sound, which will get rather annoying by the end, but its well worth it!
Now, using a cut, trim, splice, whatever tool available on all good audio editors, you need to slowly trim away at your sound from both the beginning and end until you are near the natural cycle. Now, turn on cycle / repeat at this point, because it's here that you need to be precise. Take 1/100 of a second off at a time if necessary, but get that sound sounding good! Ok, so I gather you've done that now, preferably without smashing your computer to pieces. And if you have, well, don't blame me!
Creating the Cue Points
You now need to create the cue points, the last but most vital part of creating a looping sound. A cue point tells the game where the sound should begin and where it should end. Without them it would either never start, or never repeat - in other words, it's not good! In most editors you can probably do it similarly to this:
For Cool Edit 2000
- Click on the 'view' tab next to edit, and then click on "cue list."
- Click once at the start of your wave and click add in the cue listing menu.
- Click once at the end of your wave and click add in the cue listing menu.
- Click done, save your sound again and then exit the editor.
Now all you need to do with your correctly-formatted audio file is place it correctly in Half-Life's directory structure and put it in your map. Pretty simple: you can put the sounds anywhere in Half-Lifemodnamesound. You can organise your files in subdirectories if you so desire. In Hammer, you should specify the path to the sound in the form subdirectory/sound.wav, i.e. just foo.wav if your sound is just in sound, or bar/new/foo.wav if it's in the bar and new subdirectories. You may wish to check the ambient_generic entry in our HL entity guide.
3 Comments
You must log in to post a comment. You can login or register a new account.


http://twhl.info/vault.php?map=5723
I would like to see an advanced sound tutorial on voice acting and doing scripted sentences for NPC's.