Tutorial: Rope, Waterfalls and Dripping Water Last edited 2 years ago2022-10-10 22:58:42 UTC
Rope, Waterfalls and Dripping Water.
ROPE
There have been quite a few questions recently that cover basic mapping structures. The first one we will look at is ROPE:There are a few ways to make ROPE, but I have found the easiest way is to create a brush 1 unit by 1 unit in the 2D top (x/y) view. No need to do anything special to it just yet, but stretch it out to the desired length.
If you want to be able to walk up to the rope and begin to climb it, then it will have to be about 66 units from floor level. Not much fun there, let's make it difficult and set it at about 75 units from the floor, two things happen here. Firstly, your player will be able to walk under it, and secondly, they will have to jump to get on it.
Back to the rope. You should have a perfectly formed square block. Let's texture it.
There are some textures that lend themselves to being ROPE, the main one I use is actually called that! ROPE but the fun doesn't end there. If you apply the ROPE texture to your newly formed brush, then you will get what looks like a strange catapillar.
To make the ROPE more realistic, reduce the Y Scale to about 0.30 and it should start looking more ropey, if there is such a thing. No, we are not finished yet...
Adjust the Rotation: to around 30 and that will make the ROPE spiral slightly. Just a few other things while we are at this, Click on the Justify: buttons Left or Right, Bottom or Top, but whatever you do, don't click Fit:, that makes the texture fit the brush, and might be Ok for doors, but is disastrous for ROPE.
To make your ROPE climbable, you need to create another brush and assign it to the entity func_ladder (If you turn the rope brush into a func_ladder, it wont show up when you compile, because there are no render modes with the ladder entity). The easiest way to do this is to copy the rope brush and extend it so that it is about a unit either side of the original textured rope brush. Select your new brush and move it away from the original rope brush and select To Entity, choose func_ladder. Move your ladder brush back over the top of the rope brush. You now have a really good looking ROPE, with a ladder brush covering it. [I texture the func_ladder with AAATRIGGER to make it stand out more]
You might be wondering what the smallest unit is in Half-Life. Well it is half of one unit, because you can take your ROPE from the above example and use Vertex Manipulation to merge the corner verticies to create a little triangle that is half a unit in size. This shouldn't effect your texture, but you might like to tweak the rotation angle, or Scale again.
Side by side, there really isn't much difference.
What about swinging rope?
We know that you can't have two entities assigned to the same brush, so how are we going to get a rope to swing, and be climbable at the same time? Your guess is as good as mine.... They did it in OpFor, so it should be easy? Unfortunately not - the ropes in Opposing force were a specially coded entity which used models to make the rope and had simple physics applied. You can't recreate the same effect in normal HL without coding.WATER
Water type textures in HL begin with the ! symbol. To have a look at all the available water textures just open the texture browser and type ! in the Filter box. You should be presented with about 40 different textures. While we are on the subject, here are the basic meanings behind the preface symbols for textures:{ Transparent
! Water
~ Light
+ Animated
+A Animated Toggle (Max 10 frames)
- Random Tiling
To make water, just add water!... sorry couldn't help myself :-). Build a brush the size and shape you want, and assign a water texture to the whole brush. That is the most basic way of achieving water. But it wont do things that the water in Half-Life normally does. For instance, it wont react correctly to light, it won't have any animated wave height and it wont be very realistic. To fix this we need to tie the water brush to an entity.
Before we do this, it is good practice to make all the size changes to your brush before turning it into an entity. The reason I say this is that I have had trouble before when I change a brush entities shape. So get your brush the size and shape you want, and then assign it to the func_water entity. Select To Entity and choose func_water.
Remember that when you add a water texture to a brush, after compiling, only the top face of the brush will actually show the texture, so make sure that the visable part of your brush is the top face, any sides that show will be opaque and look a little weird. Great, now we have a water brush. You will also find that if you have a large block of water, and a large wave height that you will have to stretch the X:Y Scale of the texture otherwise it will look as though it is breaking up. Let's have a look at the entity properties of func_water.
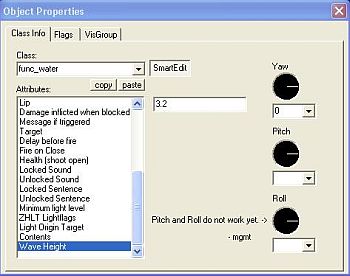 ....Waves.
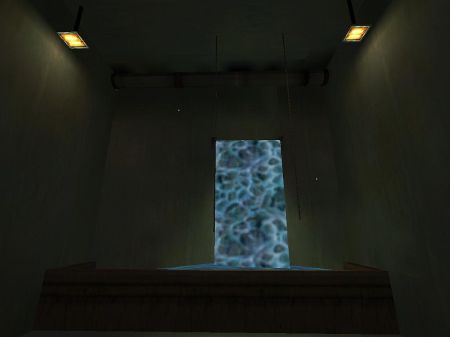
A Waterfall
Moving water is a different story. If you assign a water texture to a vertical func_water brush, it wont flow. Even if you assign a Scrolling texture to the brush it still wont flow. The only way I have found to make the water flow is to assign the brush to a func_conveyor entity. The default speed on a func_conveyor is 100, and that might be a bit quick, I find that 50 to 70 seems Ok. The added bonus in using the func_conveyor is that you can set it's Flag Not Solid and that will allow you to walk through your waterfall.To make it more realistic change the Render Mode to Texture and the FX Amount to 255. It will still look a bit block like, so you can then select all the func_conveyor brushes and give them the {Blue texture. This will make them transpearent with the Render Mode settings mentioned above. Now for the water texture, select only the front faces of the water and assign the scrolling texture to them. In the example map I used the Xen Scrolling water texture SCROLLXEN1.
I have also done a bit of the good 'ol Vertex Manipulation to to top brush so that it looks a bit more realistic. I added an Ambient_Generic and assigned the ambience/waterfall3.wav sound to it. OK, so it doesn't look like real water, but it is as close as you are going to get in HL.
Dripping Water
Dripping water is really easy to create, the main idea I follow comes from Jeff 'Yesukai' Pritchard who suggests using an env_blood to create the effect. Place an env_blood in your map and change it's attributes: Name, I creatively called mine Drip. Pitch Roll Yaw (YZX) to 90 0 0 or Down, and the Amount of blood (damage to simulate) to 1. In the Falgs Check Blood Stream.Next we need a multi_manager, you can get a better understanding of MM by checking out SlayerA's Multi_manager tutorial. Assign the multi_manager a Name and enter new KeyValues for Drip and the Name of your multi_manager (so that it reactivates itself), set the Values of these to something like 0.8. Don't forget to check the Multithreaded Flag. Now a trigger, I just used a trigger_auto to target the multi_manager as I figured that the drips might as well start with the map.
 3 tutorials in one!
- Article Credits
-
 Andy
–
Original author
Andy
–
Original author
1 Comment
masquedios
Commented 12 years ago2012-05-25 04:13:04 UTC
Comment #100559
Thanks! Very Cool!
You must log in to post a comment. You can login or register a new account.