Tutorial: Stairs Last edited 2 years ago2022-10-10 23:03:02 UTC
Stairs are great things! They're simple, but used properly, enhance maps very well. Do I even need to say that? There are lots of different ways to create staircases, and this tutorial covers one of them. It's very easy.
The Beginning
First, of course, you will need a room, or something, that has two levels. For this, create a simple cube, and hollow it out to -16, using the texture crete4_flr01. Split it into two floors by creating a flat solid and placing it in the middle height of the room. Then create a brush 64 units long and 224 units wide (looking in the status bar), and carve (right click, select Carve) a hole into the corner of the second floor. Place a player start position entity (info_player_start) somewhere while you're at it.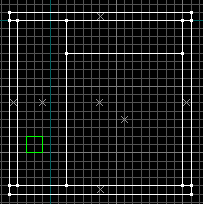 A room with a carved hole
The First Step
Now you need your first step. The maximum height for a step in Half-Life is 18 units. Higher than that and the player will have to jump. The textures that come with the game are designed for 16 unit high steps, so the one I have created is 32 wide x 64 long x 16 high. Keep the texture the same as the one you used for the room for now. Select the new step, enter Texture Application mode (Shift+A), select the uppermost face, and click Browse to open up the Texture window. Type crete4_trd01 into the filter box, and select the texture that appears. Click Apply to stick it on the top of the step. You will then need to make the X scale 0.50, and you might have to rotate it 90°. Now select the front face, and choose the crete4_stp01 texture. Apply it, shift and rotate it so that it lines up nicely with the top texture.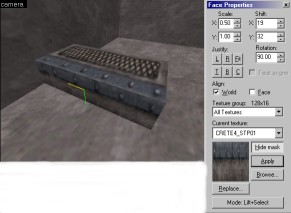 The first step
The Rest
To create the rest of the staircase, look at your x/z view (or whichever one in which you can see the side of the step). Select the step, then hold down Shift, and drag the step up and across, so that an exact copy of it is sitting on its upper-right corner. Repeat this process until you are in the middle of the room (5 steps). Now select the old concrete texture you used to create the room, by finding it near the top of the texture selector's drop-down list. Create a brush that will act as a landing, 64w x 128l x 16h. Place it in the corner, and align the steps to its outer half. It's the selected (red) object in the screenshot on the right.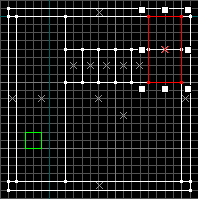 The lower steps and landing - top view
The Last Steps
Now you can create the steps leading from the landing to the top floor. To do this, select all the lower steps again (by holding Ctrl) and then Shift drag them up to clone them. They will all be in the wrong direction, so flip them horizontally by pressing Ctrl+L. Then move them to the other half of the landing in the top view, so they line up with the upper floor. Your front view should now look like the one below.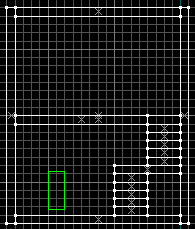 The whole staircase - front view
The End
Place a couple of light entities in your level - one on each floor should do - and run the map. You should find you can run up and down the stairs easily. You'll probably also find that you can fall off easily - try to set up some safety bars on the landing and steps! There is a special texture designed for this, but I made mine manually with brushes. To make the sloping bar, make a 192-unit long brush, press Ctrl+M and set the Y rotation to 26°.I also cut the landing and top floor in two with the carve tool (click the Carve icon until both halves are white - then the brush is left in place, but split apart). I applied the step texture to the halves that needed it. You might also want to set up some supports, to make the staircase a little more realistic.
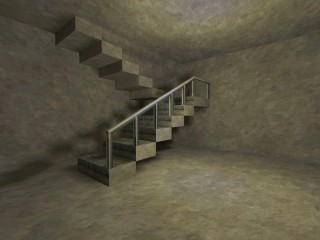 Done and done
- Article Credits
-
 atom
–
Original author
atom
–
Original author
1 Comment
You must log in to post a comment. You can login or register a new account.
12 by 16 would be more human scaled. If you're spooked of 12 not being on grid, have your stairs in groups of four, which measures a neat 48 by 64.
[2024-12-14] The page probably needs a major overhaul and address the following: