Tutorial: In the Beginning Part 5 Last edited 1 week ago2024-12-11 18:04:07 UTC
Now you should have a couple of rooms connected by a corridor with walls that look good and a little mood lighting. Remember the first level of Half-Life? Where you got to walk around and interact with the items in the rooms. Each of the areas was pretty much defined by what sort of additions were in the rooms such as desks, lamps or lab tables. Furniture is just as important as good lighting and texture, to give your level realism.
Most of the work in this tutorial will be done using the Object Bar and inserting items that are already available.
Prefab Objects
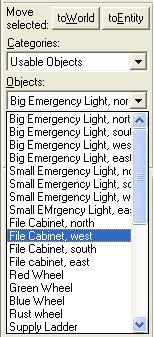
One of the simplest ways to add details is through the use of prefabs. Prefabs are prefabricated objects that are stored in libraries. Let's add a number of prefabs to this level from the prefab library.- Select Usable Objects from the categories list, and File Cabinet, west from the objects list (the use of entities in prefabs is a bit dated and sometimes pretty useless, as with this usable filing cabinet. If you want the draw to open, then all well and good, but you can't fit anything in it. One way around this is to change its properties to
func_breakableand set the properties to spawn something on break.) - On the lower part of the Objects dialog is the Insert original prefab button. Press this now.
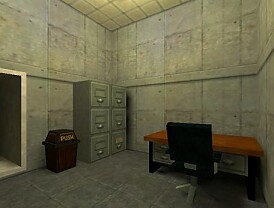
- The prefab is now inserted in your room. Move it around the 2D views until you have it in a position you like. I have placed it in the first room, up against the wall. If you look at the example map you will see that the cabinet is about two units away from each wall but sitting on the floor. This will give it a more realistic lighting profile [and is good practice in cases where the object is not an entity - this way it won't split up the wall]. Move the cabinet hard up against the wall and look at the difference in shadow when you compile the map.
- I have inserted another filing cabinet, a trash can, a black chair and an old desk, north from the random objects category. Note that the trashcan needs to be transformed by 270 on the Z axis so that the push sign aligns with the room and I have also scaled it to 0.7 on all axes.
func_pushable entity. If you leave it free in the room it can be pushed around. If you don't want it to move, then it's a good idea to select it and click to World. By doing this you won't be able to push it and it won't make a moving sound every time you brush against it.
In the second room I have added Modern shelves, south and Metal shelves (transformed 180 Z axis) from the random objects category. (The 'south' modern shelves are bound to a func_door for some reason, so click to World unless you actually want the shelves to act as a door.) The metal shelves have four boxes on them. You can adjust the Spawn on Break properties with the Map -> Entity Report by selecting the properties of each box. If you choose to spawn any item other than a weapon, ammo for instance, then you will find that if you break the box the ammo will fall through the shelf [this is a bug - it doesn't happen when you build the prefab yourself]. Have fun inserting prefabs. Just remember to check their properties as most of them are designed to function in one way or another. Practice transforming and scaling prefabs, so that they look right. What you're trying to achieve is playability balanced with good looks. There are numerous resource sites that have downloadable prefabs, but use caution and check them before putting them into your maps.
If you have any ideas or suggestions, why not add them to the forum.
- Categories
- Tutorials
- Beginner Tutorials
- Goldsource Tutorials
- Mapping
- Article Credits
-
 Andy
–
Original author
1 Comment
You must log in to post a comment. You can login or register a new account.


For now, I'll copy-paste just this part, until there's an agreement on a more permanent inclusion of this part or the whole of WC's original tutorial series into the wiki.
Once again, here is out baseline picture...
Go ahead and add stuff to your tutorial level, or load up tut5.rmf in Worldcraft to see my example.
- signs - the biohazard sign and the emergency shower sign give the area a realistic look. Half-Life's texture set includes a number of signs that can be used within your levels.
- furniture and accessories - in the starting room, there is a swivel chair and ashtray, and a shelving unit with some random boxes on it. None of this would matter in gameplay of course, but it gives the level an interesting look.
- exits - although they don't go anywhere, and in fact do not even open, I've inset two doors in the level to make it appear like this is actually a part of a building. It is important to make the player feel like he is not just being dropped into a box.
- interactive objects - the medikit box on the wall can open, dispensing health. (It is actually a rotating door with its "healthvalue" key set to "15", so that when the player opens the door, 15 health points are transferred to him). The boxes on the shelves are explodable if shot.
- shaping - the immediate tendency for most people when they start editing is to make everything square and flat. Square rooms, doors flush with walls, and things like that. It is important to get to know the three main types of brush shaping Worldcraft has to offer: Carving, Clipping, and Vertex Manipulation.
Sounds like fun...Sound is another important aspect of a level. Up until now, the only sound you'd hear in your level is your own footsteps. Let's add some other sounds now. The computer, pipes, and flickering light are candidates for sounds.
ambient_genericentity near it. The only thing you'll need to do in the entity properties is specify which WAV file to play.Evolution
Well, from the first tutorial to now, you can see quite a bit of evolution at work.