Tutorial: Environment Last edited 22 years ago2002-03-12 05:00:00 UTC
You are viewing an older revision of this wiki page. The current revision may be more detailed and up-to-date.
Click here to see the current revision of this page.
Download attachment
This was going to be a simple tutorial about creating skies, but I decided to puff it out a little by touching on a few other things as well...The Sky
First you will need to create a sky. This is actually pretty simple: create a cube that surrounds your entire level (doesn't have to be any particular size, it just needs to go around everything), and give it the 'sky' texture. This is a small, plain light blue texture which is called... you guessed it... 'sky'! Then hollow the cube, by right clicking it and choosing Hollow. Any thickness will do. Now the inside of the box will be given the default panoramic sky when you play the level.There are 19 included skies that you can use, and they are called:
- 2desert
- alien1
- alien2
- alien3
- black
- city
- cliff
- desert
- dusk
- morning
- neb1
- neb2
- neb6
- neb7
- night
- space
- xeno8
- xeno9
- xeno10
Lighting
If you've got a large outdoor map, you've probably realized that normal light entites just don't work that well... the best thing to use is the light_spot. Although it may seem even less clever to light up a whole map with a spotlight, it actually works quite well, providing you turn the Is Sky property on. This makes the light far more wide-spread (well, it's emitted from the sky...), so it lights the outdoors up well. You might need to change the Pitch, Brightness and the Angle, but everything else you can leave alone. Pitch is a value where 90 is straight up and -90 is straight down. Brightness is a setting where the first three values are for the amount of red, green and blue (i.e. colour), and the fourth is brightness. Click Pick Color to choose the colour easily, and set the brightness manually. 50 worked for my map.One thing that impoves with this kind of lighting is the way shadows are cast. Often, if you just use a normal light entity, the contrast between the bright and dark areas is very high. With light_spot, set to act as the sky, the balance is far better. On the example screenshot, below, you can see that the shadow cast by the boulder is not too dark. Replace the light_spot with a light and it will look unrealistic.
An entity more specifically designed for outdoors maps is light_environment. Experiment with that, especially the Pitch setting. Try adding a -35 Pitch and see how the shadow is formed. Just remember that you only need 1 light_environment per map, regardless of where the skies are. It just has to be in the map.
The Boulder
While I'm talking about the boulder, I'll just point out that I've raised it one unit off the ground. This is because if it touches the ground, it splits the ground up a lot. This is bad for several reasons, mainly from a performance point of view, because it gives the game engine more to render, but also the splits may appear funny on some systems, with little white dots and lines all over the place. One other way of preventing the break-up is to turn the rocks into an entity (func_wall would do). The problem with that is that the rocks won't cast shadows.Clipping
If you are using Zoners Half Life Tools (from Version 2.0.0 onwards) as your compiling tools, then you don't need to manually clip the sky. Zoners tools will automatically add a clip brush to any sky brushes when you compile. However if you do want your player to fall through the sky, you must add -noskyclip to the command parameters for the CSG compile.Zoners have also addressed the problems associated with Sky texture. Before Version 2.5.0 you had to make sure that the Sky texture was on all faces of the sky brush. Version 2.5.0 onwards allows SKY texture on any world brush without generating a mixed face contents error. All the faces inside a 'sky area' should be sky to help hlrad out by not having allocate lightmaps for faces inside the sky areas.
Pre ZHLT 2.0.0 compile tools and Sky
Another little thing I'll mention is that you should never let the player walk into the sky. This might sound pretty obvious, but it's always a good idea to make sure there's no way the player could get over the edge of the level - one way to prevent this is by using clip brushes in areas that might allow the player to fall into the sky. Just create a solid brush, and give it the texture called 'clip' (it's a small picture of a guy's nose). This will be invisible in the game, but will prevent the player from moving through it, like a wall. There's a demonstration in the example map.
Finally, just note that for this tutorial I've used a boxed-in map. This is NOT a good idea, especially for complex maps, or maps that also have indoors areas - if the player doesn't need to see the sky, there doesn't need to be a sky brush there!
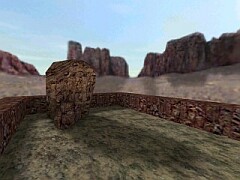 Some lovely shadows
1 Comment
You must log in to post a comment. You can login or register a new account.
http://halflife.qeradiant.com/halflife/tthl1.htm