Tutorial: In the Beginning Part 3 Last edited 3 years ago2021-08-12 01:20:44 UTC
You are viewing an older revision of this wiki page. The current revision may be more detailed and up-to-date.
Click here to see the current revision of this page.
Now that you've created a couple of rooms, it's time to think about textures. Open the beginning2.rmf from the last tutorial.
Firstly, what sort of playing area are you constructing? It's important to have a theme or at least know where you are going with this. Once you have a general idea of the type of environment you're creating, choosing textures becomes much easier.
For this tutorial, I'm using some basic room textures. Open the Texture Application tool (unless you have it as part of your Screen Element Views) and click the Browse button to have a look at what is available.
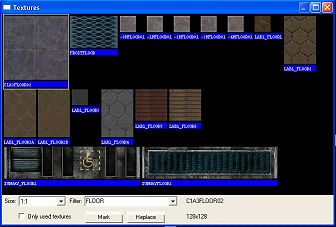 Sweet, glorious textures!
UPDATE
Textures have different functions based on the prefix in their name:
| { | Transparent (only works when tied to entities and render mode set to Solid) |
| ! | Water (a special texture that acts like water, but doesn't need an entity brush to work) |
| ~ | Light (Textures begining with this will emit light...not really, but it helps mappers set them apart from normal textures) |
| + | Animated (Means it actually functions through a set when triggered) |
| +A | Animated Toggle (cycles through Max 10 frames) |
| - | Random Tiling (there will be 3 or 4 in a set) |
| SCROLL | Scrolling Texture (used with func_conveyor) |
The Floor
I have chosen c1a3floor02 for the floor. So in the Texture Browser double click the texture you require and that texture should now be shown in Face Properties box (or on the right hand side of your screen in the Texture Bar. I have found that the easiest way to apply textures to entire brushes is to have the Texture Bar as part of your screen view. To select a brush click on the Ignore Group button, as this will stop you from accidentally applying the texture to an entire group, and select the brush you want to apply the texture to, in this case the Floor. Use Ctrl + Left Click to highlight the second floor in the map and with both the floors highlighted, just click on the Apply Current Texture button. Both floors should now resemble concrete tiles.The Walls
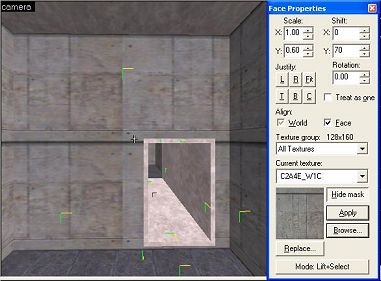
Using the same method as above, find a suitable texture for the walls such as c2a4e_w1c and select all the wall brushes and apply the texture. Just to give you an idea of what can be achieved with textures, click on Browse in either the Texture Bar or the Face Properties box. Check the box for Only Used Textures and type c2a in the Filter line. You should have the c2a4e_w1c texture as the only one showing in the Textures box. (If there is more than one texture showing, then all the textures showing will be marked). Now click on Mark and this will select all the brushes in your map that have that texture (84 or so).Move the Face Properties box so that it isn't obstructing the Camera View and move that view so that you have a clear perspective of the corridor, wall, floor and ceiling.
 Looking better...
I used the same method to apply fifties_ceil5 to the roof and then as with the walls I adjusted the ceiling to fit. Scale X 1.00 and Y 1.00, Shift X 16 and Y 55 and the Align: World box checked.
I have left the corridor as the original texture. One of Atom's tutorial's talks about the visual effects of adding door frames. You might want to create a border and apply a neutral texture to it. There are heaps of ways to apply texture. Just remember that applying texture to the entire brush can avoid mixed texture errors when compiling. Try not to use too many textures and spend some time aligning your textures so they look good. For large areas use a large texture (128x128) [and for outdoors or other huge areas make the scale high so that the texture isn't repeated too often [this also improves performance]. Getting it to look right is really important. Experimenting with textures and the tools can produce great results.
If you discover a new way to apply textures, or just a shortcut, let us know about it in the forum.
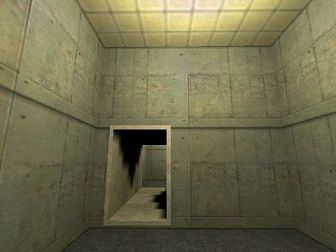 The final result
- Categories
- Tutorials
- Beginner Tutorials
- Goldsource Tutorials
Comments
You must log in to post a comment. You can login or register a new account.