Tutorial: Setting up a Mod: Part 2, Splash Screens Last edited 21 years ago2003-11-11 05:00:00 UTC
You are viewing an older revision of this wiki page. The current revision may be more detailed and up-to-date.
Click here to see the current revision of this page.
Download attachment
Putting a Splash Screen in your Mod
This tutorial follows up where Setting up a Mod ended. You've done all there is to do in part one and now it comes to the splash screen. It's simple once you understand it.First of all, go to your new Mod directory and create a folder named gfx. Go into the new gfx folder and create another folder called shell. if you are unsure of the directory structure, then look at an existing Mod like DMC, TFC or Ricochet.
Now find a picture you want to use and make sure it follows the criteria:
- The picture MUST be 640 x 480 resolution.
- Color depth may be anything. It's dependant of your video-card's capabilities.
- The picture MUST be a Bitmap picture "bmp"
Now start your Mod and notice the background picture. BUT SOMETHING'S WRONG!
Why is the HL logo being displayed?
For some reason, there has to be a logo in the Mod. And since you don't have one, the game will use the original HL logo. So quit and go to your Mod directory. Create a new folder named media. Take an empty video clip from another Mod or use the one included in the download zip, and put it into your new media folder. If you want, you can modify the animation logo and add your own.
Start up your Mod again and notice the difference. It’s just the picture that will be displayed.
The Buttons and Titles: How do I change them?
This is the same way you change all the buttons in the HL menu too. New Game, Load Game Configuration etc. Look at some Mods how they've done it. It all comes down to format, size and name.Copy the .bmp files you want to modify from the Half-Lifevalvegfxshell folder into your new shell folder. The main list of buttons is found in the btns_main.bmp. You can edit this file in MSPaint or any other paint program. I don't know why they used the horizontal list format, as it isn't easy to change, but with a little bit of work you can achieve some great results.
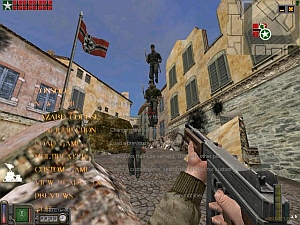 My swanky new splash screen!
4 Comments

Oskar Potatis
Commented 16 years ago2008-04-07 00:21:42 UTC
Comment #100631
This tutorial does not apply to Steam HL.
paparazziVN
Commented 12 years ago2012-05-30 01:44:05 UTC
Comment #100632
Still work if you have GCF scrape to extrac Half life stuffs

DocRock
Commented 12 years ago2012-06-06 22:16:39 UTC
Comment #100633
The .bmp needs to be named "splash" too
Hebbocake
Commented 10 years ago2014-08-14 03:09:17 UTC
Comment #100634
I need some help, even when i add the logo from the zip it takes like 5 seconds to switch between menu's, like i click on multiplayer and before it opens it takes like 3 or 5 seconds.
You must log in to post a comment. You can login or register a new account.