Tutorial: Soundscapes Last edited 1 year ago2023-01-02 03:52:39 UTC
You are viewing an older revision of this wiki page. The current revision may be more detailed and up-to-date.
Click here to see the current revision of this page.
What are soundscapes?
Soundscapes take what were original ambient_generic's in Half-Life and extends them. Instead of having to set each sound individually and configuring a trigger for each, soundscapes allow you to reference a whole bunch of sounds at one time in relation to an area in your map. When this area is triggered, the sounds fade in according to the settings you have used. When you leave the area and enter a new one, the old sounds fade out and the new sounds fade in.Valve coded this into the Source engine to help give maps atmosphere. Soundscapes allow you to add a group of little sounds to your map (creaks, howls) to make the world seem more realistic.
Why should I use them?
Without soundscapes in your map, there won't be anything to reinforce your level designing. Pretty graphics are one thing, but sound is a crucial part in establishing mood and emotion.So, how do they work?
Soundscapes work, as you know, by referencing sound effects. This sound-effects are referenced in a text file that is unique to your map. The textfile contains information pertaining to areas in your map, which you set. For example, if you have two outdoor areas in your map, you may name one of the areas in the textfile outdoor_area_1 and outdoor_area_2. You then place soundscape entities in the correct areas and name them according to the area. If all goes to plan, when the player triggers the soundscape, it will search the textfile for the sounds you referenced and play them back.So, how do I make one?
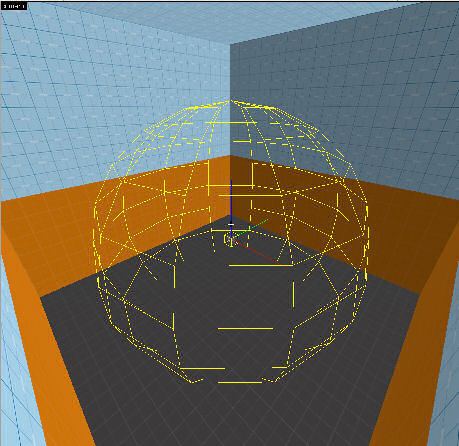
The first (and pretty obvious) thing you'll want to do is make your map. One thing I noticed is that once you use one soundscape you must continue to use them throughout the map. We will get to why that is later though.After you have your map ready, head to a room, section or area in it and insert an env_soundscape entity. Place it in a section that player will walk through: the entrance to the room, the start of the hallway, etc. You should see a little (or large) yellow sphere around the soundscape in the perspective view and a yellow circle in the grid views.This yellow sphere is the range of the soundscape. When a player hits the edge of the sphere, that particular soundscape will start.
The thing about soundscapes though is that it will continue to play, even after you have left the room, unless you set it up to stop (read on for info how). When the player enters a new soundscape, the old one will fade out and the new one will fade in.
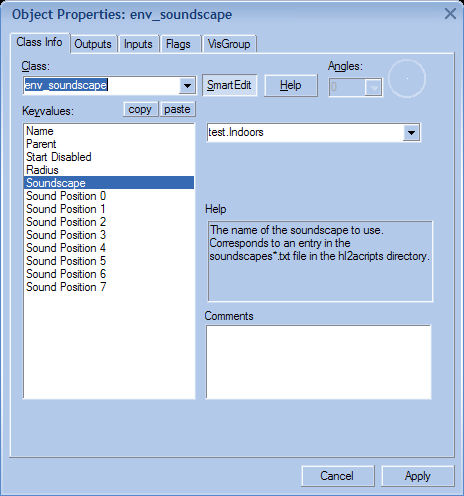
So now you have a soundscape. Now what? Go into the properties dialog of the soundscape and you'll see:
Name: Leave this blank
Parent: Leave this blank as well
Start Disabled: Set this to No or the soundscape wont work
Soundscape: This will be the name of the text file this soundscape will reference. Time to do a little more work before we go to Sound Positions!
As I mentioned earlier, soundscapes work by referencing a textfile. We'll now go through the process of creating this textfile and adding a few references in it. The soundscape text files are located in <gamedir>/scripts. If you open up the GCFs for whichever game you're mapping for (we'll say CS:S for clarity), you'll see 'em all in there. The naming of the file follows this simple convention:
soundscapes_mapname.txt
Make sure it's the exact map name! If your map is called "de_venetia", then your soundscape file would be soundscapes_venetia.txt (the "de" prefix isn't nessecary). Open up your newly created txt file and copy this info in:
"test.Indoors"
{
    "dsp"    "6"
    "playlooping"
    {
        "volume"     ".18"
        "pitch"      "100"
        "wave"       "ambient/wind/lightwind.wav"
    }
    "playrandom"
    {
        "time"       "15,45"
        "volume"     ".04,.11"
        "pitch"      "80,90"
        "rndwave"
        {
            "wave"        "ambient/overhead/hel1.wav"
            "wave"        "ambient/overhead/hel2.wav"
        }
    }
    "test.Stopsound"
    {
        "dsp"        "0"
    }
}
1. Player will walk into the area with the soundscape in it
2. Soundscape refers to the soundscape that you put into its Properties, which it'll search for in the text file
3. lightwind.wav will now loop at a volume of 0.18 (which is very soft)
4. hel1.wav and hel2.wav will play randomly in intervals of 15-45 seconds, at a volume of between .04 and .11
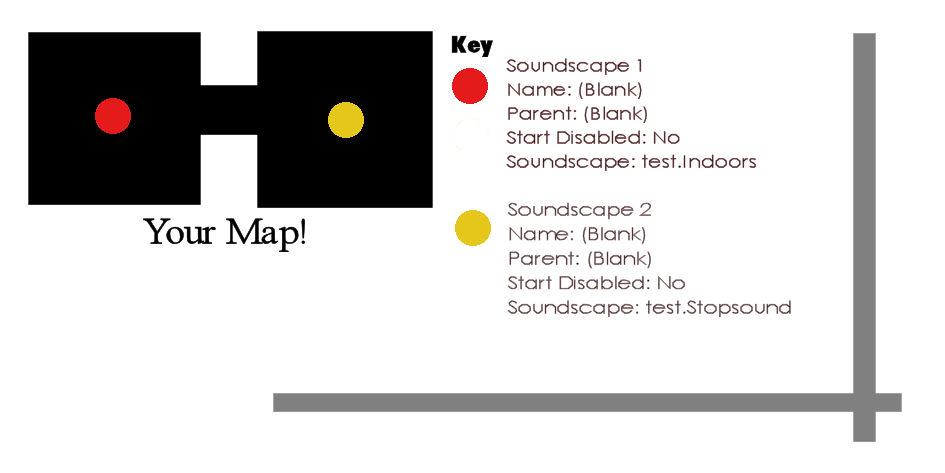
But what about that other area? "test.Stopsound"? Well, this will allow you to stop any of the soundscapes. If you place a soundscape in Hammer where you want the music to stop and reference "test.Stopsound", the sound will stop! Keep in mind that if you don't do this, the sound will continue on until you hit another soundscape.
Does it seem confusing? Here's a screenie that should (hopefully) clarify things.If you follow that basic structure, you can't go wrong. Keep in mind that you can name the areas as you see fit, you don't have to follow the "test.Indoors" example.
One option I have neglected to mention is "dsp". DSP allows you to place an effect over the sound to give it that extra touch of realism. You can find information of the various effects as well as information on soundscapes in general on the Valve Developer Wiki.
You can now proceed to add a whole bunch of different areas to your soundscapes!
Sound Positions
The sounds the soundscape uses can be broken into positions in its area (which is defined by the yellow sphere, remember?). To define these positions, you must first add a "position" option to the txt file. Let's take our previous example: "playlooping"
{
"volume" ".18"
"pitch" "100"
"wave" "ambient/wind/lightwind.wav"
"position" "1"
}
By doing this you will notice in your map that the soundscape sounds even better: instead of all the sounds coming from a central place they will come from all around.
Final Thoughts
If you use this in your maps I guarantee that they will be better. You can make the best map in the world but if it's totally quiet, no one will believe what they are playing and it will fail. So try it yourself and see if you can improve your map. Good luck!- Categories
- Tutorials
- Intermediate Tutorials
- Source Tutorials
7 Comments
You must log in to post a comment. You can login or register a new account.


It would be nice if you fixed the problem. TY..
Still, nice tutorial.
Oh, and Sillu, that'll be because aim_ isn't an official map prefix.