Tutorial: Making a working plug and combine generator Last edited 2 months ago2024-09-20 10:53:52 UTC
You've met them countless times in your adventures, those pesky plugs and occasional combine ball generators that plague the games and hinder your every move, to the point where you had to go across the underbelly of a bridge just to unplug one of these assholes. Now you can learn to annoy your friends and random strangers with these things. This tutorial will cover how to make a plug that can be unplugged and the plugged back in over and over again, as well as explaining the combine power generator prefab, and how to work with it.
We'll start with the plug.
To get us going, we'll make a new little map which contains a power generator of your choice, a socket, a plug and a little light which we will control. I used models/props_c17/powerbox.mdl for my power generator, models/props_lab/tpplugholder_single.mdl for my socket, which I named Socket1 and models/props_lab/tpplug.mdl for my plug, which, being a dynamic/static only, I parented to a func_physbox that overlapped it so that it could be a physics object but fit into the socket.
Go into the properties screen on the physbox and place in these values.
Name - PlugBox
Material Type - None
Next, head over to the "flags" tab and check the following flags.
"Motion Disabled"
"Use Preferred Carry Angles"
"Enable motion on Physcannon grab"
"Generate output on +USE"
"Prevent motion enable on player bump"
Leave everything else unchecked. Then, head over to outputs and put in the output in the image.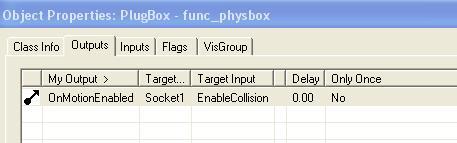 Physbox Output
There, we're done with the func_physbox setup.
Physbox Output
There, we're done with the func_physbox setup.
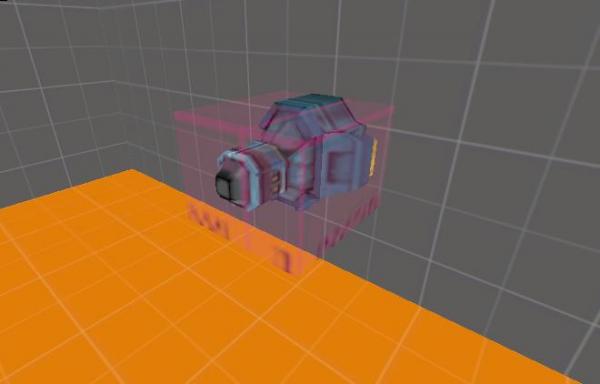 The plug/physbox combo
Once that's done, place a move_rope and keyframe_rope between the generator and plug (with the one connected to the plug parented to it) along with a phys_lengthconstraint so that the rope does have a limit to how far it can stretch. Finally, a nice light_spot named Light1 and colored red is placed above the whole thing.
The plug/physbox combo
Once that's done, place a move_rope and keyframe_rope between the generator and plug (with the one connected to the plug parented to it) along with a phys_lengthconstraint so that the rope does have a limit to how far it can stretch. Finally, a nice light_spot named Light1 and colored red is placed above the whole thing.
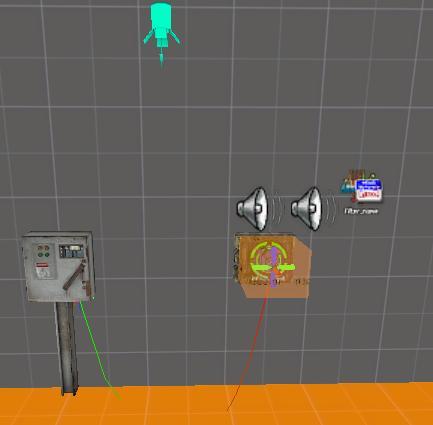
Now create 2 ambient_generic entities. Named PlugIn1 (using k_lab.plug_insert) and PlugOut1 (using ambient.electrical_zap_2). Both should have the "Start Silent" flag checked. Place both of these close to the socket and edit their sound ranges as you please (I have left them unedited in the example map).
Create a trigger_multiple that sits inside the socket, within reach of the physbox in its "plugged in" state.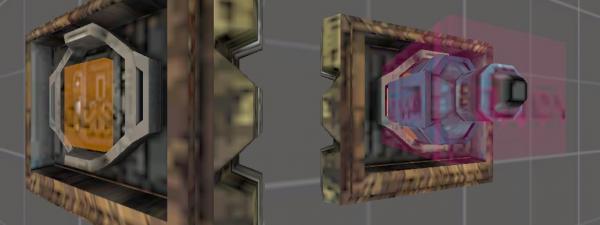 Left - Trigger_multiple resting inside the socket, Right - Plug/physbox resting over it in "plugged in" state
Now, go into the properties screen of the trigger and put in these values.
Left - Trigger_multiple resting inside the socket, Right - Plug/physbox resting over it in "plugged in" state
Now, go into the properties screen of the trigger and put in these values.
Name - Plug1
Filter Name - Filter1
Now go to the flags screen and have all but the "Physics Objects" flag unchecked, then go to the outputs screen and place the outputs in the image.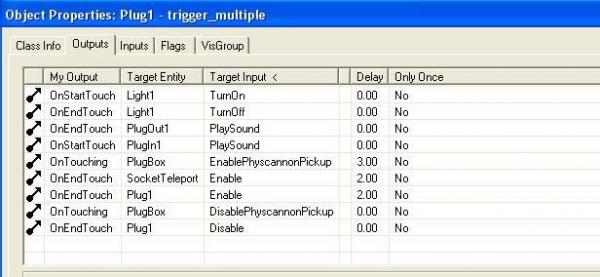 trigger_multiple outputs
Now create a new trigger entity called trigger_teleport. Make the entity cover an area outside the socket. How big an area is up to you. In my example map, the area is 18x20x16 units directly opposite the socket.
trigger_multiple outputs
Now create a new trigger entity called trigger_teleport. Make the entity cover an area outside the socket. How big an area is up to you. In my example map, the area is 18x20x16 units directly opposite the socket.
Now, go into the properties screen of this trigger and put in these values.
Name - SocketTeleport
Start Disabled - Yes
Filter Name - Filter1
Remote Destination - SocketDestination
As with the trigger_multiple, have all but the "Physics Objects" flag unchecked, then go over to the outputs screen and place in the outputs below.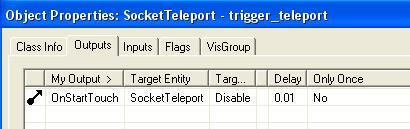 trigger_teleport outputs
Create an info_target and place it where you think the plug should be plugged in. You can judge where the plug will be teleported to from the origin (the little x inside every entity and brush). In other words, the origin of the plug prop/physbox will be teleported to the origin of the info_target. Anyway, simply name the entity in the properties box SocketDestination.
trigger_teleport outputs
Create an info_target and place it where you think the plug should be plugged in. You can judge where the plug will be teleported to from the origin (the little x inside every entity and brush). In other words, the origin of the plug prop/physbox will be teleported to the origin of the info_target. Anyway, simply name the entity in the properties box SocketDestination.
We're nearly done, we just need to add the earlier seen filter. Create a filter_activator_name entity, then go to the properties tab and put these in
Name - Filter1
Filter Mode - Allow entities that match criteria Important Otherwise it will reject the plug
Filter Name - PlugBox
You're just about done now. There's a fair number of Outputs to deal with here, so it wouldn't be surprising if you missed one by accident (I probably should've been more tidier with me outputs). You can consult my handy-dandy chart on the outputs involved in this plug setup for help, as well as saving you from going back to this tutorial continuously in order to know how to set it up.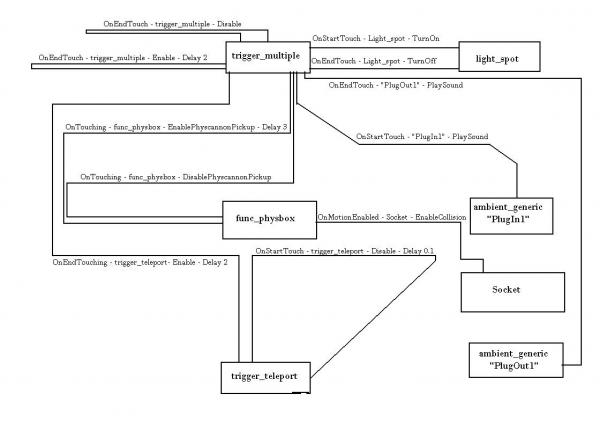 Me fancy chart
And there you have it, a working plug that can be unplugged/plugged in over and over again. I bet you can't wait to see the look on your friends face's when they see one of these controlling something in their way.
Me fancy chart
And there you have it, a working plug that can be unplugged/plugged in over and over again. I bet you can't wait to see the look on your friends face's when they see one of these controlling something in their way.
 All done!
Now that we're all done, it's time to move on to the second part of this tutorial: learning about Combine power generators.
All done!
Now that we're all done, it's time to move on to the second part of this tutorial: learning about Combine power generators.
The combine power generator - which can be pulled out of the "Prefabs HL2" category in the entities/brush listings, are made up of a number of entities which are listed on the Valve Developer Community Wiki here.
When implementing this prefab into your map, the only things you will really need to change are 2 outputs circled inside the 2 logic_relays, which need to be changed from the "combine fence" (those blue shields that pop up all over the place in the series) to whatever you want the generator to control. In my example map, this is Light2.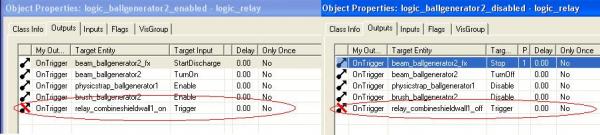 Outputs circled will need to be changed if you want to apply the generator to other uses.
There isn't much else to these really. You may want a combine ball spawner nearby with these (like in the Citadel) but seeing as they too are located in the prefabs section, and can be setup/modified very easily, there's no point in covering it.
Outputs circled will need to be changed if you want to apply the generator to other uses.
There isn't much else to these really. You may want a combine ball spawner nearby with these (like in the Citadel) but seeing as they too are located in the prefabs section, and can be setup/modified very easily, there's no point in covering it.
Well that's pretty much it folks. Have fun pestering people with your evil plugs and generators.
We'll start with the plug.
To get us going, we'll make a new little map which contains a power generator of your choice, a socket, a plug and a little light which we will control. I used models/props_c17/powerbox.mdl for my power generator, models/props_lab/tpplugholder_single.mdl for my socket, which I named Socket1 and models/props_lab/tpplug.mdl for my plug, which, being a dynamic/static only, I parented to a func_physbox that overlapped it so that it could be a physics object but fit into the socket.
Go into the properties screen on the physbox and place in these values.
Name - PlugBox
Material Type - None
Next, head over to the "flags" tab and check the following flags.
"Motion Disabled"
"Use Preferred Carry Angles"
"Enable motion on Physcannon grab"
"Generate output on +USE"
"Prevent motion enable on player bump"
Leave everything else unchecked. Then, head over to outputs and put in the output in the image.
Physbox OutputThe plug/physbox comboNow create 2 ambient_generic entities. Named PlugIn1 (using k_lab.plug_insert) and PlugOut1 (using ambient.electrical_zap_2). Both should have the "Start Silent" flag checked. Place both of these close to the socket and edit their sound ranges as you please (I have left them unedited in the example map).
Create a trigger_multiple that sits inside the socket, within reach of the physbox in its "plugged in" state.
Left - Trigger_multiple resting inside the socket, Right - Plug/physbox resting over it in "plugged in" stateName - Plug1
Filter Name - Filter1
Now go to the flags screen and have all but the "Physics Objects" flag unchecked, then go to the outputs screen and place the outputs in the image.
trigger_multiple outputsNow, go into the properties screen of this trigger and put in these values.
Name - SocketTeleport
Start Disabled - Yes
Filter Name - Filter1
Remote Destination - SocketDestination
As with the trigger_multiple, have all but the "Physics Objects" flag unchecked, then go over to the outputs screen and place in the outputs below.
trigger_teleport outputsWe're nearly done, we just need to add the earlier seen filter. Create a filter_activator_name entity, then go to the properties tab and put these in
Name - Filter1
Filter Mode - Allow entities that match criteria Important Otherwise it will reject the plug
Filter Name - PlugBox
You're just about done now. There's a fair number of Outputs to deal with here, so it wouldn't be surprising if you missed one by accident (I probably should've been more tidier with me outputs). You can consult my handy-dandy chart on the outputs involved in this plug setup for help, as well as saving you from going back to this tutorial continuously in order to know how to set it up.
Me fancy chartAll done!The combine power generator - which can be pulled out of the "Prefabs HL2" category in the entities/brush listings, are made up of a number of entities which are listed on the Valve Developer Community Wiki here.
When implementing this prefab into your map, the only things you will really need to change are 2 outputs circled inside the 2 logic_relays, which need to be changed from the "combine fence" (those blue shields that pop up all over the place in the series) to whatever you want the generator to control. In my example map, this is Light2.
Outputs circled will need to be changed if you want to apply the generator to other uses.Well that's pretty much it folks. Have fun pestering people with your evil plugs and generators.
- Categories
- Tutorials
- Intermediate Tutorials
- Mapping
- Source Tutorials
- Article Credits
-
 38_98
–
Original author
38_98
–
Original author
3 Comments
You must log in to post a comment. You can login or register a new account.
Nice tutorial :).
I was kinda wondering if this would ever work for the original HL.