Tutorial: Creating Overviews Last edited 3 months ago2024-09-16 09:52:53 UTC
Ever wondered how to generate overviews? Here is a really simple guide to producing professional looking overviews for your maps.
Things you need to know before we start:
There are a couple of ways to do this, and if you are unsure then I suggest that you have a look at the tutorial Tutorial: How to load a map (.bsp file) in-game and keep in mind that we are NOT going to open the map to play the game, so forget about adding any of the deathmatch 1 or
Open your game and change the Configuration>Video>Video Mode to OpenGL and a display size of 1024x768. The command dev_overview 1 will not work in Software Mode.
Open the map you want to generate the Overview for and make sure there are no HUD icons showing. If you are in Counter-Strike, just move away from the buyzone or if you want to be creative, you can enter hud_draw 0 at the console.
Bring up the console again and enter dev_overview 1 then close the console and you should be presented with a screen like this: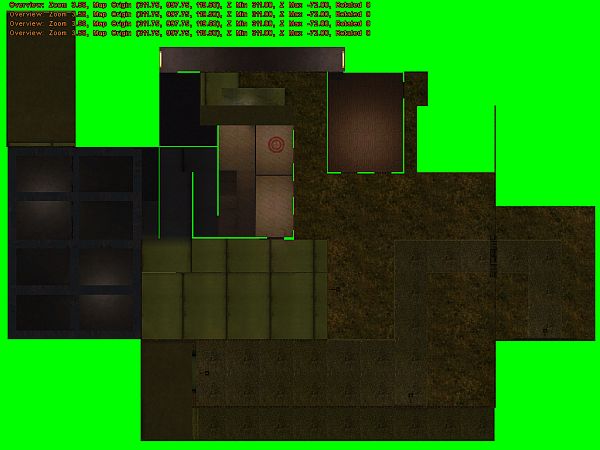 So. Very. Green.
Great, what does it all mean and what can we do with it?
So. Very. Green.
Great, what does it all mean and what can we do with it?
Before we take our screenshot, we need to do a few adjustments. By using the the keys you have assigned for movement you can position the map in the center of the screen. The defaults are W,A,S and D. And if you are using a mouse, the mouse buttons will help you zoom in and out. The idea is to get the map in the center of the screen.
Once you have your image centered, we need to have a look at the figures that are at the top of the screen before we go any further: The Numbers
These are really important so either write down the string, or take a screenshot with the F5 key. You can't take the screenshot with PrtScr because it won't include the numbers.
The Numbers
These are really important so either write down the string, or take a screenshot with the F5 key. You can't take the screenshot with PrtScr because it won't include the numbers.
Once you have written them down, bring up the console again and enter dev_overview 2 and this will get rid of the numbers. Now just hit F5. You can shut the game down now, as we have everything we need to generate the overview.
Go into the root of your game directory and select the .bmp files that were generated when you hit F5. They should be called something like yourmapname0000.bmp, where yourmapname is the actual name of your map.
Copy them into a working folder because we need to do some adjustments.
[SlayerA thought the green might burn someones eye's out. You can fix this by replacing all the green with black. It isn't easy being green ]
]
Now all you have to do is save the overview shot in 1024 x 768 256 colour 8 BPP .bmp format. The screen shot you took originally will be in 24BPP resolution, so you need to adjust it to the new format. I use the simple Batch conversion function of IrfanView. This should leave you with a screen shot that is half the disk size of the original, usually about 700Kb.
Save this into the overview folder of the game you are making the shot for.
Overview: Zoom 3.58, Map Origin (311.75, 997.75, 119.50), Z Min 311.00, Z Max -72.00, Rotated
The figures in red are the important ones.
Copy an existing Overview.txt file and open it. Rename it as yourmapname.txt. In this example I have chosen the .txt file from de_dust: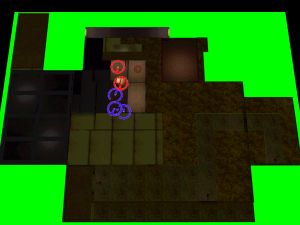 In Game
Just a couple of other things that might interest you. The overview mode only seems to take off the top layer of the map. If you have double floors then it won't see inside the room. You can solve this by removing the floors, but hey... why bother. The overview is there to give "dead" players something to look at. If you are having problems with the lighting, and you don't want the overview to be shot in shadow mode, you can add r_fullbright 1 to the console before you take the screen shot and this will light up your map.
In Game
Just a couple of other things that might interest you. The overview mode only seems to take off the top layer of the map. If you have double floors then it won't see inside the room. You can solve this by removing the floors, but hey... why bother. The overview is there to give "dead" players something to look at. If you are having problems with the lighting, and you don't want the overview to be shot in shadow mode, you can add r_fullbright 1 to the console before you take the screen shot and this will light up your map.
Things you need to know before we start:
There are a couple of ways to do this, and if you are unsure then I suggest that you have a look at the tutorial Tutorial: How to load a map (.bsp file) in-game and keep in mind that we are NOT going to open the map to play the game, so forget about adding any of the deathmatch 1 or
-toconsole +sv_lan 1 that you might normally add. You must also be able to open the console while in your map with the ~ tilde key.Open your game and change the Configuration>Video>Video Mode to OpenGL and a display size of 1024x768. The command dev_overview 1 will not work in Software Mode.
Open the map you want to generate the Overview for and make sure there are no HUD icons showing. If you are in Counter-Strike, just move away from the buyzone or if you want to be creative, you can enter hud_draw 0 at the console.
Bring up the console again and enter dev_overview 1 then close the console and you should be presented with a screen like this:
So. Very. Green.Before we take our screenshot, we need to do a few adjustments. By using the the keys you have assigned for movement you can position the map in the center of the screen. The defaults are W,A,S and D. And if you are using a mouse, the mouse buttons will help you zoom in and out. The idea is to get the map in the center of the screen.
Once you have your image centered, we need to have a look at the figures that are at the top of the screen before we go any further:
The NumbersOnce you have written them down, bring up the console again and enter dev_overview 2 and this will get rid of the numbers. Now just hit F5. You can shut the game down now, as we have everything we need to generate the overview.
Go into the root of your game directory and select the .bmp files that were generated when you hit F5. They should be called something like yourmapname0000.bmp, where yourmapname is the actual name of your map.
Copy them into a working folder because we need to do some adjustments.
The Overview Shot
Open the screenshot (without the numbers) in MSPaint, Wally, Photoshop or the editor of your choice. If you want to, you can massage the screenshot with a simple paint editor to produce a more realistic overview shot. Take out any of the green lines that have invaded your shot. They will be visable if you leave them in.[SlayerA thought the green might burn someones eye's out. You can fix this by replacing all the green with black. It isn't easy being green
]Now all you have to do is save the overview shot in 1024 x 768 256 colour 8 BPP .bmp format. The screen shot you took originally will be in 24BPP resolution, so you need to adjust it to the new format. I use the simple Batch conversion function of IrfanView. This should leave you with a screen shot that is half the disk size of the original, usually about 700Kb.
Save this into the overview folder of the game you are making the shot for.
Now the Numbers
If we go back and look at the numbers, you should have something like this:Overview: Zoom 3.58, Map Origin (311.75, 997.75, 119.50), Z Min 311.00, Z Max -72.00, Rotated
The figures in red are the important ones.
Copy an existing Overview.txt file and open it. Rename it as yourmapname.txt. In this example I have chosen the .txt file from de_dust:
// overview description file for de_dust.bsp
global
{
    ZOOM    1.20
    ORIGIN    101     1071    -192
    ROTATED    0
}

layer
{
    IMAGE    "overviews/de_dust.bmp"
    HEIGHT    -192
}// overview description file for yourmapname.bsp
global
{
ZOOM 3.58
ORIGIN 311.75 997.75 -72
ROTATED 0
}
layer
{
IMAGE "overviews/yourmapname.bmp"
HEIGHT -72
}- Article Credits
-
 Andy
–
Original author
Andy
–
Original author
5 Comments
You must log in to post a comment. You can login or register a new account.
Even the result is BAD. If you see green color in the game, you've messed things up.