RUST: Code Locks Last edited 1 year ago2023-07-21 23:07:32 UTC
Well there are several techniques to make doors with passwords, but I think this is by far the easiest method. Although this tutorial is relatively long, it is still relatively easy - trust me).
For consistency, I have colored all keys in this tutorial, and the colours are assigned thus: FIRST DIGIT , SECOND DIGIT , THIRD DIGIT , FOURTH DIGIT
In the map editor align the buttons of your key pad like this:
B1,B2,B3
B4,B5,B6
B7,B8,B9
BR,B0,BA
Make sure all buttons have wait=0.1
Buttons B0-B9 can have the "port 0#" texture. Where you make it bigger and make it so only the last number is shown, the port 0# textures are in SIGNS category in Qoole 99.
To make the 0-button, take port01, but use the zero in the beginning.
BR can have the empty round, gray button that turns orange when pressed.
BA can have elevator button pointing UP.
As stated above, the code is set to 5734
B1:
targetname: B1
target: but_reset
B2:
targetname: B2
target: but_reset
B3:
targetname: B3
target: but_reset
B4:
targetname: B4
target: but_reset
B5:
targetname: B5
target: but_open1
B6:
targetname: B6
target: but_reset
B7:
targetname: B7
target: but_reset
B8:
targetname: B8
target: but_reset
B9:
targetname: B9
target: but_reset
B0:
targetname: B0
target: but_reset
BR:
targetname: (nothing)
target: but_reset
BA:
targetname: BA
target: sound_denied
targetname: but_reset
target: B0
newtarget: but_reset
targetname: but_reset
target: B1
newtarget: but_reset
targetname: but_reset
target: B2
newtarget: but_reset
targetname: but_reset
target: B3
newtarget: but_reset
targetname: but_reset
target: B4
newtarget: but_reset
NOTE: The first code digit must be reset correctly, or else the code lock will "lock" after entering a wrong code digit!! (I learnt that the hard way)
targetname: but_reset
target: B5
newtarget: but_open1
targetname: but_reset
target: B6
newtarget: but_reset
targetname: but_reset
target: B7
newtarget: but_reset
targetname: but_reset
target: B8
newtarget: but_reset
targetname: but_reset
target: B9
newtarget: but_reset
targetname: but_reset
target: BA
newtarget: sound_denied
GROUP 1
targetname: but_open1
target: B5
newtarget: but_reset
targetname: but_open1
target: B7
newtarget: but_open2
GROUP 2
targetname: but_open2
target: B7
newtarget: but_reset
targetname: but_open2
target: B3
newtarget: but_open3
GROUP 3
targetname: but_open3
target: B3
newtarget: but_reset
targetname: but_open3
target: B4
newtarget: but_open4
GROUP 4
targetname: but_open4
target: B4
newtarget: but_reset
targetname: but_open4
target: BA
newtarget: sound_granted
The first button:
targetname: sound_denied
target: but_reset
sound: Access Denied
wait: 0.1
The second button:
targetname: sound_granted
target: but_door
sound: Access Granted
wait: 0.1
targetname: but_door
target: but_reset
<<< NOTE!! The but_reset is vital to reset the code when the door has been opened. For example, in multiplayer maps this means the next play can not open the door, without re-entering the code
Finally I have included an flow diagram of all the triggers and buttons required to make this work. It doesn't display to well here, so click and download: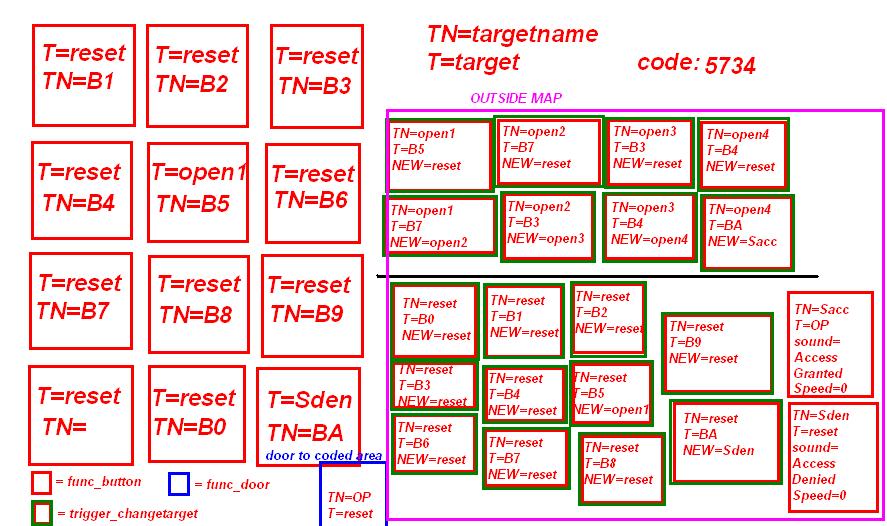 Have fun with your code locks!
STEP 1: BUILDING A KEY PAD
If you want to do a key pad password to a door(or anything else) the following is required. Note, that the colors of the keys relate to the key position and order they must be pressed to unlock the door. In this example the code is 5734:For consistency, I have colored all keys in this tutorial, and the colours are assigned thus: FIRST DIGIT , SECOND DIGIT , THIRD DIGIT , FOURTH DIGIT
In the map editor align the buttons of your key pad like this:
B1,B2,B3
B4,B5,B6
B7,B8,B9
BR,B0,BA
Make sure all buttons have wait=0.1
Buttons B0-B9 can have the "port 0#" texture. Where you make it bigger and make it so only the last number is shown, the port 0# textures are in SIGNS category in Qoole 99.
To make the 0-button, take port01, but use the zero in the beginning.
BR can have the empty round, gray button that turns orange when pressed.
BA can have elevator button pointing UP.
STEP 2: MAKING THE LOCK CODE
The first code number must have a trigger referring to the first trigger_changetargetAs stated above, the code is set to 5734
B1:
targetname: B1
target: but_reset
B2:
targetname: B2
target: but_reset
B3:
targetname: B3
target: but_reset
B4:
targetname: B4
target: but_reset
B5:
targetname: B5
target: but_open1
B6:
targetname: B6
target: but_reset
B7:
targetname: B7
target: but_reset
B8:
targetname: B8
target: but_reset
B9:
targetname: B9
target: but_reset
B0:
targetname: B0
target: but_reset
BR:
targetname: (nothing)
target: but_reset
BA:
targetname: BA
target: sound_denied
STEP 3: CODING THE TRIGGER_CHANGETARGETS
11 trigger_changetarget are required to make the key pad work. Note that all these triggers here are trigger_changetarget. Set the trigger_changetargets to:targetname: but_reset
target: B0
newtarget: but_reset
targetname: but_reset
target: B1
newtarget: but_reset
targetname: but_reset
target: B2
newtarget: but_reset
targetname: but_reset
target: B3
newtarget: but_reset
targetname: but_reset
target: B4
newtarget: but_reset
NOTE: The first code digit must be reset correctly, or else the code lock will "lock" after entering a wrong code digit!! (I learnt that the hard way)
targetname: but_reset
target: B5
newtarget: but_open1
targetname: but_reset
target: B6
newtarget: but_reset
targetname: but_reset
target: B7
newtarget: but_reset
targetname: but_reset
target: B8
newtarget: but_reset
targetname: but_reset
target: B9
newtarget: but_reset
STEP 4: SETTING THE RESET FOR THE ENTER BUTTON
The reset for "enter" button by:targetname: but_reset
target: BA
newtarget: sound_denied
STEP 5: BUILDING THE CODE CHECK
Now we create an 8 trigger_changetarget to update the codelock, if the correct code digit has been entered.GROUP 1
targetname: but_open1
target: B5
newtarget: but_reset
targetname: but_open1
target: B7
newtarget: but_open2
GROUP 2
targetname: but_open2
target: B7
newtarget: but_reset
targetname: but_open2
target: B3
newtarget: but_open3
GROUP 3
targetname: but_open3
target: B3
newtarget: but_reset
targetname: but_open3
target: B4
newtarget: but_open4
GROUP 4
targetname: but_open4
target: B4
newtarget: but_reset
targetname: but_open4
target: BA
newtarget: sound_granted
STEP 6: CONNECTING THE CODE LOCK TO THE DOOR
Connecting the code lock to the door is essential, else the codelock is completely useless. To do this you need to create two small button OUTSIDE the map.The first button:
targetname: sound_denied
target: but_reset
sound: Access Denied
wait: 0.1
The second button:
targetname: sound_granted
target: but_door
sound: Access Granted
wait: 0.1
STEP 7: TARGETING THE DOOR
Now we target but_door to what we want when the correct code is entered. We target it to a single func_door:targetname: but_door
target: but_reset
<<< NOTE!! The but_reset is vital to reset the code when the door has been opened. For example, in multiplayer maps this means the next play can not open the door, without re-entering the code
CONCLUSION
The codelock can be used again and again. I believe this will be cool in multiplayer maps, where the developer can have a "code" to enter a protect-room, or full with weapons. Imagine a button to open a door with lava under all the other players. Why not a turret? use your imagination!Finally I have included an flow diagram of all the triggers and buttons required to make this work. It doesn't display to well here, so click and download:
- Categories
- Archived Articles
- RUST Archive
- Tutorials
- Mapping
- Article Credits
- Sebastiannielsen – Author
This article was originally published on Gamedesign.net RUST.
The original URL of the article was http://www.gamedesign.net/node/290.
The archived page is available here.
TWHL only publishes archived articles from defunct websites, or with permission.
For more information on TWHL's archiving efforts, please visit the
TWHL Archiving Project page.
Comments
You must log in to post a comment. You can login or register a new account.