Tutorial: Adding an HL2 Custom Sequence Last edited 2 years ago2022-10-10 22:36:29 UTC
For clarity, the following colors are used in this tutorial:
Now create a new folder in the modelsrc folder named humans_sdk, click on the the humans_sdk_orig folder, select everything (ctrl-A) and right-click drag the contents of that folder to your new humans_sdk folder. When asked, click Copy Here, not Move Here.
Browse in your sourcesdk_contentmaterialsrc folder and click on the SDKhumans folder. Change it's name to humans_orig, create a new humans folder and copy the contents of the humans_orig folder to the new humans folder.
Because you might want to modify the textures of the model, preserve the compiled textures as follows:
Browse in your half-life 2hl2materialsSDKmodels folder and click on the Humans folder. Rename it to Humans_orig, create a new Humans folder and copy the contents of Humans_orig to the new Humans folder.
Now you're ready to experiment with the character model provided in the SDK.
Browse to the sourcesdk_contenthl2modelsrchumans_sdkMale_sdk folder. Drag-and-drop (left click drag) the file Male_06_sdk.qc file onto the studiomdl shortcut on your desktop. A DOS window will open up and you should see the compiling process taking place. Be patient. It may take a minute or two to fully compile the model.
Open the Half-Life Model Viewer (Model Viewer) from the Source SDK dialog (you do have it on your desktop, right?). Click File->Load Model.. and browse to the modelssdk folder and double-click. Double-click on the humans folder. Double-click on the male_06_sdk model icon.
You should see a C17-garbed citizen. Under the Sequences tab you'll find this model has several sequences available to use with scripted_sequences.
Valve has been kind enough to provide a scene file that has everything you need to create new sequences for your model. The most valuable objects in this scene are animation controls. You can't see them in any of the windows because they have their visibility disabled by default.
In the main menu, click View->Unhide All Objects to get a colorful display of the model and all the animation controls.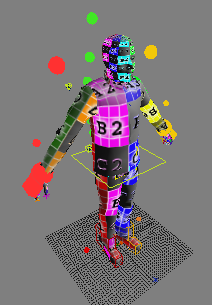 The model and all the controlsFor prudence' sake, immediately save the file as an XSI .exp file named 'salute' (or something appropriate) so you can reload it if needed. You may have noticed that the free version of the XSI program (v4.2) has saving of scene files disabled, in any case.
This is the reference "I'm an airplane!" or ragdoll pose for Valve's biped models. The colored spheres and boxes surrounding the model are convenient controls for moving various parts of the model with constraints. That is, when you select a control and rotate or translate it, the constraints roughly enforce movements of the model to make the animations more lifelike. Some controls are for translating and some are for rotating.
Play around selecting a control and translate it or rotate it to see which model parts it controls. Remember, you can undo your experimentations. If you get things messed up too badly, reload your saved EXP file (you did save it, right?).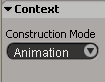 Set animation modeOn the far right of the playback controls, set the total number of frames for the new sequence to 100 to provide a reasonably smooth animation.
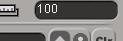 Set frames for the animationClick the auto button to the left of the key button. The auto feature will capture all the changes you make for each frame in which you select a control and change that control.
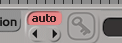 Set auto modeYou're going to be selecting and unselecting animation controls many times during this tutorial. Due to Valve's effort in setting up the animation controls in this reference scene, you'll be selecting only animation controls to position the model. You don't have to (and don't want to) select individual bone chains as in the Simple Animation tutorial.
So, to avoid selecting unwanted objects, like bones and meshes, you'll make everything but the animation controls unselectable.
In the main menu, click Select->Selectability->Make All Unselectable. A quick look in any view with the Wireframe display will show that everything is grayed. You can't select anything.
Now you'll make all (and only) the animation controls selectable.
Press 8 or click the Explorer button (the button with the image of a relation tree) just below the main menu to bring up the scene explorer pane.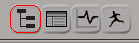 Explorer buttonNotice that all the objects listed in the scene tree are grayed. Click on the small + (plus sign) beside ValveBiped to expand that branch of the tree. Near the bottom of the branch are several branches with group icons (a cluster of grapes?). Right-click on the All_Animatable_Controls group and click Select Members. Close the Explorer pane.
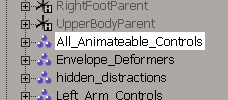 Select all the controlsBack in the main menu, click Select->Selectability->Toggle Selected Objects to make the animation controls selectable.
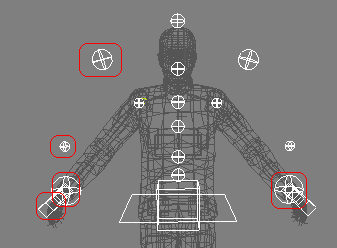 Controls used in this tutorialThe animation controls of most interest in this tutorial are shown circled in the picture above. By making the mesh and other objects near those controls unselectable, you'll be able to select those animation controls easily.
Ensure that you're in frame 0 (there will be a 0 in the box just to the right of the playback controls and the red indicator in the frames slider will be to the far left).
With all the animation controls selected, press v to select the translate tool and click the key button to record the initial position for the model.
Select frame 100 in the slider and click the key button to record the final position for the model.
There's one additional object you may need, the up vector for the right arm.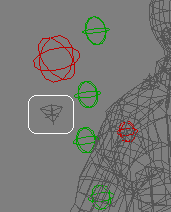 The up vectorOpen Explorer, expand ValveBiped and expand the group plotted. Scroll down and click ValveBiped.rArmUpV. In the main menu, click Select->Selectability->Toggle Selected Objects. Close Explorer.
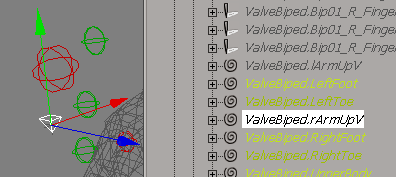 Up vector in translate modeWith the up-vector selected and the translate tool selected (v), select frame 0 and click the key button. Select frame 100 and click the key button again.
You've recorded the position of the key parameters in the animation in the first and last frames of the sequence.
Unlike making a movie in which the character is recorded to film in each frame, XSI lets you position the character in several key frames and then calculates the positions for the unkeyed frames "in-between" keyed frames. Sometimes this is called 'tweening. It saves the animator an incredible amount of effort.
The calculations that XSI does are not always what you want. You can then go back to one of the "between" frames, position the model more finely and set the key parameters for that frame. If you create too many key frames, however, the movement will appear jerky because you may not be able to position the model as finely as XSI can calculate.
For the purpose of this tutorial, we'll keep it simple. You'll set the key parameters in only 3 frames and let XSI do the rest. As the animator, your job is to position the model in each key frame and record the key parameters.
So what are the key parameters you have to record in the key frames?
For the purpose of this tutorial, the key parameters are just the positions or rotations of any animation control you select and change during the animation. Any controls that aren't used during the animation will remain as they are in the reference position throughout the animation.
You've already recorded key parameters for the first and last frames. You're going to change a couple of things in those frames but the base position from which you will work has been set.
In XSI, you don't have to manually record the changes you make. By clicking the auto button next to the key button, any changes you make will be automatically recorded for the frame you currently have selected.
While I was writing this tutorial, however, I did almost all of the manipulations in a maximized User view with a textured display with liberal use of orbit and pan.
Hint: Sometimes the model appears distorted when you zoom in tight on an area. Dolly back from the model and zoom in again.
First off, let's change the starting position for the sequence to something more believable than "I'm an airplane!"
Select frame 0 and make sure the auto button is selected (it'll be red).
Select the red sphere at the model's right wrist. You should go into translate mode automatically. If not, press v to get into translate mode. Lower the right arm to a more natural rest position. As shown, the translate coordinates are x: -4.85, y: -22.4, z: 1. Anywhere close to that is fine.
When in the translate mode, notice that you can constrain movement by moving the mouse over the various axes of the control to move along just one axis (x, y or z) or position over the center of the control to move it in any direction.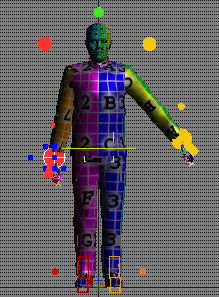 Right arm in rest positionSelect the yellow sphere near the model's left wrist and move it to a more natural position, also.
In frame 0 with the translate tool selected, notice that the key parameters you just changed have been set.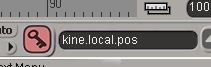 Positions not recordedClick in the frames slider above the key button to select frame 100. The key button will turn green to indicate the key parameters have not been recorded in this frame. You're going to set the key for this frame so the model returns to the rest position at the end of the "salute."
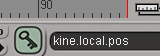 Positions recordedSelect one of the wrist spheres and, in translate mode, edit the x, y and z coordinates to make them the same as frame 0. You can click on the first frame and last frame buttons in the playback controls to switch back and forth. Go to the first frame, note the x coordinate, goto the last frame and edit the x coordinate. Continue until that wrist is in the same position in frame 100 as it is in frame 0.
 Rewind and end-of-animation buttonsDo the same for the other wrist. The changes you make are been recorded automatically.
You've set 2 of the 3 key frames. Now you'll set a key frame in the middle of sequence.
Click on the 50 in the frame slider to select frame 50 for the next set of key parameters. The key button will turn green to indicate the keys have not been set in this frame.
Using a combination of the five controls shown (the two red "floating" spheres, the red sphere and the red box at the wrist and the yellow pyramid which starts out behind the right shoulder), position the model's right hand just above the eyes and near the forehead. You may have to use a liberal dose of undo's while you learn how to use the controls.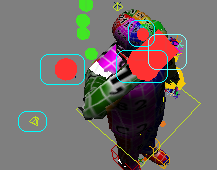 Controls to position right armBy experimentation, I ended up with the following parameters for the controls. Select a control (its name is shown in the box in the lower left-hand corner) and check that your positions are somewhat similar. As long as the position looks remotely like a salute, you're in business.
 Identifying the selected control
In the dialog in the Options section, select Skeletal Animation (.SMD).
In the File section just above the Options section, click the ... button and navigate to your sourcesdk_contenthl2modelsrchumans_sdkMale_Animations_SDK folder. You'll see all the various animations for the model.
At the bottom, enter salute as the filename and click OK. Click OK in the SMDExportProperty dialog to save your animation file.
It may take a minute or more to export the file. Be patient.
If you want, save your EXP file and exit XSI.
Open the male_shared_XSI_sdk.qci file in Notepad or other ASCII editor.
Just below the line that starts $sequence Idle03.., add a new line as follows, including the quotation marks:
Save the file. Make sure your editor (like Notepad) doesn't add a ".txt" extension.
Browse to the nearby humans_sdkMale_sdk folder. Drag-and-drop the file Male_06_sdk.qc file onto your studiomdl shortcut.
A DOS window will open up and you'll see info and stats scroll by as studiomdl compiles your model, including your new "salute" sequence.
Be patient. It may take a minute or two for the compilation.
When the DOS window closes, fire up the Half-Life Model View (HLMV) from your Source SDK dialog.
Click File->Load Model.. and browse to the sdk folder. Double-click the folder and then double-click the Humans folder. Double-click the Male_06_sdk.mdl file.
In HLMV, click the Sequence tab. In the first pulldown under the tabs, select your new sequence Salute. You should see a looped animation of your C17 citizen model repeatedly performing a pretty crappy looking salute.
Close out HLMV.
In a new map, create a room with an info_player_start entity, a light, a generic_actor entity, and a scripted_sequence entity. Create a brush for a button and tie it to a func_button entity.
In the generic_actor properties, select Male_06_sdk as the Model and give the entity the name man. Move the angle to face the button so you can see him salute when you push the button. Click Apply.
In the scripted_sequence properties, give it the name man_script1. Set the Target NPC to man. Set the Pre Action Idle Animation and Post Action Idle Animation to Idle01. You'll have to type it in. For the Action Animation, type in Salute. Click Apply.
In the func_button properties, under the flags tab, click Don't Move and Use Activates. In the Outputs tab, Add an output OnPressed, target entity man_script1, Target Input MoveToPosition, and a delay of 0 seconds. Add another output OnPressed, target entity man_script1, Target Input BeginSequence, and a delay of 5 to 10 seconds, however long it may take for man to move to the scripted_sequence. Click Apply.
Compile, run, press the button and get a salute (still pretty crappy looking) from your model!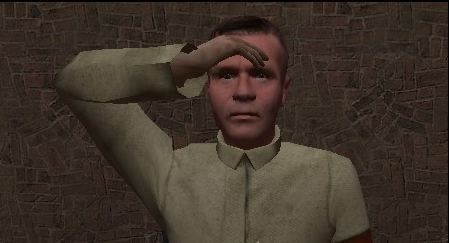 The Salute
- folder names and paths, filenames and values (numbers and text) entered in dialogs
- buttons, keyboard keys or menu items you press or click
- names of objects in XSI and names of entities in the Hammer editor
- Softimage XSI EXP v4.2
- ValveSource SDK (Software Development Kit)
- Preserve the original files provided with the Source SDK
- Compile and view the male model provided with the Source SDK
- Setup the male model in XSI to prepare for adding a sequence to the model
- Record an animation sequence in XSI
- Save the animation sequence to a skeletal SMD file
- Modify the model's qci file to recognize your new custom sequence
- Compile the model to include the new sequence
- View the new sequence in the Model Viewer
- Add the model to an HL2 map, using the new sequence
Setting up
If you browse in your sourcesdk_contenthl2modelsrc folder you'll find a humans_sdk folder. To preserve the original files while you experiment with using the model, rename the humans_sdk folder to something like humans_sdk_orig.Now create a new folder in the modelsrc folder named humans_sdk, click on the the humans_sdk_orig folder, select everything (ctrl-A) and right-click drag the contents of that folder to your new humans_sdk folder. When asked, click Copy Here, not Move Here.
Browse in your sourcesdk_contentmaterialsrc folder and click on the SDKhumans folder. Change it's name to humans_orig, create a new humans folder and copy the contents of the humans_orig folder to the new humans folder.
Because you might want to modify the textures of the model, preserve the compiled textures as follows:
Browse in your half-life 2hl2materialsSDKmodels folder and click on the Humans folder. Rename it to Humans_orig, create a new Humans folder and copy the contents of Humans_orig to the new Humans folder.
Now you're ready to experiment with the character model provided in the SDK.
Check the SDK Model
If you haven't setup for compiling models, browse to your sourcesdkbin folder. Right-click on studiomdl.exe and send a shortcut to your desktop.Browse to the sourcesdk_contenthl2modelsrchumans_sdkMale_sdk folder. Drag-and-drop (left click drag) the file Male_06_sdk.qc file onto the studiomdl shortcut on your desktop. A DOS window will open up and you should see the compiling process taking place. Be patient. It may take a minute or two to fully compile the model.
Open the Half-Life Model Viewer (Model Viewer) from the Source SDK dialog (you do have it on your desktop, right?). Click File->Load Model.. and browse to the modelssdk folder and double-click. Double-click on the humans folder. Double-click on the male_06_sdk model icon.
You should see a C17-garbed citizen. Under the Sequences tab you'll find this model has several sequences available to use with scripted_sequences.
Setup the model
Open up XSI. Click File->Open.. and browse to the sourcesdk_contenthl2modelsrchumans_sdkXSI_scn_files folder. Select and open the SDK_Male_reference.scn file.Valve has been kind enough to provide a scene file that has everything you need to create new sequences for your model. The most valuable objects in this scene are animation controls. You can't see them in any of the windows because they have their visibility disabled by default.
In the main menu, click View->Unhide All Objects to get a colorful display of the model and all the animation controls.
The model and all the controlsThis is the reference "I'm an airplane!" or ragdoll pose for Valve's biped models. The colored spheres and boxes surrounding the model are convenient controls for moving various parts of the model with constraints. That is, when you select a control and rotate or translate it, the constraints roughly enforce movements of the model to make the animations more lifelike. Some controls are for translating and some are for rotating.
Play around selecting a control and translate it or rotate it to see which model parts it controls. Remember, you can undo your experimentations. If you get things messed up too badly, reload your saved EXP file (you did save it, right?).
Setup for the Animation
Get into animation mode by pressing 2 to change the toolbar on the left to Animate. Below the Animate toolbar, change the Construction Mode to Animation.Set animation modeSet frames for the animationSet auto modeSo, to avoid selecting unwanted objects, like bones and meshes, you'll make everything but the animation controls unselectable.
In the main menu, click Select->Selectability->Make All Unselectable. A quick look in any view with the Wireframe display will show that everything is grayed. You can't select anything.
Now you'll make all (and only) the animation controls selectable.
Press 8 or click the Explorer button (the button with the image of a relation tree) just below the main menu to bring up the scene explorer pane.
Explorer buttonSelect all the controlsControls used in this tutorialEnsure that you're in frame 0 (there will be a 0 in the box just to the right of the playback controls and the red indicator in the frames slider will be to the far left).
With all the animation controls selected, press v to select the translate tool and click the key button to record the initial position for the model.
Select frame 100 in the slider and click the key button to record the final position for the model.
There's one additional object you may need, the up vector for the right arm.
The up vectorUp vector in translate modeYou've recorded the position of the key parameters in the animation in the first and last frames of the sequence.
Key Parameters
Creating a sequence for a model is somewhat like making a movie. You position the model and take a snapshot. You reposition the model a little and take another snapshot. When the snapshots are played back in HL2, the character appears to be going through smooth and natural motions.Unlike making a movie in which the character is recorded to film in each frame, XSI lets you position the character in several key frames and then calculates the positions for the unkeyed frames "in-between" keyed frames. Sometimes this is called 'tweening. It saves the animator an incredible amount of effort.
The calculations that XSI does are not always what you want. You can then go back to one of the "between" frames, position the model more finely and set the key parameters for that frame. If you create too many key frames, however, the movement will appear jerky because you may not be able to position the model as finely as XSI can calculate.
For the purpose of this tutorial, we'll keep it simple. You'll set the key parameters in only 3 frames and let XSI do the rest. As the animator, your job is to position the model in each key frame and record the key parameters.
So what are the key parameters you have to record in the key frames?
For the purpose of this tutorial, the key parameters are just the positions or rotations of any animation control you select and change during the animation. Any controls that aren't used during the animation will remain as they are in the reference position throughout the animation.
You've already recorded key parameters for the first and last frames. You're going to change a couple of things in those frames but the base position from which you will work has been set.
In XSI, you don't have to manually record the changes you make. By clicking the auto button next to the key button, any changes you make will be automatically recorded for the frame you currently have selected.
Creating the Sequence
You may have to use different views to check your movements. You can change the size of the views to suit by dragging the center of the view frame (where all the frames meet in the middle) or dragging the top or side frame of a view, and select from User, Top, Right, etc., views in any view window. Use Wireframe or Textured displays to suit yourself as you manipulate the model.While I was writing this tutorial, however, I did almost all of the manipulations in a maximized User view with a textured display with liberal use of orbit and pan.
Hint: Sometimes the model appears distorted when you zoom in tight on an area. Dolly back from the model and zoom in again.
First off, let's change the starting position for the sequence to something more believable than "I'm an airplane!"
Select frame 0 and make sure the auto button is selected (it'll be red).
Select the red sphere at the model's right wrist. You should go into translate mode automatically. If not, press v to get into translate mode. Lower the right arm to a more natural rest position. As shown, the translate coordinates are x: -4.85, y: -22.4, z: 1. Anywhere close to that is fine.
When in the translate mode, notice that you can constrain movement by moving the mouse over the various axes of the control to move along just one axis (x, y or z) or position over the center of the control to move it in any direction.
Right arm in rest positionIn frame 0 with the translate tool selected, notice that the key parameters you just changed have been set.
Positions not recordedPositions recordedRewind and end-of-animation buttonsYou've set 2 of the 3 key frames. Now you'll set a key frame in the middle of sequence.
Click on the 50 in the frame slider to select frame 50 for the next set of key parameters. The key button will turn green to indicate the keys have not been set in this frame.
Using a combination of the five controls shown (the two red "floating" spheres, the red sphere and the red box at the wrist and the yellow pyramid which starts out behind the right shoulder), position the model's right hand just above the eyes and near the forehead. You may have to use a liberal dose of undo's while you learn how to use the controls.
Controls to position right armIdentifying the selected control- rArmUpV: -8.5, 0, 1.5 (translate x,y,z)
- ClavicleControlR: 14.014 (rotate x,y,z)
- HandControlPosR: 1.35, 10.5, 7.25 (translate x,y,z)
- HandControlRotR: 36.9, -7.4, -6.5 (rotate x,y,z)
- ArmRollR: -65.95, 0, -16.2 (rotate x,y,z)
Exporting the Skeletal Animation SMD File
In the main menu, click ValveSource->Export SMD..In the dialog in the Options section, select Skeletal Animation (.SMD).
In the File section just above the Options section, click the ... button and navigate to your sourcesdk_contenthl2modelsrchumans_sdkMale_Animations_SDK folder. You'll see all the various animations for the model.
At the bottom, enter salute as the filename and click OK. Click OK in the SMDExportProperty dialog to save your animation file.
It may take a minute or more to export the file. Be patient.
If you want, save your EXP file and exit XSI.
Compiling the Model
In Windows Explorer, browse to your sourcesdk_contenthl2modelsrchumans_sdkMale_Animations folder.Open the male_shared_XSI_sdk.qci file in Notepad or other ASCII editor.
Just below the line that starts $sequence Idle03.., add a new line as follows, including the quotation marks:
$sequence Salute Salute activity ACT_SALUTE 1 node "standing"Save the file. Make sure your editor (like Notepad) doesn't add a ".txt" extension.
Browse to the nearby humans_sdkMale_sdk folder. Drag-and-drop the file Male_06_sdk.qc file onto your studiomdl shortcut.
A DOS window will open up and you'll see info and stats scroll by as studiomdl compiles your model, including your new "salute" sequence.
Be patient. It may take a minute or two for the compilation.
When the DOS window closes, fire up the Half-Life Model View (HLMV) from your Source SDK dialog.
Click File->Load Model.. and browse to the sdk folder. Double-click the folder and then double-click the Humans folder. Double-click the Male_06_sdk.mdl file.
In HLMV, click the Sequence tab. In the first pulldown under the tabs, select your new sequence Salute. You should see a looped animation of your C17 citizen model repeatedly performing a pretty crappy looking salute.
Close out HLMV.
Using the Sequence in a Map
Fire up the Hammer editor from the Source SDK dialog.In a new map, create a room with an info_player_start entity, a light, a generic_actor entity, and a scripted_sequence entity. Create a brush for a button and tie it to a func_button entity.
In the generic_actor properties, select Male_06_sdk as the Model and give the entity the name man. Move the angle to face the button so you can see him salute when you push the button. Click Apply.
In the scripted_sequence properties, give it the name man_script1. Set the Target NPC to man. Set the Pre Action Idle Animation and Post Action Idle Animation to Idle01. You'll have to type it in. For the Action Animation, type in Salute. Click Apply.
In the func_button properties, under the flags tab, click Don't Move and Use Activates. In the Outputs tab, Add an output OnPressed, target entity man_script1, Target Input MoveToPosition, and a delay of 0 seconds. Add another output OnPressed, target entity man_script1, Target Input BeginSequence, and a delay of 5 to 10 seconds, however long it may take for man to move to the scripted_sequence. Click Apply.
Compile, run, press the button and get a salute (still pretty crappy looking) from your model!
The Salute- Categories
- Tutorials
- Advanced Tutorials
- Source Tutorials
- Article Credits
-
 BJ
–
Original author
BJ
–
Original author
1 Comment

Meerjel01
Commented 2 years ago2022-07-08 16:59:34 UTC
Comment #104629
Isn't that a beta Citizen model?
You must log in to post a comment. You can login or register a new account.