Tutorial: Basic Voice Acting Last edited 4 months ago2024-09-20 03:19:34 UTC
This tutorial will show you how to include basic custom voice acting in your scenarios. This can add immensely to custom missions, and is well worth taking the time to work out. It also makes your maps that bit more personal.
This tutorial is by no means comprehensive. This is just the way I have learned to do it, and there are probably better ways of doing it. I wouldn't have dreamt of showing people my method had I not received numerous emails asking me how I got the voice acting parts of my maps to work.
In this tutorial I will create a character called Anne. I recommend that you do the same if you are following this for the first time, and not try and substitute your own names just yet.
This tutorial will assume that you know how to do the following:
Your sound files can say whatever you like really, but I recommend for this tutorial that you have sound files which say the following two sentences:
A female voice would be helpful too, for cosmetic purposes, but is by no means essential.
Now, if like me you are recording your samples using an average PC microphone, they are likely to be much too quiet and filled with background hiss.
If you own a recording studio, you can skip this bit.
So you need to edit your samples. Personally I use SoundForge to both record and edit, but that costs money. Luckily there is a reasonably good freeware alternative called Audacity which I mentioned earlier - Google it. You'll have to learn how to use Audacity yourself, but it's not that difficult.
So, this is what you should have by now: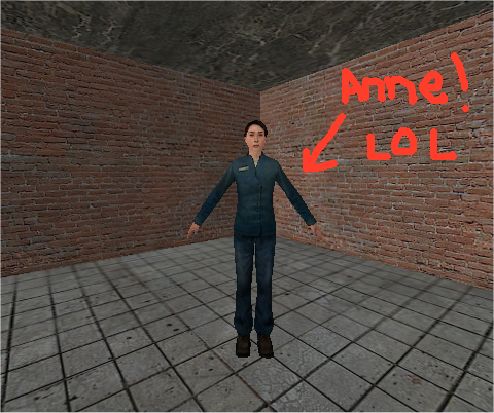 Our Lovable Character Anne.
I like to prefix them with the name of the character they are for, and have the names as a reminder of the words being spoken. So, rename your files as shown below: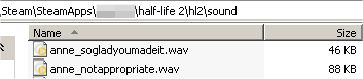 Anne's Life in two files
Now it's time to move on to the FacePoser for awhile.
Anne's Life in two files
Now it's time to move on to the FacePoser for awhile.
FacePoser
The Faceposer is an amazing piece of software, but it's pretty daunting at first. There are several parts to it.
Take a deep breath, and load the Faceposer from the SourceSDK menu.
When it's finished loading, look for the tabs at the bottom-right of the screen: Lots of tabs
Clicking on one of these will set that character to be the 3D model shown on the screen. You can use other models, but we don't need to do that here. Indeed - I find it doesn't really matter which model you use, it only affects the behaviour of the face poser. You can use a different model to the one you have in your map in Hammer, and as long as your scene is set up right for the model inside Hammer it will still work. However it is much easier to get the scene right if you have the same model loaded in Faceposer.
Lots of tabs
Clicking on one of these will set that character to be the 3D model shown on the screen. You can use other models, but we don't need to do that here. Indeed - I find it doesn't really matter which model you use, it only affects the behaviour of the face poser. You can use a different model to the one you have in your map in Hammer, and as long as your scene is set up right for the model inside Hammer it will still work. However it is much easier to get the scene right if you have the same model loaded in Faceposer.
In this case Anne is using the Female_01 model, so that's the model we will select here. Click on the tab labelled Female_01.
To create a whole character as quickly as possible you should do some groundwork before you really start. You don't necessarily need to do this next bit, but I strongly recommend it. It's what I do before I begin putting a character together.
Making a Template Scene
If you're making a character of any depth, then he or she will have more than one "scene" to play out. You're going to save quite a bit of time if you make a basic template scene now, from which you can create all the others. It saves you repeating the early scene creation process over and over again.
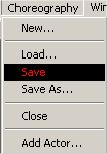
1. Select "New" from the "Choreography" menu at the top of the screen.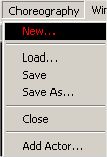 A new lease on life
2. You will be prompted to name your scene file - call it anne_template
A new lease on life
2. You will be prompted to name your scene file - call it anne_template
3. You will then be prompted for your characters name.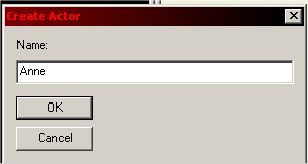 Who ya gunna call? Anne, of course!
4. Every reference to your character in both the Faceposer and Hammer must use this exact name. If it's different anywhere, then it simply won't work. The name is not case sensitive however, so you don't have to worry about capital letters.
Who ya gunna call? Anne, of course!
4. Every reference to your character in both the Faceposer and Hammer must use this exact name. If it's different anywhere, then it simply won't work. The name is not case sensitive however, so you don't have to worry about capital letters.
5. Your screen will now have this in the area below the 3D model: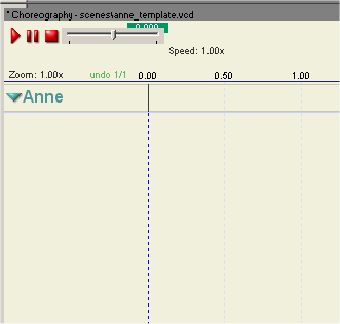 Empty template
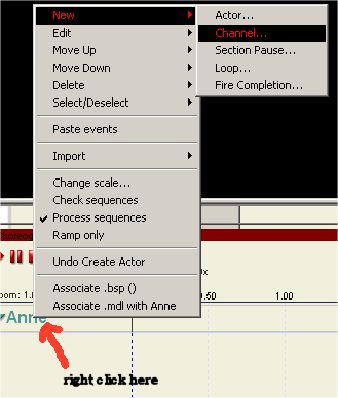
6. Right click as shown in the next picture, and select to create a new channel, as shown:
Empty template
6. Right click as shown in the next picture, and select to create a new channel, as shown:
 Adding a new channel
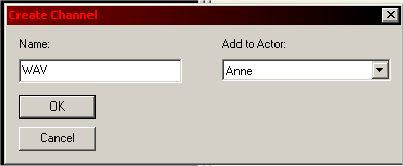
7. Give it the name "WAV", as shown:
Adding a new channel
7. Give it the name "WAV", as shown:
 Not very creative
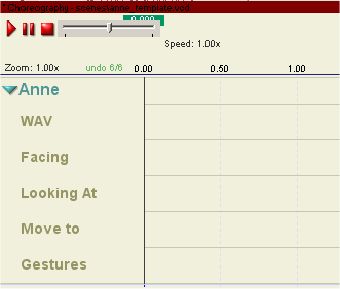
8. Now, repeat that process four more times, and create four more channels with the following names:
Not very creative
8. Now, repeat that process four more times, and create four more channels with the following names:
 Not-so-empty template
10. Now save the file from the Choreography menu.
Not-so-empty template
10. Now save the file from the Choreography menu.
 Saving...
The Phoneme Editor
Saving...
The Phoneme Editor
Now it's time to actually lip sync your sound files.
Here's a reminder of the sound files you should have again.Nothing's changed...
Take another deep breath.
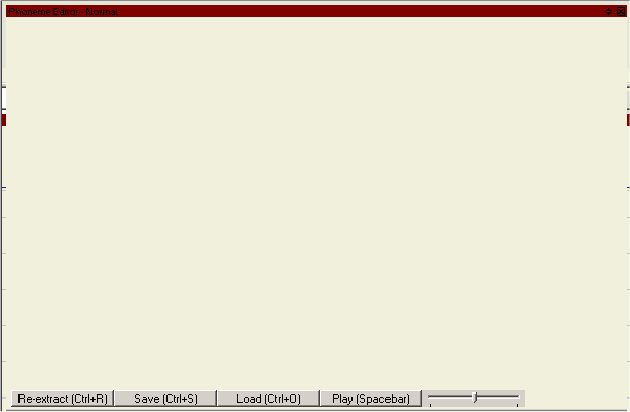
Select the Phoneme Editor from the tabs on the bottom left of the screen:- Phenome....whatever that means.
And this window will come to the front somewhere on the screen, probably on the bottom right:-
Phenome....whatever that means.
And this window will come to the front somewhere on the screen, probably on the bottom right:-
 Bland window.
It looks pretty bland at first, I know.
Bland window.
It looks pretty bland at first, I know.
Click on Load at the bottom, and select your first sound file. In this case select anne_sogladyoumadeit.wav
The image of the soundwave should then appear on the blank canvas of the Phoneme Editor.
Click on the Re-extract button at the bottom. You will then be prompted to enter the text of the sentence being spoken. Do so:-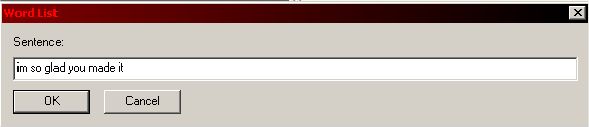 I'm so glad you made it!
Don't include any punctuation, no matter how tempting, because it can cause problems.
I'm so glad you made it!
Don't include any punctuation, no matter how tempting, because it can cause problems.
Your PC may whirr away for a second or two after you've hit OK.
Your sample will now resemble the below picture. The window won't look exactly the same as this, but you'll definitely get the idea. Notice the text pointed out by the arrow.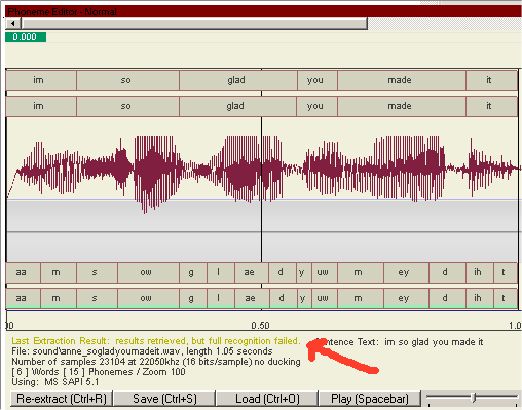 Like magic!
This text will either be green, yellow or red. Here it is yellow as you can see. This text tells you how well the automatic lip sync interpreter has dealt with your sound file.
Like magic!
This text will either be green, yellow or red. Here it is yellow as you can see. This text tells you how well the automatic lip sync interpreter has dealt with your sound file.
Green - As good as it gets. You probably won't have to alter this extraction manually at all.
Yellow - Not too bad. You might have to manually edit the extraction, or you might not. Either way, it's going to work at least to some degree.
Red - Bad. It didn't work at all, and unfortunately you're probably going to have to start over unless you can fix what the editor doesn't like about your sound file. Usually I have found this only happens if there is something wrong with the format of the WAV file, or if it is too short (I've had problems with samples under 2 seconds long). Occasionally, loud noises or pops in the sample can cause this too.
I'll assume you got yellow or green.
Right click the mouse on the image of the soundwave itself, and select the option Commit Extraction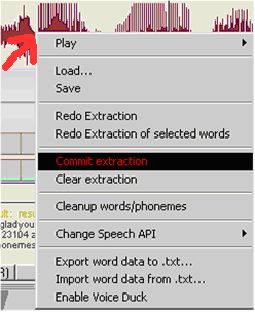 To have read this far, you must be very committed!
Your PC might whirr for a second again here.
To have read this far, you must be very committed!
Your PC might whirr for a second again here.
Now click the Play button on the Phoneme Editor window. If you have followed the steps correctly, the 3D model will speak your sentence with full lip sync! If you got green text on the extraction above, it will probably look perfect already. Even if you get yellow, it usually turns out pretty good - all on its own. (If the 3D model seems unresponsive and does not speak even though the sound does, try clicking on the 3D view and then playing the sound file again)
If there are mistakes in the sync, and they do happen, then you can manually edit the extraction to make it look better. However this is fiddly and would warrant a tutorial of its own. So I won't cover that here --- this example will still work even if the lip sync is not perfect. And I'm still very poor at manually editing it myself - when I've had to do it my results are way worse than when the automatic system achieves a green text report - it's really a hard process.
So, let's move on with what we have.
Click the Save button on the Phoneme editor window. It is very important that you do this.
Now repeat the whole process with the second sound file - anne_notappropriate.wav. Load it into the Phoneme editor, extract it, enter the sentence and commit the extraction. Click Save at the end (remember - very important).
Building the Scene Files
Now we're actually going to put together the scene file. I like to give the scenes the same names as the main sound file in them. I'd imagine this is harder to do for complex, multi- character scenes, but here it works just fine.
You should still have your anne_template file open in the main Face Poser Window. If not, load it up now from the Choreography menu at the top.
Then, from the Choreography menu, select Save As: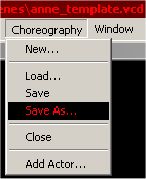 Another save dialog
We're going to deal with the sentence "I'm so glad you made it!" first - so save your new file as anne_sogladyoumadeit, just like the sound file. It won't conflict because the files are in different directories, and also have different file extensions.
Another save dialog
We're going to deal with the sentence "I'm so glad you made it!" first - so save your new file as anne_sogladyoumadeit, just like the sound file. It won't conflict because the files are in different directories, and also have different file extensions.
Right click your mouse in the WAV channel you created (you have to actually click inside the right channel) as shown in the picture:-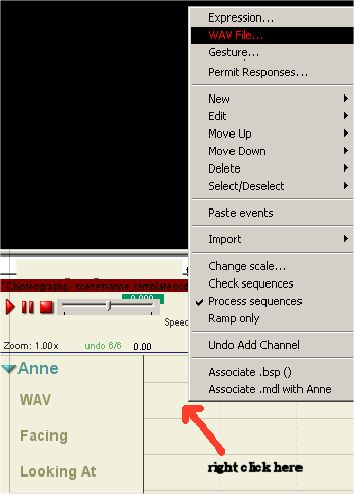 Amazing.
Please note that I have shortened the menu in the picture above quite a lot, because it is massive. Select WAV File - it's second from the top.
Amazing.
Please note that I have shortened the menu in the picture above quite a lot, because it is massive. Select WAV File - it's second from the top.
You will see the following window appear. You only need to fill in the Name and Sound fields. The name can be anything (it helps if it's relevant though) - but get the filename of the sound file right - and make sure you put .WAV on the end.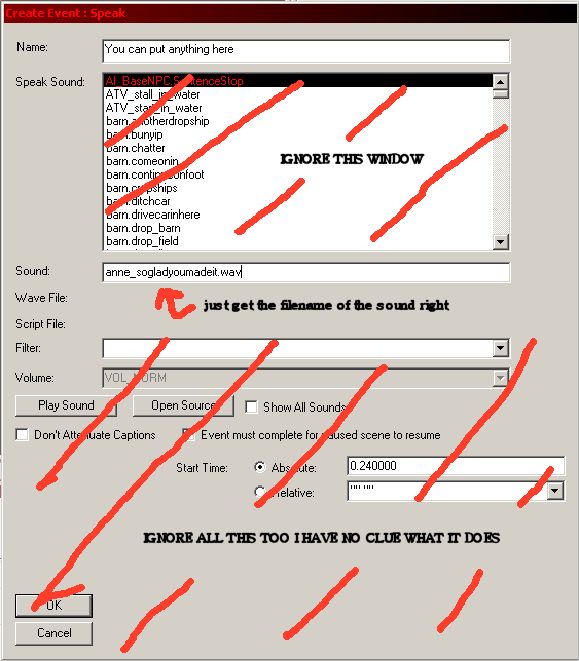 I really have no clue what it does
  It is at this point, when you are making a bigger character and doing this repeatedly, that you will thank yourself for naming the sound and scene files the same way. If you forget the name of the sound file, you can just look at the title bar of the main faceposer window, which has the name of the scene right there.
Your sound file will now appear on your scene "timeline".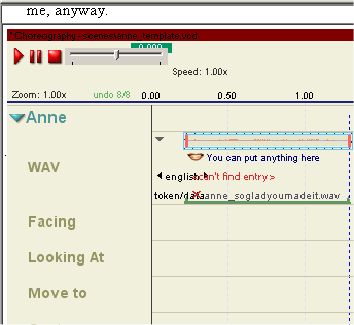 Now it's starting to take form!
Ooh, I really should have put a better name. But it doesn't matter. It's a pretty short sample, so this timeline won't be very long unless you want to get the character to move a long way somewhere, or perform lots of silent gestures like some kind of oppressed mime artist.
Now it's starting to take form!
Ooh, I really should have put a better name. But it doesn't matter. It's a pretty short sample, so this timeline won't be very long unless you want to get the character to move a long way somewhere, or perform lots of silent gestures like some kind of oppressed mime artist.
The red text that says <can't find entry> is referring to a subtitles file, which you would use if you wanted the speech to automatically be subtitled on screen. I've never done it, so I can't show you how to do that.
Now, we're going to add things to the other channels just like we added the sound file to the WAV channel.
Right click in the Facing Channel (actually in the timeline itself, under where your sound file is in the wav channel)
Select Face Actor from the long menu, and you'll see this:-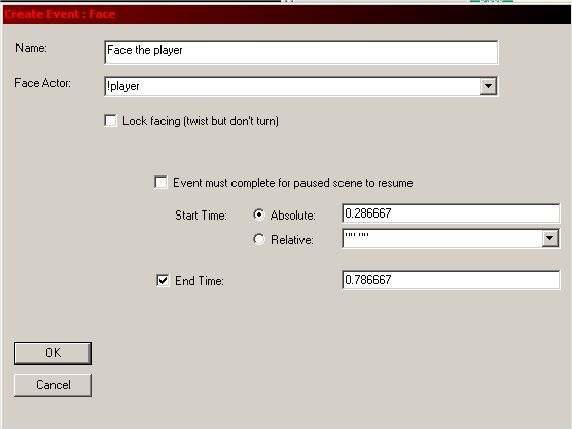 Face the player at all times
Fill it in as shown. The Face Actor field should say !player.
Face the player at all times
Fill it in as shown. The Face Actor field should say !player.
Click OK and a new item will exist on your timeline.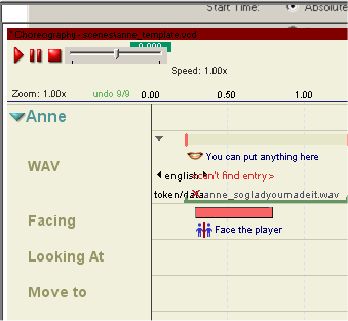 And there it is!
Now right click in the Looking At channel, and select Look at Actor from the menu.
And there it is!
Now right click in the Looking At channel, and select Look at Actor from the menu.
This bit is the same as for the last bit. Enter !player in the Look at Actor field, and give it a name. Then click OK. Another entry on the timeline.
You don't really need to be doing these bits in other channels if you only want your character to speak in-game and nothing else. However you can set up these channels however you like, using the method you've just been using. Right click in a channel and select the appropriate thing you want to put in that channel. Each type of event is different, but they are all similar in a way. Just remember to always refer to the player as !player . I guess it's ok to mix up different types of event in the same channel - but personally I'd imagine it's a bad idea really.
When you have events in your channels, you can use the mouse to stretch them or shrink them, and drag them along the timeline.
If you want to use some gestures, they can be worked out by using the SourceSDK model viewer to load up the model you are using, and finding out the names of the gestures that model can do (look in the Sequence tab in the model viewer).
This is shown below: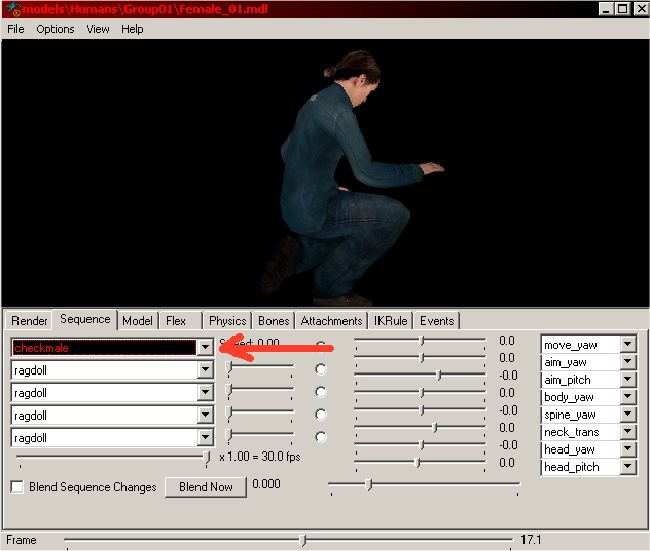 Playing chess with l's instead of t's
The arrow is pointing to the drop down box which has a list of all the names of gestures for that model. Some are easier to use than others.
Playing chess with l's instead of t's
The arrow is pointing to the drop down box which has a list of all the names of gestures for that model. Some are easier to use than others.
Custom Facial expressions are a pain in the backside, I haven't got a good grasp of those myself yet, so they aren't covered here. Thankfully, the engine delivers pretty good expressions on its own anyway.
Experiment, and you'll end up maybe with something resembling this:-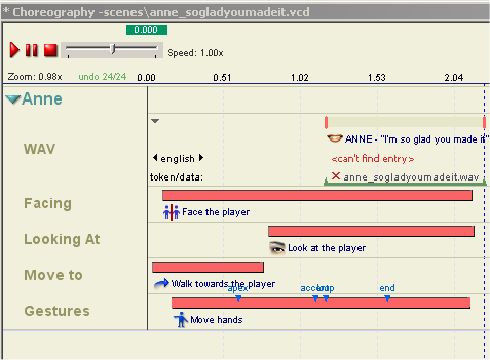 The complete thing
This is your first complete choreography scene. It's very basic, and has only one character in it. But still, it's an achievement. As you are no doubt becoming aware, making complicated multi-character scenes is quite a lot of work!
The complete thing
This is your first complete choreography scene. It's very basic, and has only one character in it. But still, it's an achievement. As you are no doubt becoming aware, making complicated multi-character scenes is quite a lot of work!
Click on Save in the Choreography menu.Save.....again!
You can now preview your scene by pressing the play arrow above the timeline. If you've done everything right, your character will start acting in the 3D view!
Now you need to make the second scene.
Putting it together in Hammer
This bit is really easy compared to what you've just been through.
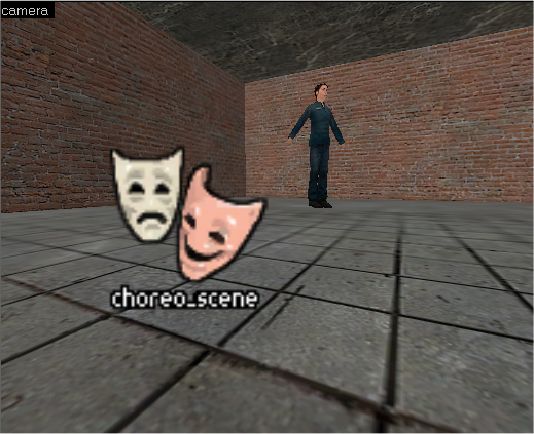
Load up the map you're going to use. For this tutorial, I've just made a basic square room. A basic square room
Use the entity tool to place a logic_choreographed_scene entity into your map. It looks like this in the Hammer 3D view:-
A basic square room
Use the entity tool to place a logic_choreographed_scene entity into your map. It looks like this in the Hammer 3D view:-
 A basic square room with an entity
In the properties of this entity you can see its various parameters:-
A basic square room with an entity
In the properties of this entity you can see its various parameters:-
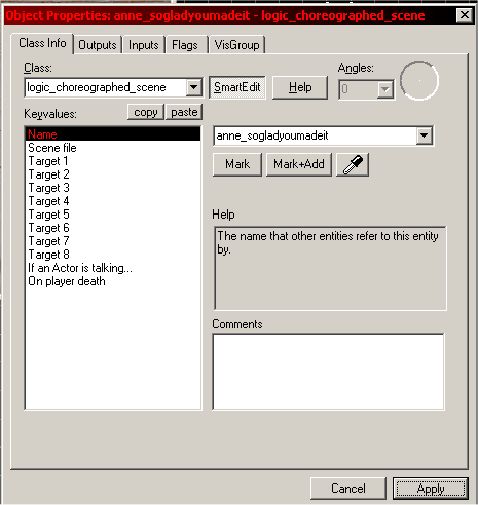 Properties of the entity
Fill in the fields as follows.
Properties of the entity
Fill in the fields as follows.
Name - The name for the entity which you will use to trigger the scene to start. This can be anything, but once again it helps if you use the same name as the sound and scene files which are going to be used. So the name of this entity is anne_sogladyoumadeit, as shown above.
Scene file - The scene file you made earlier. Again this will be anne_sogladyoumadeit.vcd. Hammer is nice and friendly on this parameter and allows you just to browse for the file - it even opens in the correct directory. How nice!
Target 1 - The name of the NPC which is going to be acting. This MUST be the same as the name of the NPC entity in Hammer and also the actor which you set up in the scene files. All three must match, or nothing will work at all. So for this tutorial, enter anne into this field.
If you make a scene file with more than one actor, you put the other actors names in the other target parameter boxes. But we don't need to do that here. We can ignore the bottom two options for now also. Close the window.
Now make a second logic_choreographed_scene entity. Set that one up the same way, except use the anne_notappropriate sound and scene files instead.
There really isn't anything very difficult left to do. Just a few final steps:-
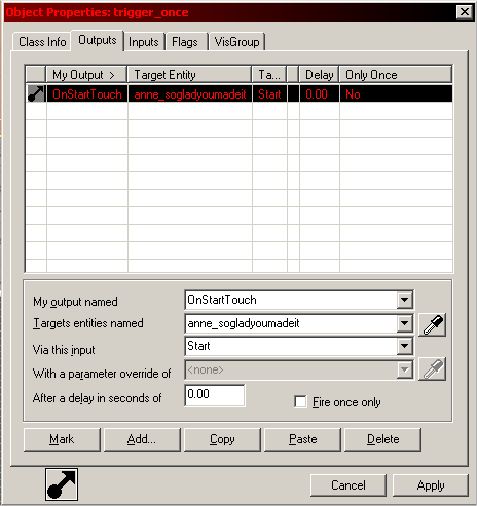
1. Make a brush trigger entity across the centre of the room dividing the player start point and Anne. For this tutorial, make it a trigger_once and leave all the settings at default. A basic square room with an entity and a trigger
2. Go to the properties of your new trigger_once and add the following entry to the Outputs tab.
A basic square room with an entity and a trigger
2. Go to the properties of your new trigger_once and add the following entry to the Outputs tab.
 Some properties of the trigger
3. Now go to the properties of your NPC and add the following trigger to its Outputs tab.
Some properties of the trigger
3. Now go to the properties of your NPC and add the following trigger to its Outputs tab.
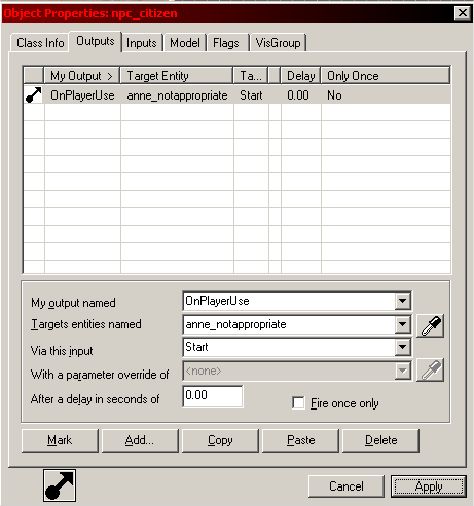 More properties of the trigger
Now, save your map. You've done it! If you did everything correctly, you can compile your map and play it, and when you walk through the trigger in the middle of the room, Anne will tell you how glad she is that you made it. Awww. However, if you go and "use" her, she'll tell you off!
More properties of the trigger
Now, save your map. You've done it! If you did everything correctly, you can compile your map and play it, and when you walk through the trigger in the middle of the room, Anne will tell you how glad she is that you made it. Awww. However, if you go and "use" her, she'll tell you off!
So, I've shown you how to make some scene files, and get them to play in a map. Very basic, but with what you've learned already you can make things which seem much more complex. You can trigger the scenes you make with almost anything in your map if you just use the outputs tab to trigger your scene entities - just like we did earlier with the trigger across the middle of the room, and the NPC Anne herself. But you can use anything! Experiment...the possibilities even with this limited method are pretty wide ranging if you're clever with the I/O system.
For long speeches I have scenes trigger each other (using OnCompletion on the Outputs tab) so when one finishes it causes another to start - you can effectively link together many scenes into one long dialogue with this.
Remember, if you distribute maps with custom voice acting, you must include all the WAV and VCD files with the map, and they have to remain in the correct directories.
This tutorial is by no means comprehensive. This is just the way I have learned to do it, and there are probably better ways of doing it. I wouldn't have dreamt of showing people my method had I not received numerous emails asking me how I got the voice acting parts of my maps to work.
In this tutorial I will create a character called Anne. I recommend that you do the same if you are following this for the first time, and not try and substitute your own names just yet.
This tutorial will assume that you know how to do the following:
- Make a playable single-player HL2 map with Hammer
- Record speech using a microphone
Your sound files can say whatever you like really, but I recommend for this tutorial that you have sound files which say the following two sentences:
- "I'm so glad you made it!"
- "Gordon, that's not appropriate!"
A female voice would be helpful too, for cosmetic purposes, but is by no means essential.
Now, if like me you are recording your samples using an average PC microphone, they are likely to be much too quiet and filled with background hiss.
If you own a recording studio, you can skip this bit.
So you need to edit your samples. Personally I use SoundForge to both record and edit, but that costs money. Luckily there is a reasonably good freeware alternative called Audacity which I mentioned earlier - Google it. You'll have to learn how to use Audacity yourself, but it's not that difficult.
- Take your recorded samples and cut them so that there is about half a second of silence at the beginning and end.
- Boost the volume of the sample as much as you can before it starts to become distorted.
- Filter out the noise from the sample. In Audacity, it asks you to point out an area of just pure hiss in the file, so that it knows better what to filter out. Specify the area either at the beginning or the end of the sample to do this.Getting the noise filter settings right can be tricky. Experiment, and don't be afraid to do it in two, or even three less aggressive passes.
- Make the very beginning of the sample fade in from zero volume, and the very end of the sample fade back out to zero volume. This will make even a slightly hissy sample sound OK ingame, as it will not suddenly "click in".
So, this is what you should have by now:
- A basic map with an NPC in it. Make sure you name the NPC entity. Allow me to introduce you to Anne - she uses the Female01 model.
Our Lovable Character Anne.- Two WAV files, preferably with a voice speaking the lines specified at the start of the tutorial.
I like to prefix them with the name of the character they are for, and have the names as a reminder of the words being spoken. So, rename your files as shown below:
Anne's Life in two filesFacePoser
The Faceposer is an amazing piece of software, but it's pretty daunting at first. There are several parts to it.
Take a deep breath, and load the Faceposer from the SourceSDK menu.
When it's finished loading, look for the tabs at the bottom-right of the screen:
Lots of tabsIn this case Anne is using the Female_01 model, so that's the model we will select here. Click on the tab labelled Female_01.
To create a whole character as quickly as possible you should do some groundwork before you really start. You don't necessarily need to do this next bit, but I strongly recommend it. It's what I do before I begin putting a character together.
Making a Template Scene
If you're making a character of any depth, then he or she will have more than one "scene" to play out. You're going to save quite a bit of time if you make a basic template scene now, from which you can create all the others. It saves you repeating the early scene creation process over and over again.
1. Select "New" from the "Choreography" menu at the top of the screen.
A new lease on life3. You will then be prompted for your characters name.
Who ya gunna call? Anne, of course!5. Your screen will now have this in the area below the 3D model:
Empty templateAdding a new channelNot very creative- Facing
- Looking At
- Move To
- Gestures
Not-so-empty templateSaving...Now it's time to actually lip sync your sound files.
Here's a reminder of the sound files you should have again.
Nothing's changed...Select the Phoneme Editor from the tabs on the bottom left of the screen:-
Phenome....whatever that means.Bland window.Click on Load at the bottom, and select your first sound file. In this case select anne_sogladyoumadeit.wav
The image of the soundwave should then appear on the blank canvas of the Phoneme Editor.
Click on the Re-extract button at the bottom. You will then be prompted to enter the text of the sentence being spoken. Do so:-
I'm so glad you made it!Your PC may whirr away for a second or two after you've hit OK.
Your sample will now resemble the below picture. The window won't look exactly the same as this, but you'll definitely get the idea. Notice the text pointed out by the arrow.
Like magic!Green - As good as it gets. You probably won't have to alter this extraction manually at all.
Yellow - Not too bad. You might have to manually edit the extraction, or you might not. Either way, it's going to work at least to some degree.
Red - Bad. It didn't work at all, and unfortunately you're probably going to have to start over unless you can fix what the editor doesn't like about your sound file. Usually I have found this only happens if there is something wrong with the format of the WAV file, or if it is too short (I've had problems with samples under 2 seconds long). Occasionally, loud noises or pops in the sample can cause this too.
I'll assume you got yellow or green.
Right click the mouse on the image of the soundwave itself, and select the option Commit Extraction
To have read this far, you must be very committed!Now click the Play button on the Phoneme Editor window. If you have followed the steps correctly, the 3D model will speak your sentence with full lip sync! If you got green text on the extraction above, it will probably look perfect already. Even if you get yellow, it usually turns out pretty good - all on its own. (If the 3D model seems unresponsive and does not speak even though the sound does, try clicking on the 3D view and then playing the sound file again)
If there are mistakes in the sync, and they do happen, then you can manually edit the extraction to make it look better. However this is fiddly and would warrant a tutorial of its own. So I won't cover that here --- this example will still work even if the lip sync is not perfect. And I'm still very poor at manually editing it myself - when I've had to do it my results are way worse than when the automatic system achieves a green text report - it's really a hard process.
So, let's move on with what we have.
Click the Save button on the Phoneme editor window. It is very important that you do this.
Now repeat the whole process with the second sound file - anne_notappropriate.wav. Load it into the Phoneme editor, extract it, enter the sentence and commit the extraction. Click Save at the end (remember - very important).
Building the Scene Files
Now we're actually going to put together the scene file. I like to give the scenes the same names as the main sound file in them. I'd imagine this is harder to do for complex, multi- character scenes, but here it works just fine.
You should still have your anne_template file open in the main Face Poser Window. If not, load it up now from the Choreography menu at the top.
Then, from the Choreography menu, select Save As:
Another save dialogRight click your mouse in the WAV channel you created (you have to actually click inside the right channel) as shown in the picture:-
Amazing.You will see the following window appear. You only need to fill in the Name and Sound fields. The name can be anything (it helps if it's relevant though) - but get the filename of the sound file right - and make sure you put .WAV on the end.
I really have no clue what it does Your sound file will now appear on your scene "timeline".
Now it's starting to take form!The red text that says <can't find entry> is referring to a subtitles file, which you would use if you wanted the speech to automatically be subtitled on screen. I've never done it, so I can't show you how to do that.
Now, we're going to add things to the other channels just like we added the sound file to the WAV channel.
Right click in the Facing Channel (actually in the timeline itself, under where your sound file is in the wav channel)
Select Face Actor from the long menu, and you'll see this:-
Face the player at all timesClick OK and a new item will exist on your timeline.
And there it is!This bit is the same as for the last bit. Enter !player in the Look at Actor field, and give it a name. Then click OK. Another entry on the timeline.
You don't really need to be doing these bits in other channels if you only want your character to speak in-game and nothing else. However you can set up these channels however you like, using the method you've just been using. Right click in a channel and select the appropriate thing you want to put in that channel. Each type of event is different, but they are all similar in a way. Just remember to always refer to the player as !player . I guess it's ok to mix up different types of event in the same channel - but personally I'd imagine it's a bad idea really.
When you have events in your channels, you can use the mouse to stretch them or shrink them, and drag them along the timeline.
If you want to use some gestures, they can be worked out by using the SourceSDK model viewer to load up the model you are using, and finding out the names of the gestures that model can do (look in the Sequence tab in the model viewer).
This is shown below:
Playing chess with l's instead of t'sCustom Facial expressions are a pain in the backside, I haven't got a good grasp of those myself yet, so they aren't covered here. Thankfully, the engine delivers pretty good expressions on its own anyway.
Experiment, and you'll end up maybe with something resembling this:-
The complete thingClick on Save in the Choreography menu.
Save.....again!Now you need to make the second scene.
- Load your template scene back up
- Save it as a new scene file. (anne_notappropriate.vcd)
- Add your second sound file (anne_notappropriate.wav) to the WAV channel, and anything else you like in the other channels. Move them and stretch them to make your scene.
- Save it.
Putting it together in Hammer
This bit is really easy compared to what you've just been through.
Load up the map you're going to use. For this tutorial, I've just made a basic square room.
A basic square roomA basic square room with an entityProperties of the entityName - The name for the entity which you will use to trigger the scene to start. This can be anything, but once again it helps if you use the same name as the sound and scene files which are going to be used. So the name of this entity is anne_sogladyoumadeit, as shown above.
Scene file - The scene file you made earlier. Again this will be anne_sogladyoumadeit.vcd. Hammer is nice and friendly on this parameter and allows you just to browse for the file - it even opens in the correct directory. How nice!
Target 1 - The name of the NPC which is going to be acting. This MUST be the same as the name of the NPC entity in Hammer and also the actor which you set up in the scene files. All three must match, or nothing will work at all. So for this tutorial, enter anne into this field.
If you make a scene file with more than one actor, you put the other actors names in the other target parameter boxes. But we don't need to do that here. We can ignore the bottom two options for now also. Close the window.
Now make a second logic_choreographed_scene entity. Set that one up the same way, except use the anne_notappropriate sound and scene files instead.
There really isn't anything very difficult left to do. Just a few final steps:-
1. Make a brush trigger entity across the centre of the room dividing the player start point and Anne. For this tutorial, make it a trigger_once and leave all the settings at default.
A basic square room with an entity and a triggerSome properties of the triggerMore properties of the triggerSo, I've shown you how to make some scene files, and get them to play in a map. Very basic, but with what you've learned already you can make things which seem much more complex. You can trigger the scenes you make with almost anything in your map if you just use the outputs tab to trigger your scene entities - just like we did earlier with the trigger across the middle of the room, and the NPC Anne herself. But you can use anything! Experiment...the possibilities even with this limited method are pretty wide ranging if you're clever with the I/O system.
For long speeches I have scenes trigger each other (using OnCompletion on the Outputs tab) so when one finishes it causes another to start - you can effectively link together many scenes into one long dialogue with this.
Remember, if you distribute maps with custom voice acting, you must include all the WAV and VCD files with the map, and they have to remain in the correct directories.
- Categories
- Audio
- Tutorials
- Intermediate Tutorials
- Source Tutorials
- Article Credits
-
 Playbus
–
Original author
Playbus
–
Original author
4 Comments
You must log in to post a comment. You can login or register a new account.
I don't hang around here anymore for various reasons, but I've progressed a lot on this subject so if anyone has any questions they are free to ask me.
I probably wont' reply to messages sent on this site, but if you've downloaded any of my work - then you have my email address.
If you are doing it from the beginning , you need to download the MICROSOFT SPEECH SDK
Honestly , I want around a few tutorials before I learned you needed it