Tutorial: Creating caves using Displacements Last edited 3 months ago2024-09-17 17:21:14 UTC
Introduction
In this tutorial I will be explaining one of the simplest methods to create decent looking caves using Displacements in Source and what we can add to make it look "realistic". If you're new to displacements I recommend reading a beginner tutorial on them first before trying this intermediate level tutorial.There are three steps, I suggest clicking Save during and after every step. Most people don't save often, but it can save you hours of work.
Step 1: Structuring our Caves
First off, we will need to open Source SDK's Hammer Editor preferably on an empty grid for now. I strongly suggest you don't put this straight into a map yet because this method is treated by the Source engine the same way the 'outdoor' areas are treated, like a huge open space. Although it does depend on what type of cave you're going for.Then, using the Nodraw texture we need to create a brush. I will be making mine with 32 unit width brushes just to keep it simple. Using the brush you have created you will need to create a box. When making this box you need to make sure that all the edges connect, so later Subdivision will take place correctly. Subdivide is a displacement related tool that 'rounds off' all the selected displacements.
Then, apply which ever texture you wish to the face that will made into displacements. I'm using
nature/blendrockdirt_tunnel03a from Episode Two materials pack.
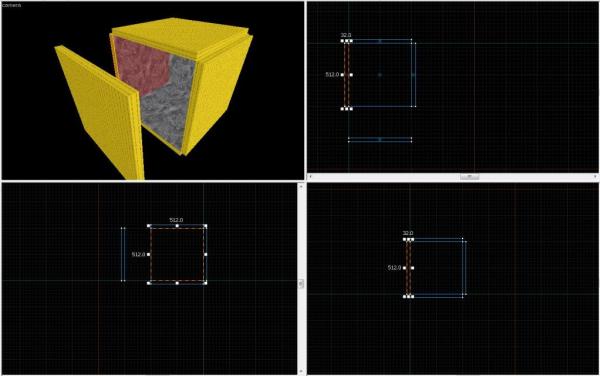 As you can see, all the edges are connected.
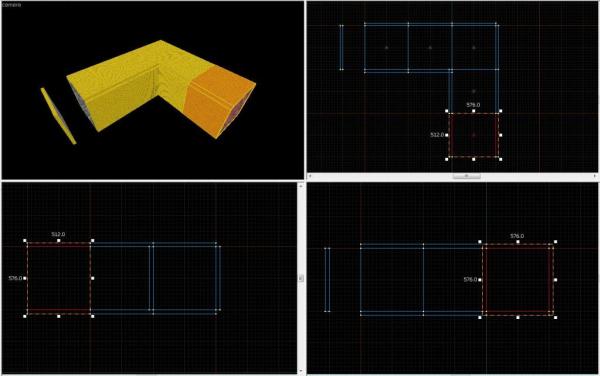 Simple 'tunnel' design.
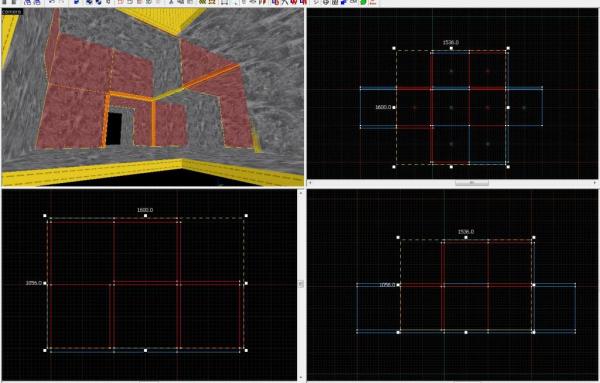 More complicated design using the same priciple.
Step 2: Creating the Displacements
Now we need to select all and only the faces that will become the displacements, the ones we have applied our cave texture to. Then, go to the displacements tab and pick create (to the power of 3 if you made your brushes on the 32 units scale. Larger brushes will the power of 4 and vice vesa).If you have connected all of your edges correctly in the structure step and then click Subdivide it should round it all off for you, making the next job so much easier! I will say though, if you have a huge cave when clicking Subdivide it can cause your Hammer to stop functioning for about 30 seconds...then unfreezes.
At this point we want our almost tube-like cave to be more cavern like, so we must open the Paint Geometry on our Edit Face Sheet. When editing our displacements we need to make sure at all times we have ALL the cave displacements selected! Even when displacing the walls you must have the floor and ceilling displacements selected - This stops gaps between the displacements being created. NOTE: If your displacements start so leave 'gaps' you can always click Sew to snap them all back together.
To paint our geometry effectively we must make sure we leave nothing that looks blocky or pointy. To start this off, change the Axis (in the displacement window drop down box) to the 'Z-Axis' (the Z axis is the vertical axis). Now set the Spatial Radius to roughly 350.0 and just click the floor displacements in random places to give it a 'bumpy' look, but leave it even enough to walk along.
Now we will move onto the Y-Axis, which is 1 of the horizontal axis', or forward and backwards. This axis will be used for our walls, but only 2 of the 4 walls because the top and bottom walls on judging from the "top (x/y)" view. For this, clicking left mouse button will push the displacement forward and the right mouse button will counter that and pull it backwards. To create these 2 walls correctly I find that it looks best if the bottom and top of the displacement walls are protruding inwards, leaving the middle outwards and keeping that rounded effect, but adding 'noise'.
Now for the last axis which is the the X-Axis. This should be easy for it is the other 2 walls, or left to right. Using the same technique as the Y-Axis you should mould your displacement alike.
When you're happy with the shape of your cave, you can tweak it by lowering the Radius and evening out those pesky points.
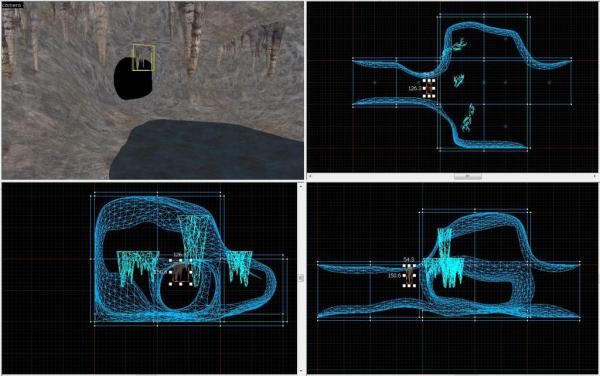
 My displacements... displaced evenly, but cave-like.
Step 3: Caving-up the Caves
After you're all done and happy with your disfigured cavern you might be thinking "it all looks the same", so click on Paint Alpha and start giving it a paint job. Using a low Value such as 25.0 and a high Brush such as 5 makes it easier and even looks better too.After, you might wish to add some Props for example, the Stalactites which props can be found in Episode Two's model collection; that come under the name of props_miningstactile_static## [## being 01, 02, 03, 04]. These props are static so should be set to prop_static entities.
Adding water to the cave will also improve it's looks. Just make sure that the edges of the water can not be seen. When you have placed the water check it with the Camera view thoroughly.
In the end you should have something along the lines of:
 Making sure you can't see the Nodraw faces on the props and water!
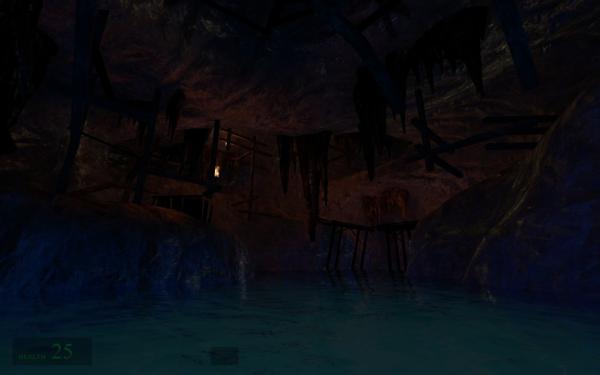 My final product. 1 Hour work, but worth every minute.
Conclusion
Thank you for reading. Hope this tutorial covers everything for you, the rest is 'trial and error' and your own mapping experience, so keep at it!- Categories
- Tutorials
- Intermediate Tutorials
- Source Tutorials
- Mapping
- Article Credits
-
 Moaby
–
Original author
Moaby
–
Original author
8 Comments
You must log in to post a comment. You can login or register a new account.
Great tut, but how did you learn how to do this?
Using this new knowledge, I might be able to make good looking displacements now.
Thanks to you for share this, is incredible!!