Tutorial: Grunts and Guns Last edited 21 years ago2003-03-22 05:00:00 UTC
You are viewing an older revision of this wiki page. The current revision may be more detailed and up-to-date.
Click here to see the current revision of this page.
Download attachment
Remember that rocket launcher in On a Rail? Yeah, you know, the one that was at the end of the tunnel. You had to kill the grunt to get it to stop firing.First thing you need to do is to read Atom's tutorial on Tankrockets. Build a turret using the tutorial and place it in your map. In this example I have used the func_tank entity because you can set the Bullets to None and this saves you having to go into God Mode to test it.The turret I have used was built from scratch (Using Vertex Manipulation) as I had a particular field gun theme in mind, but you don't have to limit yourself to the func_tank. This tutorial will work with the func_tanklaser, tankmortar or rocket.
Place your func_tank in the map and give it a name. I have used Gun1. The only other thing you have to do is set Active on in its flag properties. Don't set the Controllable flag. I will talk about that later.
Place a monster_grunt behind it and set the grunt properties:
Trigger Target: Gun1 (the name of the func_tank)
Trigger Condition: Death (the reason I haven't set it to 50% is that I had trouble with the tank stopping if the grunt was killed outright on the first shot - sometimes the gun would continue to function). In the grunt's Flag properties check Prisoner as this will stop the grunt from leaving the gun and attacking. you can also check Gag if you want the grunt to stay silent.
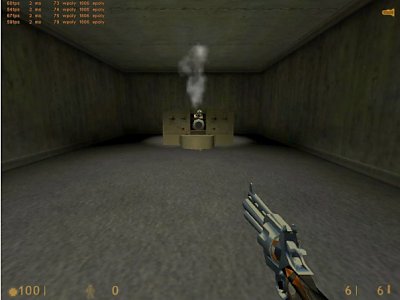
Ok, run the map and you should have a functioning gun with a grunt behind it. Shoot the grunt, the gun stops!
If the gun doesn't stop when you kill the grunt, then go over the settings again. If it still doesn't work you can add a trigger_relay and get the grunt to Trigger Target the relay's name, and the relay to target the func_tank, with the Trigger State set to Off. Either way you now have a gun that will target the player.
But now...
What if you want to kill the grunt and then let the player use the gun?Taking what you have achieved above, copy your tank.
Give it a name of Gun2.
Change the Render Mode attribute to Texture.
Leave the FX Amount set at 0. Set the Controllable flag on, and make sure Active is not checked.
Place gun 2 in the exact same place as gun 1, so that they look like one in all views.
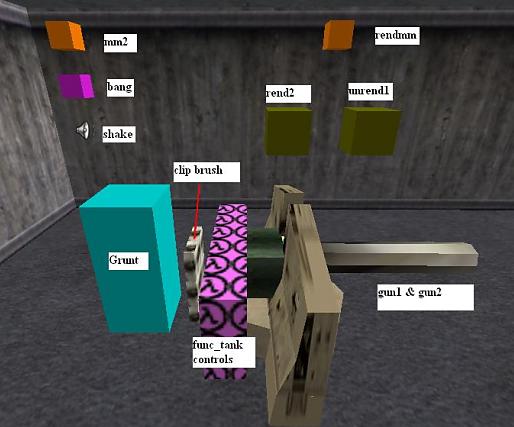
Create a brush and tie it to a func_tankcontrols entity, Set the Tank Entity Name to Gun2 and place the brush so Gun2 will be controllable. Check out the example: The func_tankcontrols is placed at the player end of the gun, but to make it useable a clip brush is added so the player won't get caught on the gun. Also in the initial trial the corpse of the grunt got in the way; Check Fade Corpse in the grunt's properties to fix this.
Note that placing objects on top of each other can create problems if you want to make changes, because it's hard to select the individual guns. A tip is to go to Map -> Entity Report and select the properties of the func_tank you want to modify. The tank will then be highlighted.
Add two env_render entities to your map. For ease of use I put them above and to the right of the gun.
The first env_render:
Name it unrend1.
Target is Gun1.
Set the Render Mode to Texture.
The second env_render:
Name it rend2.
Target is Gun2.
Leave the rest of the settings at their defaults.
Add a multi_manager to your map.
Name it rendermm. With Smart Edit off, add the following keys and values:
unrend1 0.2
rend2 0.2
gun1 0
You will see with Smart Edit off that the Name you gave the multimanager will already be there as targetname rendermm (Smart Edit properties correspond to non-Smart Edit properties).
Click on your grunt, and change his Trigger Target property to rendermm.
So what's happening?
The gun will commence firing when it has the player in range. Shooting the grunt triggers rendermm which instantly switches off Gun1, then triggers unrend1 and rend2. Unrend1 makes Gun1 disappear. Rend2 makes Gun2 appear and Gun2 is flagged as Controllable. The player can now use the gun!Just a few things added to this map to make it more realistic: I have added another multimanager, an env_shake and an ambient_generic because the func_tank is set to No Bullets. There is no need to add the ambient_generic if you set the gun to fire something (the func_tank is the only entity that can be set not to fire anything) as it is already included as part of the entity.multi_manager:
Name set to mm2.
Smart edit off and keys and values added for bang, 0 and shake, 0.
env_shake:
Name set to shake.
ambient_generic:
Name set to bang. WAV File Name set to weapons/explode3.wav.
To get this part of it to work, you need to set Gun1 and Gun2 to Target mm2. That way mm2 will turn the sound and shake on for Gun1 when it fires, and turn it on again when Gun2 is fired by the player.
Thanks to SlayerA, The Handy Vandal and Ramon Talavera for information used in this tutorial.
8 Comments
You must log in to post a comment. You can login or register a new account.


But what really bothers me about this process is that you can literally walk right up beside the grunt and begin firing your own invisible gun, all while the grunt is still in control of its own func_tank. I haven't found a way around this, since func_tankcontrols apparently cannot be targeted (they have no name field), and thus cannot be switched on and off with a relay.
I rate it four stars because the method is sound, but it's a bit messy for my tastes, and it leaves something to be desired.
I have only tested this in Sven-Coop and Opposing Force.