Tutorial: Setting up a Mod: Part 3 - Game Strings Last edited 3 months ago2024-09-01 21:04:50 UTC
Before you do anything:
This tutorial continues on where part 2 ended. So we assume you've got some sort of mod folder. You can use your
$INSTALL_DIR\valve folder too but I recommend caution if you do so.
How to modify game strings
What's a string?A string is a line of text mostly. In the HL menus they are "Start a new game" or "Load a new game" and so on. In other words the descriptions of the buttons.
How do I modify them?
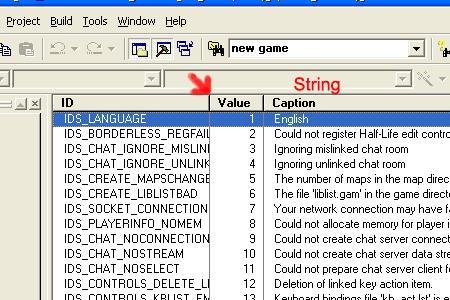
First we need to find out what the strings are. It's all in file package 1 available in the download
custmod_03.zip. Within that directory is a file called HL_Res.RC. I recommend using a program that handles Resource template files for this. However text editors such as Notepad are capable of opening them but it will be a bit harder to acquire values then. Opening the HL_Res.RC (Using a program capable of resource templates) will look like this:
 HL_Res.RC
If you have a resource template capable program
First of all: Ignore the ID.To find the line you wish to modify: You need to know what the line is. Then select find from the edit menu and write in that particular line.
Next create a file called
strings.lst inside your mod's gfx/shell directory. Open it using a text editor. Now find the line you wish to edit. Look at it's value. Then write it's value first and then within " your text " write your text.Example: 189 "Charge up Steinin's incomplete mod".
Start the mod and see if it has changed.
You don't have a resource template capable program?
If you don't have a resource template capable program you can use text editors. First open up theHL_Res.RC. Now the ID suddenly becomes important. Note that no values are written if you view in text editors. The values are stored in an external file called resource.h. That's a file generated by MS developer studio. Open up resource.h too. Find the line in HL_Res.RC as described above. Copy the ID ("Ctrl + C") from the HL_Res.RC, you can recognize an ID by the IDS_ . Go to resource.c. Choose find from edit and paste in the line ("Ctrl + V"). Then note the number next to the ID. That number is the value written in the resource template. Write it down in the strings.lst as described above.
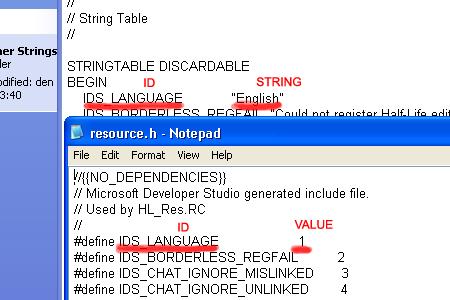 resource.h
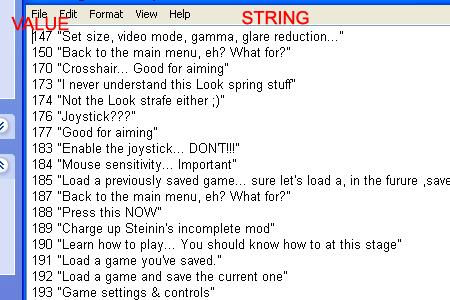 This is how your strings.lst should look
Making a console background and a loading screen.
I have described this earlier in a topic on the forums. However, that only created the same picture for the Conback and the loading screen. Now we want separate pictures. For this purpose, Master of Puppets and I have set up things to be as easy for you as possible.You will need to open file package 2 found in the download
custmod_3.zip.Find a picture for the console background and one for the loading screen. Make sure they meet the following criteria:
The pictures must be:
- 320 x 200 pixels
- 256 colors or 8 bit
- BMP format
- The console background to
console.bmp - The Loading screen to
Loading.bmp
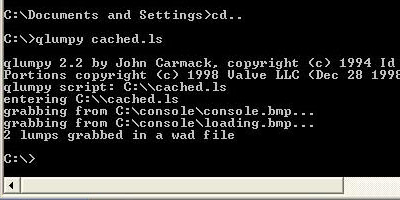
C:\console. Copy qlumpy and cached.ls from the file package 2 into C:\Run command prompt and type the following:
C:\qlumpy cached.ls.You should get a new file called
cached.WAD in C:\, copy it your mod's folder.Run your mod with console and see if the console background has changed. If successful, run HL again, this time without console. Start a new game. Has the Loading screen changed? It should have.
 qlumpy and cached.ls
- Categories
- Tutorials
- Advanced Tutorials
- Goldsource Tutorials
- Article Credits
-
 Steinin
–
Original author
Steinin
–
Original author
1 Comment
You must log in to post a comment. You can login or register a new account.
And Will Cause HL To Crash, Use qlumpy.exe **WARNING**