Tutorial: Source Modelling Setup Last edited 2 months ago2024-09-20 11:07:35 UTC
This tutorial will take you step-by-step through setting up your computer to generate and compile models for use in HL2 maps. This is not a modelling tutorial - you won't learn how to create the model itself here. However, you will find out the things you must know to get a model into Hammer for HL2 mapping.
Getting Started
The first thing you need is the Source SDK. SDK stands for 'software development kit,' by the way.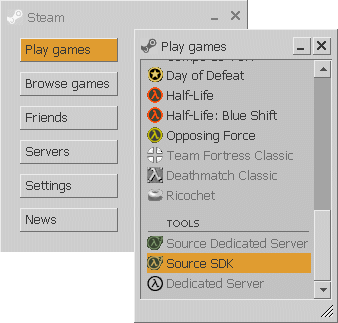 Steam Games list
Once the SDK has been installed, you should have a desktop icon to launch the Source SDK programs, similar to your Steam launch icon. When you double-click the icon, a menu with several programs will pop up.
Steam Games list
Once the SDK has been installed, you should have a desktop icon to launch the Source SDK programs, similar to your Steam launch icon. When you double-click the icon, a menu with several programs will pop up.
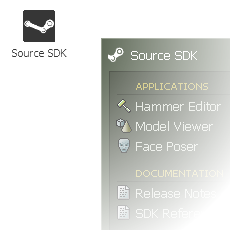 SDK Launcher
You're going to need a modelling program that will export SMD (Source Model Description) files, at least reference SMDs. Preferably it will export reference, skeletal and physics box SMDs.
SDK Launcher
You're going to need a modelling program that will export SMD (Source Model Description) files, at least reference SMDs. Preferably it will export reference, skeletal and physics box SMDs.
There are several available good modellers available for free (XSI EXP v4.2, Blender) and several other shareware and you-must-buy-it programs (3ds, Milkshape). Blender is good for basic modeling program. XSI is a very complete modeler and model animator. Milkshape appears similar to XSI. I've never used 3Ds. I think all the programs mentioned require some sort of addon to export (or import) SMD files.
Blender is available for download from blender.org. You'll need the SMD export addon which you can get from here. Copy the .py file and put it in the folder C:\Blender Foundation\Blender\.blenderscripts which should have been created when you installed Blender. More information about Blender and HL2 modeling can be found at the Valve wiki.
XSI EXP v4.2 is a very complete program available at softimage.com. If you interested in XSI:
Texturing
You'll need a basic graphics program for making textures. A okay editor aimed at gaming textures is Wally. You can download it . GIMPshop is another good freeware image editor. You can also use Adobe Photoshop or other image editor.
Setup the VPROJECT environment variable
To make life very simple when compiling textures or models, the Source SDK software checks for an environment variable to place compiled files in the directory system. If you don't know what an environment variable is, it's ok. Just follow the instructions.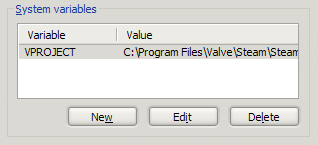 System Variables dialog
Setup a folder system for HL2 Modeling
System Variables dialog
Setup a folder system for HL2 Modeling
I'm going to define a term called [steam-logon] to simply this section. [steam-logon] is the directory path to your Steam logon folder. It should be something like "C:\Program Files\Valve\Steam\SteamApps\[your steam logon name]".
If you're not sure about it, open up Windows Explorer and look in the SteamApps folder in the path above. You should see a folder named with your steam logon. That's the folder I'm going to call [steam-logon].
Get into Windows Explorer and navigate to [steam-logon]. Notice that there's a half-life 2 folder, a sourcesdk folder and a sourcesdk_content folder. You'll be using those extensively while modeling for HL2.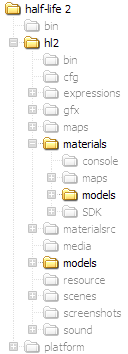 Game directory tree
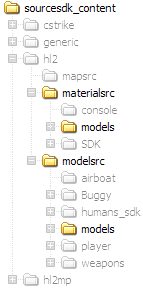 SDK directory tree
Create folders or check they exist:
SDK directory tree
Create folders or check they exist:
You don't need to create the individual model folders yet. But, for every new model with the name [model-name] you fashion, you should:
If you've setup folders as recommended above, you can compile the texture for use by Source engine as follows: Compiling textures
For example, if you're creating a model named "mycrate" and you're texturing it with "crate_tex.tga," your vmt file will look like this:
Compiling
You need to create three SMD-type files:
Once you have created the model and textured it in your modeling program, save or export the SMD files. Your modeling program should support saving or exporting all three types of files if you want to create animated models.
The SMD files should be exported to or placed in the folder: [steam-logon]\sourcesdk_content\hl2\modelsrc\models\[model_name].
You must use a Source-compatible Targa (TGA) file to texture your model. The texture name is saved in the SMD file and that texture must be compiled as described above before the model can be used successfully.
Before you can compile your model, you have to create a .qc file to tell the compiler what parameters to use in the model. Using a text editor, create a file with contents similar to the following:
To compile your model for use with the Source engine:
Using your Model
Open up Hammer and create a room for your model. Be sure to include a info_player_start and a light.
Put a new prop_static entity somewhere in the room. In the entity's property box, go to World model in the Class Info tab and browse to your new model's folder. Double-click the folder and double-click on the icon for your model. Back in the property box, click apply.
You should actually be able to see your new model in the 3D textured window of Hammer. Compile your room, run it and admire your new model.
Getting Started
The first thing you need is the Source SDK. SDK stands for 'software development kit,' by the way.
- Start Steam
- Press the Play Games button
- Scroll down to the Tools section and press the Source SDK button
- Follow instructions and don't do anything while the files are downloading and installing.
Steam Games listSDK LauncherThere are several available good modellers available for free (XSI EXP v4.2, Blender) and several other shareware and you-must-buy-it programs (3ds, Milkshape). Blender is good for basic modeling program. XSI is a very complete modeler and model animator. Milkshape appears similar to XSI. I've never used 3Ds. I think all the programs mentioned require some sort of addon to export (or import) SMD files.
Blender is available for download from blender.org. You'll need the SMD export addon which you can get from here. Copy the .py file and put it in the folder C:\Blender Foundation\Blender\.blenderscripts which should have been created when you installed Blender. More information about Blender and HL2 modeling can be found at the Valve wiki.
XSI EXP v4.2 is a very complete program available at softimage.com. If you interested in XSI:
- Download XSI EXP v4.2 from here or download from the official page if you don't mind the hassle of Fileplanet or Fileshack.
- Install XSI and run it. Before you do anything in XSI, click on File/Save in the menu to start the online registration window. Get your activation key form softimage (via email I believe). You have to register, but it's free and it's an excellent program.
- Activate XSI with your activation key.
- Download and install the ValveSource addon from the softimage downloads page mentioned above.
- Download and install the XSI documentation from the softimage downloads page mentioned above.
Texturing
You'll need a basic graphics program for making textures. A okay editor aimed at gaming textures is Wally. You can download it . GIMPshop is another good freeware image editor. You can also use Adobe Photoshop or other image editor.
Setup the VPROJECT environment variable
To make life very simple when compiling textures or models, the Source SDK software checks for an environment variable to place compiled files in the directory system. If you don't know what an environment variable is, it's ok. Just follow the instructions.
- Locate the "My Computer" icon on your computer.
- Right-click on the icon and select "Properties" from the menu.
- In the properties dialog, click the Advanced tab and press the Environment Variables button
- Under the System Variables table, click New
- Enter the Variable Name: VPROJECT
- Enter the Value: C:\Program Files\Valve\Steam\SteamApps\[your steam logon]\half-life\hl2
- Press OK buttons until you're back to your desktop
System Variables dialogI'm going to define a term called [steam-logon] to simply this section. [steam-logon] is the directory path to your Steam logon folder. It should be something like "C:\Program Files\Valve\Steam\SteamApps\[your steam logon name]".
If you're not sure about it, open up Windows Explorer and look in the SteamApps folder in the path above. You should see a folder named with your steam logon. That's the folder I'm going to call [steam-logon].
Get into Windows Explorer and navigate to [steam-logon]. Notice that there's a half-life 2 folder, a sourcesdk folder and a sourcesdk_content folder. You'll be using those extensively while modeling for HL2.
Game directory treeSDK directory tree- [steam-logon]\half-life 2\hl2\models
- [steam-logon]\half-life 2\hl2\materials\models
- [steam-logon]\sourcesdk_content\hl2\modelsrc\models
- [steam-logon]\sourcesdk_content\hl2\materialsrc\models
You don't need to create the individual model folders yet. But, for every new model with the name [model-name] you fashion, you should:
- Create a new folder: [steam-logon]\sourcesdk_content\hl2\modelsrc\models\[model-name]
- Create a new folder: [steam-logon]\sourcesdk_content\hl2\materialsrc\models\[model-name]
- Create a new folder: [steam-logon]\half-life 2\hl2\models\[model-name]
- Create a new folder: [steam-logon]\half-life 2\hl2\materials\models\[model-name]
- Textures must be a power-of-2 number of pixels on each side. That is, each side of the texture must be 2, 4, 8, 16, 32, 64, 128, 256, 512 or 1024 pixels (actually, it can be greater than 1024 pixels but now you're talkin' big texture).
- The sides of the texture do not have to be the same length. You can have 256x256 or 16x512 sized textures.
- The texture you create, ready for compiling, must be in Targa format (.tga).
If you've setup folders as recommended above, you can compile the texture for use by Source engine as follows:
- Open up Windows Explorer to the texture folder: [steam-logon]\sourcesdk_content\hl2\materialsrc\models\[model-name]
- Open up another Windows Explorer to the SDK programs folder: [steam-logon]\sourcesdk\bin
- Click and drag the texture file [new texture].tga from the texture folder and drop it onto the program vtex.exe in the bin folder.
Compiling textures- A DOS window should open up, give you some information on your texture file and give you a "Hit Key to Continue" prompt.
- For a successful texture compile, that information should not contain any "could not find.." or "could not open.." errors.
- If successful, you should have a [new texture].vtf file in the folder: [steam-logon]\half-life 2\hl2\materials\models\[model-name].
- There will also be a [new texture].txt file in the materialsrc folder. It can be ignored. It's used for more advanced texturing.
"VertexLitGeneric"
 {
    "$baseTexture" "models/[model-name]/[new texture]"
    "$model" 1
}For example, if you're creating a model named "mycrate" and you're texturing it with "crate_tex.tga," your vmt file will look like this:
"VertexLitGeneric"
{
    "$baseTexture" "models/mycrate/crate_tex"
    "$model" 1
}Compiling
You need to create three SMD-type files:
- A model reference file (e.g. [model_name]_ref.smd)
- A skeletal animation file (e.g. [model_name]_idle.smd)
- A collision box descriptor (e.g. [model_name]_physbox.smd)
Once you have created the model and textured it in your modeling program, save or export the SMD files. Your modeling program should support saving or exporting all three types of files if you want to create animated models.
The SMD files should be exported to or placed in the folder: [steam-logon]\sourcesdk_content\hl2\modelsrc\models\[model_name].
You must use a Source-compatible Targa (TGA) file to texture your model. The texture name is saved in the SMD file and that texture must be compiled as described above before the model can be used successfully.
Before you can compile your model, you have to create a .qc file to tell the compiler what parameters to use in the model. Using a text editor, create a file with contents similar to the following:
$modelname sec_cam/sec_cam.mdl
$cdmaterials models/sec_cam
$staticprop
$scale 1.0
$body studio "sec_cam_ref.smd"
$sequence idle "sec_cam_idle.smd" fps 1
$collisionmodel "sec_cam_phys.smd" {
    $Mass 20
}To compile your model for use with the Source engine:
- Open Windows Explorer to the model folder: [steam-logon]\sourcesdk_content\hl2\modelsrc\models\[model-name]
- Open another copy of Windows Explorer to the SDK programs folder: [steam-logon]\sourcesdk\bin
- Click and drag the [model-name].qc file from the model folder and drop it onto the program studiomdl.exe in the bin folder.
- A DOS window should open up, give you some information on your model file and close.
- If successful, you should have a [model-name].mdl file (and a bunch of others) in the folder: [steam-logon]\half-life 2hl2models[model-name].
- Launch the model viewer (HLMV.exe) and take a look at your model.
$modelname sec_cam/sec_cam.mdl
$cdmaterials models/sec_cam
$staticprop
$scale 1.0
$body studio "sec_cam_ref.smd"
$sequence idle "sec_cam_ref.smd" fps 1
$collisionmodel "sec_cam_ref.smd" {
    $Mass 20
}Using your Model
Open up Hammer and create a room for your model. Be sure to include a info_player_start and a light.
Put a new prop_static entity somewhere in the room. In the entity's property box, go to World model in the Class Info tab and browse to your new model's folder. Double-click the folder and double-click on the icon for your model. Back in the property box, click apply.
You should actually be able to see your new model in the 3D textured window of Hammer. Compile your room, run it and admire your new model.
- Categories
- Tutorials
- Intermediate Tutorials
- Modelling
- Source Tutorials
- Article Credits
-
 BJ
–
Original author
BJ
–
Original author
2 Comments
You must log in to post a comment. You can login or register a new account.
https://developer.valvesoftware.com/wiki/Crowbar