VERC: Leaks Last edited 2 years ago2022-09-29 07:55:04 UTC
Leaks: !@$@#$#!!
Everyone experiences them. Everyone hates them. They're the frickin' level leak. Below are some causes and effects, and a number of ways you can deal with leaks.The Cause
First, you should know what causes them. The most common cause of a leak is a gap in your level that "leaks" into the void. Look at the picture below.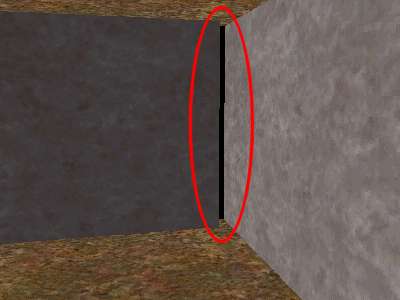
Sometimes these gaps aren't quite so obvious. They can be as little as one unit wide and still cause a leak.
Another big cause of leaks is having a point entity outside the level. All point entities must be inside valid level space.
One more cause is when you seal off your level with a brush entity, like a func_door. Brush entities are ignored when visibility by the engine is concerned, and so they also count as a leak if they are contacting both the inside and the outside (the void) of the level. They create the same condition as if there were a gap in their place.
The Effects
A leak in a level has a number of bad effects. First, the BSP process will report the leak, and it will not produce a portal file (mapname.prt). The portal file is used by the VIS process to perform its visibility calculations. Since there is no portal file, VIS will not run at all. When VIS doesn't run, it doesn't produce the files necessary for the RAD process to calculate its light bounces. Due to this, the RAD process will only perform direct lighting - no light bounces. (If you are using Zoner's Half-Life compile tools - you should be! - the RAD process won't run at all)The most serious effect by far is the fact that the VIS process will not run when a leak is present. When the level is run in Half-Life, the rendering engine will not have any visibility info available with which to limit itself, so it will attempt to draw the entire level. This will most certainly lead to high polygon counts and may lead to things like doors, items, and the sky blacking out or not being drawn if the maximum rendered polygon limit is reached.
The Fix
The Pointfile
There are a number of ways to deal with leaks. The first way you should check is by loading the pointfile. Make sure that mapname.pts is being copied into the valvemaps folder along with the compile map (you'll have to move it manually otherwise). The .pts file contains a set of coordinates that form a line of dots that should lead you to the leak. To load the pointfile in the game, bring down the console and type pointfile .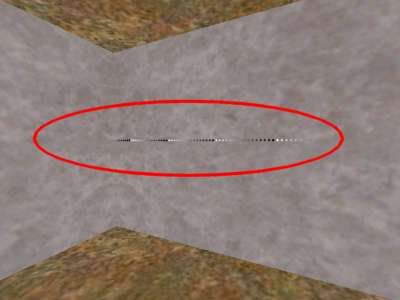
The default engine limit is 2048 points, which may not be enough to trace a line to the leak in your map. If this is the case, start Half-Life at the command prompt with "hl -particles 10000" (or some higher number) to allow the engine to display more particles, and thus trace a longer line to help you find your leak.
When you've loaded the pointfile, type "noclip" to allow you to walk through walls and "r_fullbright 1" to make the map bright so you can see everything. (If you're using Zoner's compile tools, the map will already be fullbright since the RAD process didn't run.) If there are monsters placed in the level, typing 'god' and 'notarget' at the console will make things easier as well. The 'notarget' command causes monsters not to become hostile to your presence, and 'god' makes you immune to damage of any sort. If you noclip outside the level, it might also be useful to type 'gl_clear 1' in the console. This will turn the void into a solid color, rather than the mess that it will be if you're using the glide or opengl renderer.
Once you find the line, follow it. It bounces all over the place, goes in screwy directions, both inside and outside the level. At some point, it will pass through a hole in the walls of your level. There's your leak.
The Big Block Method
If your level is especially large and you're having difficulty tracking down your leak, you might benefit from using the "Big Block Method" of leak tracking. What this is essentially, is you covering a large portion of your level with a solid block (make sure it goes completely through from top to bottom). A recommended size is a quarter of your level.Place the large block over a portion of your level, then attempt to compile. Move the block to a new section and recompile until the leak error disappears. When this happens, you know the leak is somewhere within the space of the block. Now you can repeat the procedure using a smaller block, only within the space that was covered last with the big block.
This method would only work, of course, if you had one leak, or a number of leaks that would all be covered at once by the block.
Neal White adds this about the Big Block method:
I discovered the Big Block Method on my own, but I use it for an entirely different purpose. It is very helpful in tracking down those damn leaf-saw-into-leaf portal bugs. It's the only good way I've found to track them down. It also can be used to drastically reduce your level compile times when you just need to test the lighting in a room or two.Great idea!
The Bright Light Method
Some people favor this method over the big block, but depending on the level, it can be very time consuming. It involves placing a large box around the entire level, then placing a number of very bright purple (or other easily visible color) lights inside the box, but outside what would be your level. Now, compile the level, and since the level is inside a big box, it should compile fine, and the RAD process should also run fine. Once its in the game, run around your level looking for the light leaks.The main drawback to this is that the compile for the map may take an exceptionally long time, and you'd probably be better off using the pointfile method, but this method may work better if you're faced with multiple leaks throughout your level.
Note: Some people would point out - if placing a box around your level gets rid of the leak, why not stop there? Well, it gets rid of the leak, but it doesn't get rid of the main bad effect of the leak - VIS still cannot properly optimize the level because it doesn't know what is inside or outside the level. You will still see the high polygon counts and poor framerate. This is not a solution.
An Ounce of Prevention
It was pointed out to me that I originally missed talking about the most important way to fix leaks, and this is by preventing them in the first place. Take your time when building, make sure things are snapped properly to the grid. This is the note I received -this is where the phrase "an ounce of prevention is worth a pound of cure" comes in.. ie: take your time .. make sure all wall joins are solid and thick .. I always myse 64 unit walls all around the outside of my map and then build detail inside of that .. this allows me to see if I happen to have misaligned brushes ...
The 64 unit thick walls aren't completely necessary, but they will make it more obvious if you have a misaligned brush. The whole point is, be careful, be attentive, take your time. I'll end this before it sounds like a father/son lecture.
Conclusion
Leaks are bad, and can be really frustrating to find. Hopefully this information has shed a little bit of light on the subject for those that need it. Also remember, sometimes a good eye is all that's needed to find the leak. Look around the level in Worldcraft - look for gaps or misaligned brushes, point entities in the void, etc. Kill those leaks!- Article Credits
- Chris 'autolycus' Bokitch – Author
This article was originally published on Valve Editing Resource Collective (VERC).
The original URL of the article was http://collective.valve-erc.com/index.php?doc=1015284096-68318600.
The archived page is available here.
TWHL only publishes archived articles from defunct websites, or with permission.
For more information on TWHL's archiving efforts, please visit the
TWHL Archiving Project page.
Comments
You must log in to post a comment. You can login or register a new account.