Tutorial: Dead NPCs for HL1 and CS Last edited 19 years ago2005-07-17 04:00:00 UTC
You are viewing an older revision of this wiki page. The current revision may be more detailed and up-to-date.
Click here to see the current revision of this page.
It's always nice to add some horror scenes to your map: dark vaults, blood stains and the like. But dead bodies? OK, it's not so easy to get a dead body, eh?
Well, we know the opposite from the game: e.g. in CS it is easy to get a dead body: just shoot a hostage. You can add a non-player character (NPC) to your map using a model file (*.MDL) of a character you want and the cycler_sprite entity. However, you cannot choose the animation that you want, due to the fact that CS does not have a scripted_seqeunce entity. This means that your NPC will be displayed using its default animation (usually standing or walking). Your NPC will be safe and sound, not dead at all!
Instead of arranging some puzzling scripts to kill the NPC each time the round starts, let's take a more simple way and just edit the existing model to make it, err... dead.
Second, find an existing model (*.MDL) of a character you want. Note that the model should contain at least one "dying" animation sequence, because you need a dead body after all! In this tutorial, we are not going to cover how to create a model from scratch or how to add a "dying" animation sequence to a model that does not have one (if you want more info on editing models, start with the Editing Half-Life Models tutorial). ), but you need to check to be sure.
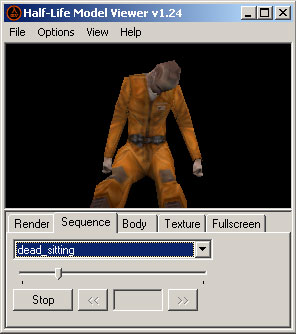
Let's take as an example the hostage model from Counter-Strike (hostage.mdl) which is usually found in the cstrikemodels folder. Open this model with the Half-Life Model Viewer, choose the Sequence tab and look through the list until you find a dead posture that meets your needs. If you can't find one, choose another model, or edit this one (the latter is not what this tutorial is about). Remember the name of the sequence.Now you need to decompile this model using MilkShape 3D. First, copy all hostage*.mdl files into a separate folder before decompiling. Here hostage.mdl is a master model, so don't forget all the hostage01.mdl, hostage02.mdl, etc. However, you decompile only hostage.mdl: others are decompiled automatically.
Then in MilkShape 3D, go to Tools -> Half-Life -> Decompile normal MDL file and choose hostage.mdl as a source. As a result, you receive tons of various *.SMD files (separate models for each movement), some bitmaps (textures for the model) and a *.QC file, which is a kind of compilation directive script.
Using our example, let's create models of two dead workers, one lying on his back and one sitting. To do so, copy the hostage.qc file to and rename two copies: deadbody1.qc and deadbody2.qc. Now we have two compilation files that we are going to edit in order to get what we want. For that you can either use MilkShape 3D (Tools -> Half-Life -> Edit QC file) or any text editor, like Notepad.
First, in each *.QC file, you have to change the resulting model name to let MilkShape 3D save the result with a new filename. So, in the very first line of each *.QC file you will have something like:
$modelname "D:MymapModelsDeadBodyhostage.mdl"
In this line, change hostage.mdl to deadbody1.mdl (in deadbody1.qc) and deadbody2.mdl (in deadbody2.qc).
Now, you have to remove all unwanted animations from the model and keep only the single frame dead posture. To do so, in each *.QC file you keep the rest untouched except for the sequence section (the big list in the end). This list initially starts with a comment like:
// 129 sequences
For deadbody1.qc, delete everything after this line except the following:
$sequence lying_on_back "lying_on_back" fps 30
Change the fps to 0, because there is no animation anyway.
For deadbody2.qc, similarly, remove all sequences except the following line:
$sequence dead_sitting "dead_sitting" fps 30
Change the fps to 0 here too.
After that, in MilkShape 3D, choose Tools -> Half-Life -> Compile QC file to compile each file. If you made no mistakes, you'll get deadbody1.mdl and deadbody2.mdl, files, useable with the cycler_sprite entity.
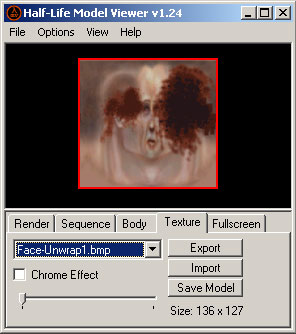
Open your new models in Half-Life Model Viewer, choose the Texture tab and find the textures you wish to stain with blood. Click the Export button to export them to bitmap files. Now use any picture editor to put some stains of blood to the textures e.g. this poor guy on the example picture has got a rather nasty headshot.When you finish, import the modified texture back to the model (click the Import button) and then save the model with the same name (Save Model button).
Don't forget to use different textures for different game characters in order to create more diversity. In our example we can use different head skins for our two models.
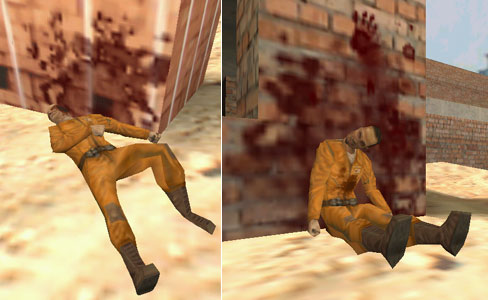
Finally, let's see how it looks on the map. For the first guy (to the left) we use our model deadbody1.mdl. He is lying on his back and dead of a headshot (see texture above). The second guy (deadbody2.mdl) has probably received several shots to his back and chest, though he did not die immediately: look at the bloody hand stains on the wall, poor guy! Here we use different texture for the head (the first model is blonde, the second has darker hair) and a different body texture (to have blood stains on his chest).
Well, we know the opposite from the game: e.g. in CS it is easy to get a dead body: just shoot a hostage. You can add a non-player character (NPC) to your map using a model file (*.MDL) of a character you want and the cycler_sprite entity. However, you cannot choose the animation that you want, due to the fact that CS does not have a scripted_seqeunce entity. This means that your NPC will be displayed using its default animation (usually standing or walking). Your NPC will be safe and sound, not dead at all!
Instead of arranging some puzzling scripts to kill the NPC each time the round starts, let's take a more simple way and just edit the existing model to make it, err... dead.
What do we need to create a dead body model?
First, you need to get MilkShape 3D and Half-Life Model Viewer. Note that while the model viewer is free, MilkShape 3D has limitations when unregistered. However, it does not prevent us to do what we want now.Second, find an existing model (*.MDL) of a character you want. Note that the model should contain at least one "dying" animation sequence, because you need a dead body after all! In this tutorial, we are not going to cover how to create a model from scratch or how to add a "dying" animation sequence to a model that does not have one (if you want more info on editing models, start with the Editing Half-Life Models tutorial).
How to Kill a Model
First of all let's check if the model you have chosen contains needed "dead" sequence. Usually the answer is "yes" (unless it is a model of a Buick ), but you need to check to be sure.
Let's take as an example the hostage model from Counter-Strike (hostage.mdl) which is usually found in the cstrikemodels folder. Open this model with the Half-Life Model Viewer, choose the Sequence tab and look through the list until you find a dead posture that meets your needs. If you can't find one, choose another model, or edit this one (the latter is not what this tutorial is about). Remember the name of the sequence.Now you need to decompile this model using MilkShape 3D. First, copy all hostage*.mdl files into a separate folder before decompiling. Here hostage.mdl is a master model, so don't forget all the hostage01.mdl, hostage02.mdl, etc. However, you decompile only hostage.mdl: others are decompiled automatically.
Then in MilkShape 3D, go to Tools -> Half-Life -> Decompile normal MDL file and choose hostage.mdl as a source. As a result, you receive tons of various *.SMD files (separate models for each movement), some bitmaps (textures for the model) and a *.QC file, which is a kind of compilation directive script.
Using our example, let's create models of two dead workers, one lying on his back and one sitting. To do so, copy the hostage.qc file to and rename two copies: deadbody1.qc and deadbody2.qc. Now we have two compilation files that we are going to edit in order to get what we want. For that you can either use MilkShape 3D (Tools -> Half-Life -> Edit QC file) or any text editor, like Notepad.
First, in each *.QC file, you have to change the resulting model name to let MilkShape 3D save the result with a new filename. So, in the very first line of each *.QC file you will have something like:
$modelname "D:MymapModelsDeadBodyhostage.mdl"
In this line, change hostage.mdl to deadbody1.mdl (in deadbody1.qc) and deadbody2.mdl (in deadbody2.qc).
Now, you have to remove all unwanted animations from the model and keep only the single frame dead posture. To do so, in each *.QC file you keep the rest untouched except for the sequence section (the big list in the end). This list initially starts with a comment like:
// 129 sequences
For deadbody1.qc, delete everything after this line except the following:
$sequence lying_on_back "lying_on_back" fps 30
Change the fps to 0, because there is no animation anyway.
For deadbody2.qc, similarly, remove all sequences except the following line:
$sequence dead_sitting "dead_sitting" fps 30
Change the fps to 0 here too.
After that, in MilkShape 3D, choose Tools -> Half-Life -> Compile QC file to compile each file. If you made no mistakes, you'll get deadbody1.mdl and deadbody2.mdl, files, useable with the cycler_sprite entity.
Putting the bodies in the map
When you test your dead bodies on your map, you will notice that those nice blood decals do not stain the bodies. This is because decals paint on brushes, not models. So why not to put some blood stains on your models' skins?Open your new models in Half-Life Model Viewer, choose the Texture tab and find the textures you wish to stain with blood. Click the Export button to export them to bitmap files. Now use any picture editor to put some stains of blood to the textures e.g. this poor guy on the example picture has got a rather nasty headshot.When you finish, import the modified texture back to the model (click the Import button) and then save the model with the same name (Save Model button).
Don't forget to use different textures for different game characters in order to create more diversity. In our example we can use different head skins for our two models.
Finally, let's see how it looks on the map. For the first guy (to the left) we use our model deadbody1.mdl. He is lying on his back and dead of a headshot (see texture above). The second guy (deadbody2.mdl) has probably received several shots to his back and chest, though he did not die immediately: look at the bloody hand stains on the wall, poor guy! Here we use different texture for the head (the first model is blonde, the second has darker hair) and a different body texture (to have blood stains on his chest).
8 Comments
You must log in to post a comment. You can login or register a new account.


http://img143.imageshack.us/img143/8030/whatthisfuckcolorft0.png
you need to use cycler_sprite to import the model. Yes, it is for sprites, but you still can use it to import a model. Newer versions of the engine have dedicated one for models called cycler.
adrianpl,
yes, it is a bit difficult because you HAVE to use the palette of the game. Photoshop is probably not the best tool for that. You will have to guess which color from photoshop palette to use in order to get red color in the HL palette. As you can see from my screenshots, I did it, so there's no raeson you can't
I just have one problem with it:
I wanted to create a hanging dead body and therefore I wanted to use the frame number 3 of the animation dieforward1 of the hostage model.
(this one: http://img21.imageshack.us/img21/9765/63877409.jpg )
The problem was: In the end I got this one:
http://img109.imageshack.us/img109/72/48800067.jpg
So my model is standing. I have no idea how to change the sequence in the qc file so that the model will be in the frame number 3 ... :S
I would be very happy to get some help so that I could rate 5 Stars
You only need to make a cycler_sprite, choose the model, choose the sequence #, get framerate to 0 and you're done !! Why uncompiling ?? The entity does it all already !!!!
There are also some nice *.mdl files in maps like cs_manor, you can grab them and use them directly if you want...