Tutorial: Hallways Last edited 2 years ago2022-09-01 11:32:16 UTC
You are viewing an older revision of this wiki page. The current revision may be more detailed and up-to-date.
Click here to see the current revision of this page.
Hallways
This tutorial will help you to create stylish hallways and corridors in a tile-based system allowing you to not only to re-use your hallways elsewhere on your map, but to connect separate hallways to an infinite extent via copy & paste.To do this you should have knowledge of creating a room, the Clipping tool, Vertex Manipulation and an average imagination.
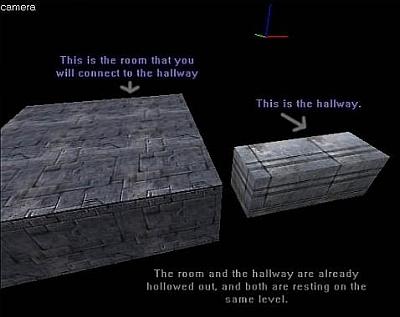
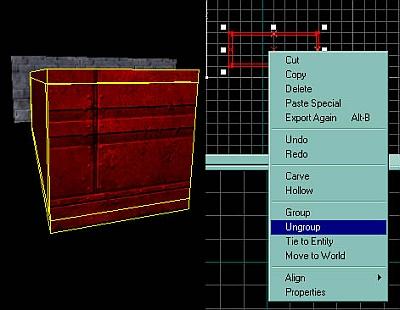
Create a room that the hallway will connect to. Hollow it out and texture it as necessary. Next: Create a basic rectangular hallway, either brush by brush or by hollowing out a block. Make sure the bottom brush (where the person will walk) is on the same level as the bottom brush of the room you will connect this hallway to. (This is not necessary if you are experienced in connecting hallways. It is just to make things easier).The next step is to ungroup the hallway. Once ungrouped, delete the end brushes, exposing your hallway on both entrances. Translate the two sides that are shorter than the other two, and make the hallway into a perfect rectangle.Now, this is where you can start to use your imagination. Select the two vertical brushes of your hallway, and slice them horizontally into 3 sections. Make sure you are using the clipping tool that does not delete anything, the entire selection should be white. The slices don't have to be equal. You can also build each individual brush, but this is one of those 'good' uses for the clipping tool.
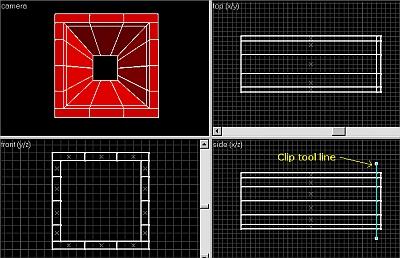
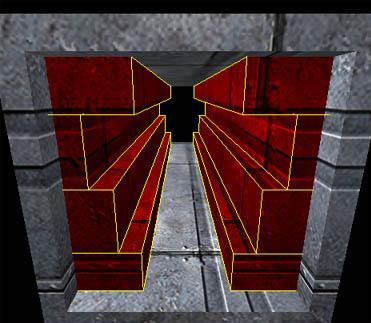
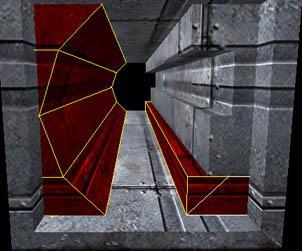
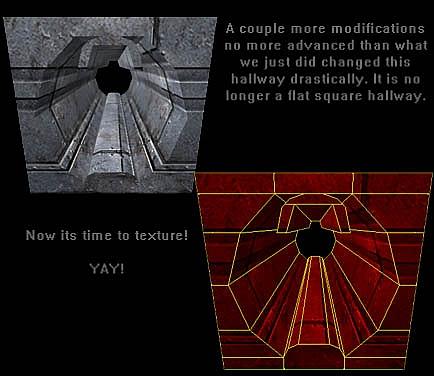
The image below is what your hallway should begin to look like. Use the Clipping tool in one of the 2D windows. This is where GRID settings are really important. To save you from errors later on, the clip line must be straight. The easiest way to achieve this is to set the GRID to something around 8. I know a lot of web sites say that clipping is Evil, but with a bit of practice, it is sometimes more convienient when cutting large blocks. Just remember that when you clip, the Texture attributes are not saved to the individual brushes. By that I mean, if you have aligned the texture, then clipping might not keep the alignment. This is why Vertex Manipulation is prefered, as it keeps the texture attributes.I've made a few more slices than needed in the above image, but that is for more customization. Now, translate the 3 vertical sections towards the center of the hallway as I have in an uneven pattern (or make up your own pattern!). Look at the next image for an idea of what I mean. (Note: The image has a square brush at the beginning of the hallway, which I use as a guide to determine the height and width of my hallway in order to prevent too much clipping.)Now, its time to have a little fun. Go to the 3D view in Hammer where you can look down the corridor. Make sure everything is translated how you like it. Select one brush at a time (I start from the bottom up, but do your own thing here). After you have the brush selected, use the Clipping tool or Vertex Manipulation to redesign the brush in whatever imaginative pattern you would like. The next image should give you an idea what I mean.Now, do the same to the opposite wall. You can create a totally new style or do "whatever". For mine, I made it look like a pipe, having symmetrical sides. Now, you can do the same thing to the bottom brush and the top brush, as I did in my hallway. The bottom "hump" in the image was easy, I clipped the bottom brush and translated the middle brush upwards. I then clipped the sides. I did the same for the top "upside-down U" by clipping a workable area, translating it downwards, and clipped it again.
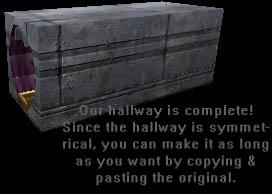
If you are using Vertex Manipulation, Click on the brush, click on a Yellow handle and use the Hot Key Ctrl+F to further split the verticie so you can move it.Now, you can begin to modify the floor and the ceiling with the same method. Use your imagination.Now, your hallway should still be rectangular on the outside, but different on the inside. If there is a time to texture it, now is that time. Once your done texturing, If you did everything right, your hallway should be connectable to another hallway of this type. Connect the hallway to your room, and try it out.
Remember, Clipping is Ok, if you know how to use it. The biggest mistake made by mappers is not keeping the clip line straight, either vertically or horizontally in the 2D window. Experiment with this tool, and the Vertex Manipulation tool and your Brush work will get better.
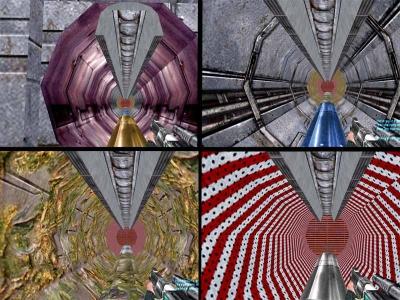
Heres a couple examples of what the new hallway looks like with NS textures... perhaps you like rustic pipes... futuristic pipes, infested pipes or dangerous pipes.
5 Comments
You must log in to post a comment. You can login or register a new account.

It isn't good advice to tell people to split their hallways into reusable componenrs, this would lead to poorer optimisation but more importantly, this sort of reuse would be the kind easy to notice (and a technique beginners could have figured out alone).
Besides, there's nothing wrong with the clip tool, apart from the minor texture tweaks it sometimes causes, but it's rare and brush manipulation tool is supposed to be before texturing. It never creates invalid shapes, unlike the Vertex tool.
Hollow tool on the other should be discouraged, it can encourage bad practice with beginners.