Tutorial: Vertex Manipulation Part 2 Last edited 21 years ago2003-02-22 05:00:00 UTC
You are viewing an older revision of this wiki page. The current revision may be more detailed and up-to-date.
Click here to see the current revision of this page.
Download attachment
In this tutorial we are going to explore a more advanced application of vertex manipulation. If you haven't already, I suggest you read the Vertex Manipulation Intro tutorial first, so that you understand the basics of the tool.Most beginners ignore vertex manipulation and use the simpler Carve and Clip etc. tools to alter solids. These are weak in comparison! Their major drawback is that they often result in sub-unit vertices. These are rounded-off when the map is compiled, resulting in strange problems. Take a look at this carved hole:
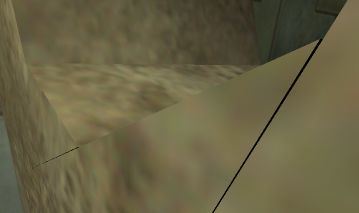 One of the many reasons carving shortens your life expectancy
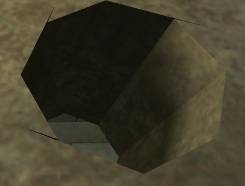 Ugly carving!
 Off-the-grid evil
So what's the answer? Well, vertex manipulation, of course! The thing said most often with regard to the vertex tool is 'be careful', but frankly, it's far easier to mess up with the other tools, and at least invalid shapes created by the vertex tool are detected by WorldCraft (Map -> Check for Problems). Altering vertices alone, it's impossible to get them onto sub-unit grid points (even with Snap to Grid off, the vertices will still snap to single units).
In this tutorial we're going to make an alternative to the cylinder carve I just showed you, that looks and works much better. This is just to give you an idea of what can be achieved with vertex manipulation - working out whether and how it should be used to solve other problems is up to you.
The Template
The first thing to note about the cylinder primitive is that all of its vertices will always land up on a grid unit (there are never any sub-unit vertices). Just don't resize the cylinder after you've created it.Let's start with a 32w x 64l x 32h 8-sided cylinder. We're going to use it as a template around which we'll construct our tube. You could use any number of sides, but smaller, even numbers are easier to work with. You'll see why in a minute...
 Not very exciting...
Making a Tube
Because we're making a tube, we need to create sides. Because we've got an even number of sides to our template cylinder, we only need to create one piece of the tube that we can then clone for the other sides.Make sure you're in 1-unit grid mode (press [ until it goes no further). Zoom into one diagonal of the template, and build a block like so:
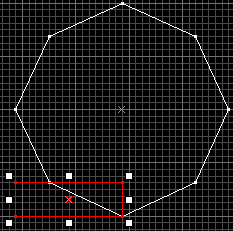 Start small
Now, with the new block selected, go into vertex manipulation mode (Shift+V). Drag the top-right vertex across to the cylinder's vertex, and the top-left vertex down to the bottom-left one (and say 'Yes' when it asks you if you want to merge them). There are plenty of other ways to do this, as long as you end up with something like the picture below. Notice how the bottom-left vertex is in line with the furthest-left point of the cylinder:
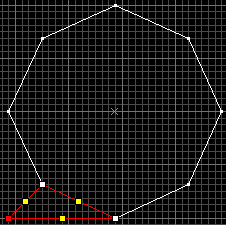 Vertex Manipulation = Win
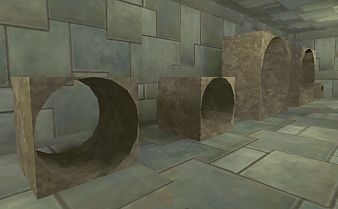
Finally, delete the template cylinder, and add any extra blocks around the tube that you need. You'll land up with something like this:
 No more invalid solids!
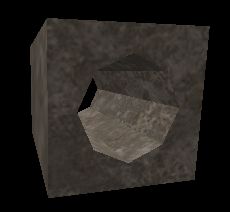 Much better!
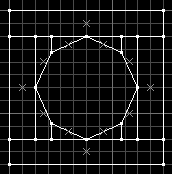 But can we make it a bit more smooth?
 Of course! Looks great, eh?
 Whatever you do, don't try this at home.
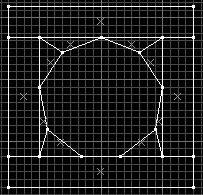 How odd O.o
By the way, rotating solids using the Transform Tool (Ctrl+M) is far safer than rotating using the Selection Tool and manually rotating - it always snaps vertices to units. So that's one tool you can always trust!
The example map includes the set of tubes used in this tutorial, which you can experiment with. Just remember: if you can do it with clip, carve, hollow etc., you can do it better with vertex manipulation!
 The example map has no shortage of tubes.
6 Comments
You must log in to post a comment. You can login or register a new account.
First of all, vertex manipulation can NOT do pretty much anything. It's a tool you sort to in many cases when you would use the carve tool, so you got that much right. For the rest of your tutorial, you really shouldn't write things that you don't know are true. The vertex manipulation tool is something you should use carefully in cases where using a different tool would create problems. Some examples are when creating tubes (as shown above), arches, and tetrahedrons.
"Just bear in mind that the 'simple' tools, Carve, Clip, Hollow, Rotate, Shear, when used improperly, can cause far worse problems than vertex manipulation can when used improperly."
-That is an outright lie, and I hope that the fact that you have time on your side has paid off for you. The problem with vertex manipulation is, in fact, that it causes some very nasty problems, if you use it the wrong way. Brushes can get inverted, and they can easily cause many of the same issues that you describe above, when talking about carving.
However, I still hope that most people reading this tutorial is experienced enough not to believe that using vertex manipulation over any other tool is an intelligent thing to do.
ONE LAST THING, do NOT use the Transform Tool (Ctrl+M) to rotate objects, try doing so, and it will explain itself.
I guess most people won't actually go do it, so to keep it short, I have included an example with an object larger than 1 block here:
Left to right: no rotate, transform tool, selection tool
I would like to make a tube with a curve that way. Does anybody know how to do that?