Tutorial: Water Last edited 21 years ago2004-02-07 05:00:00 UTC
You are viewing an older revision of this wiki page. The current revision may be more detailed and up-to-date.
Click here to see the current revision of this page.
Download attachment
Water Tutorial
This is a tutorial about how to use water textures and water in the Half-Life engine. There are many ways water can be used in a Half-life map. Just so you can test how water will work before putting it into a map of yours begin by making a new rmf.Make a room or beachhead as I have. If you made a room make a sink, pool or toilet in it. First we will select the texture(s) that we will be using for our water (make sure liquids.wad is a texture wad you have active).
Go to the texture browser and type in ! as your filter text. Some water textures will come up. You can tell if a texture is a water texture if it has ! in front of it (as in '+' for lightable objects and { for decals).Once you have your texture picked out you should make a brush with it were you want your water to be. Now save and compile your map. Check out the water in the game. That wasn't very good now was it? There are several things you can do to make this water look better:
If your video card is compatible with OpenGL and you aren't already running with it do so now, you'll thank me later. Now with OpenGL mode on you can edit the height of waves that you can create using a brush entitie called func_water. This entity sort of acts like a door that continually is moving in different ways.
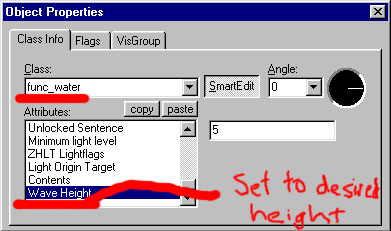
Ok back to the waves. If you tie your ! textured brush to a func_water and go to its object proporities you will see alot of keys representing a door. Start by scrolling to the bottom of this list untill you find a key called Wave Height.
Enter the height of the waves you want. I'm not sure how these heights are measured so just use a number like 10 to start then experiment with the height untill you reach the desired height.
[font=red]I think it is based on one peak of wave form, ie: 5 will give you a Wave top to Wave bottom of 10 units, the WorldSpawn entity can also be used to set default wave heights, but the actual entity value will over-ride that. : Andy[/font]Now run the map. Look any better? For those of us running on software (like me
 ) that doesn't look any better. Don't give up there is something else you can do.
Set the transparencey level! this is done exactly as its done for a func_wall with a glass texture. In the object proporitys go to Render Mode and set it to Texture. Then set the FX Amount to a number between 1-255. I use about 120-30 for a good effect. Now compile the map and look at your beautiful water?
But wait theres more! Go back to your object properties for the func_water and there is a key called Contents it can be used to set your func_water brush to act as Lava, Slime or good ole' H20.
Using water, large expanses of water will push the r_speeds up. This is because the water texture is small. Stretching water textures makes it look really odd. The functionality of a block of water affects the way the map is rendered, and can cause Lag. Just keep these in mind when you are making your map.
6 Comments
You must log in to post a comment. You can login or register a new account.


Problem:
If you have a big "pool" of func_water made out of many brushes and after compile many top faces of the water randomly won't show up.
Fix:
Instead of making all the brushes of the pool a single func_water, make each seperate brush it's own func_water, and this should eliminate the disappearing face error.