Tutorial: Compiling Introduced Last edited 2 years ago2022-10-10 22:47:33 UTC
Compiling is what you have to do to the map you're working on before it can be played in Half-Life. The process involves several programs - the first one is provided with a .map file (which is produced by Hammer), which it processes and then leaves behind one or more files to be used by the next compile program. This cycle repeats itself for each program, until you end up with a .bsp that can be played in Half-Life.
It's at the compile stage that many problems occur or become apparent. Completely dark or completely bright ('fullbright') maps become so during compiling and problems with a map's geometry may manifest themselves (including leaks, over-complex shapes etc.)
Read on to find out about the compile programs, the different methods you can use to compile maps and their pros and cons.
CSG - CSG stands for Constructive Solid Geometry. It's the map 'type' that Half-Life uses - the format for defining a 3D world. This program is a kind of pre-processor for the BSP tool. It breaks up your map geometry into simpler polygons so that the BSP program can handle it all.
BSP - BSP stands for Binary Space Partition (don't ask), and it basically creates a playable .bsp file from the .map. This .bsp will have no visibility matrix and no lighting (so it'll probably be completely bright). Light and visibility are worked out by the next two programs.
VIS - Although this program doesn't have to be run to make your map work, and you may not even notice a difference when you do run it, it is crucial for final compiles. VISibility calculates which polygons are visible from every point in the map, so that only polygons visible to the player are drawn at each point. If not run, every polygon will be visible from every point in the map, which can cause major performance loss in big maps, or on slow PCs.
RAD - RADiosity is the tool that'll probably take the longest to work. It lights your level, working out texture brightness and colour, and the brightness of the sky, etc. If RAD is not run, the .bsp will either be completely dark or completely bright, and if your map turns out like this, it's probably because of a problem that prevented RAD from running (or you forgot to make it run, or forgot to add lights).
There are two sub-methods you can use...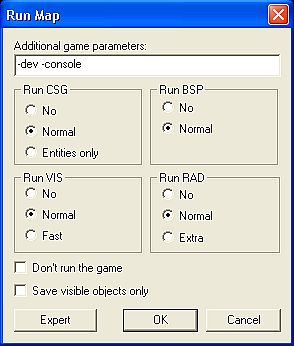 Normal compileThis method is the simplest. Put -dev -console into the Additional game parameters box, click Normal for everything, and click OK. The map should compile correctly. If it doesn't, either the setup is at fault, or the map itself. Check the compile process window (the grey window that text appears in while a map's compiling) for errors.
 Expert compileIf you click the Expert button while in Normal mode, you'll be presented with a wider box that looks a lot more complicated. It isn't really. Well, it is, but that won't be a problem for long.
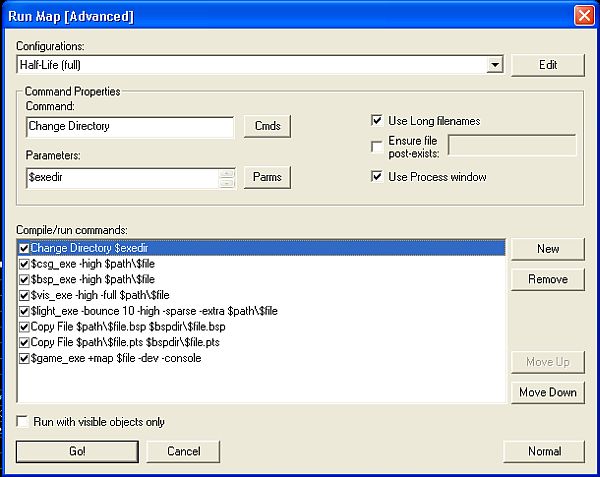
This method gives you far more control over the compile process, allowing you to specify command-line arguments and create Configurations (not the same as game configs). There are a few configs there already. Select the one you want and give it a try.
Create a new config by clicking Edit, then New. Select this new config, then click the New button to create new checkboxes.
Change things by selecting one of the Compile/run commands (the things with the checkboxes). You will be shown the Command and its Parameters. Click the Cmds button to select a common command, or to select one of the compile programs. The things with $ in front of them (like $bsp_exe) are variables (mainly things set in the Tools & Options screen under Game Configurations and Build Programs). $bsp_exe, for example, is the BSP program.
Because you can specify command-line parameters for the compile tools, you have a lot more control over compiling than you do with Normal mode.
This set of commands should work, providing your Hammer setup is correct:
Change Directory $exedir: Changes working directory to the one holding the game executable (hl.exe)
$csg_exe $path\$file: Runs the CSG program on the map
$bsp_exe $path\$file: Runs the BSP program on the map
$vis_exe $path\$file: Runs the VIS program on the map
$light_exe $path\$file: Runs the RAD program on the map
Copy File $path\$file.bsp $bspdir\$file.bsp: Copies the map from where its being compiled to the game's maps folder
Copy File $path\$file.pts $bspdir\$file.pts: Copies a leak-finding file that is created during compiling.
$game_exe -dev -console +map $file: Runs the game in developer mode (with debugging info), with the console, loading the current map. Add +set deathmatch 1 for deathmatch maps (and always for CS) and -game <moddir> if you're working on a mod (e.g. -game cstrike).
moddir: The mod's folder.
Note that for commands like Copy File, you cannot just type it in. You have to select it from the Cmds button's drop-down list.
Also, some people prefer the freedom that working directly with the tools provides, but, frankly, it can't get much more free than the Expert mode within Hammer.
To create a batch file, simply open Notepad and type the following:
Of course, you could make the batch file do all that - just edit it so that it looks like the Hammer Expert mode, substituting DOS commands for the Hammer ones, and giving the variables values. For example:
Copy File $path\$file.pts $bspdir\$file.pts
becomes
copy C:\mymaps\testmap.pts C:\Half-Life\valve\maps\testmap.pts
You can also launch Half-Life from the batch file, providing you've moved the compiled .bsp into the maps folder first.
Personally, I find them more complicated than they should be, but if compiling in Hammer isn't an option, and you can't be bothered to learn about batch files, then they're your best option.
Well, that's about it. I know compiling is one of the hardest things to get to grips with in mapping, but hopefully this tutorial has given you a starting point.
Just like to say thanks to MASTeRmiNd for providing the inspiration and some of the information that went into this tutorial.
It's at the compile stage that many problems occur or become apparent. Completely dark or completely bright ('fullbright') maps become so during compiling and problems with a map's geometry may manifest themselves (including leaks, over-complex shapes etc.)
Read on to find out about the compile programs, the different methods you can use to compile maps and their pros and cons.
The Compile Programs
These are the four programs that are used, and in this order:CSG - CSG stands for Constructive Solid Geometry. It's the map 'type' that Half-Life uses - the format for defining a 3D world. This program is a kind of pre-processor for the BSP tool. It breaks up your map geometry into simpler polygons so that the BSP program can handle it all.
BSP - BSP stands for Binary Space Partition (don't ask), and it basically creates a playable .bsp file from the .map. This .bsp will have no visibility matrix and no lighting (so it'll probably be completely bright). Light and visibility are worked out by the next two programs.
VIS - Although this program doesn't have to be run to make your map work, and you may not even notice a difference when you do run it, it is crucial for final compiles. VISibility calculates which polygons are visible from every point in the map, so that only polygons visible to the player are drawn at each point. If not run, every polygon will be visible from every point in the map, which can cause major performance loss in big maps, or on slow PCs.
RAD - RADiosity is the tool that'll probably take the longest to work. It lights your level, working out texture brightness and colour, and the brightness of the sky, etc. If RAD is not run, the .bsp will either be completely dark or completely bright, and if your map turns out like this, it's probably because of a problem that prevented RAD from running (or you forgot to make it run, or forgot to add lights).
The Different Methods
There are several ways you can do this compiling thing. They vary in how much control they give you, how long they take to set up, how easy they are to work with, and perhaps how fast they are. This tutorial will cover the different methods, and you are then free to choose which you prefer.Within Hammer
This is the method most people will start with. It relies on a correct set-up (Tools -> Options), but once that's sorted out (and it can be challenging), then you've got two pretty useful compile options to try. The main advantage of both of them is that they're easy to work with. Just press F9 when you want to test your map, and within a couple of clicks, you're in Half-Life. The only real disadvantage is that lots of resources are taken up by Hammer, so the compile tools (especially RAD) won't have as much memory and CPU power to work with. On a powerful PC, this may not be an issue.There are two sub-methods you can use...
Normal Compile
Normal compileExpert Compile
Expert compileThis method gives you far more control over the compile process, allowing you to specify command-line arguments and create Configurations (not the same as game configs). There are a few configs there already. Select the one you want and give it a try.
Create a new config by clicking Edit, then New. Select this new config, then click the New button to create new checkboxes.
Change things by selecting one of the Compile/run commands (the things with the checkboxes). You will be shown the Command and its Parameters. Click the Cmds button to select a common command, or to select one of the compile programs. The things with $ in front of them (like $bsp_exe) are variables (mainly things set in the Tools & Options screen under Game Configurations and Build Programs). $bsp_exe, for example, is the BSP program.
Because you can specify command-line parameters for the compile tools, you have a lot more control over compiling than you do with Normal mode.
This set of commands should work, providing your Hammer setup is correct:
Change Directory $exedir: Changes working directory to the one holding the game executable (hl.exe)
$csg_exe $path\$file: Runs the CSG program on the map
$bsp_exe $path\$file: Runs the BSP program on the map
$vis_exe $path\$file: Runs the VIS program on the map
$light_exe $path\$file: Runs the RAD program on the map
Copy File $path\$file.bsp $bspdir\$file.bsp: Copies the map from where its being compiled to the game's maps folder
Copy File $path\$file.pts $bspdir\$file.pts: Copies a leak-finding file that is created during compiling.
$game_exe -dev -console +map $file: Runs the game in developer mode (with debugging info), with the console, loading the current map. Add +set deathmatch 1 for deathmatch maps (and always for CS) and -game <moddir> if you're working on a mod (e.g. -game cstrike).
moddir: The mod's folder.
Note that for commands like Copy File, you cannot just type it in. You have to select it from the Cmds button's drop-down list.
Outside Hammer
The alternative to compiling within Hammer it to do it, er.. without Hammer. The main advantage to this is that it allows you to do compiling after having closed Hammer, which means you can have as much free memory etc. as possible to give to the tools.Also, some people prefer the freedom that working directly with the tools provides, but, frankly, it can't get much more free than the Expert mode within Hammer.
Batch Compiling
If you've ever written a DOS .bat batch file, then you'll understand what to do here. Batch compiling is basically what Hammer does, except in a raw DOS mode. This has the advantage of letting you define what programs are running in the background, and can reduce compile times.To create a batch file, simply open Notepad and type the following:
hlcsg.exe C:\mymaps\testmap
hlbsp.exe C:\mymaps\testmap
hlvis.exe C:\mymaps\testmap
hlrad.exe C:\mymaps\testmapOf course, you could make the batch file do all that - just edit it so that it looks like the Hammer Expert mode, substituting DOS commands for the Hammer ones, and giving the variables values. For example:
Copy File $path\$file.pts $bspdir\$file.pts
becomes
copy C:\mymaps\testmap.pts C:\Half-Life\valve\maps\testmap.pts
You can also launch Half-Life from the batch file, providing you've moved the compiled .bsp into the maps folder first.
GUIs
GUIs (graphical user interfaces) (usually) provide a more powerful, easier-to-set-up interface for the compile tools, often allowing you to modify all the parameters available to each tool. There are several GUIs available, and each one will have its own setup instructions. You can find one, ZHLT Compile GUI, here. They can be a bit like Hammer's Expert Mode, but of course you don't need Hammer running to use them.Personally, I find them more complicated than they should be, but if compiling in Hammer isn't an option, and you can't be bothered to learn about batch files, then they're your best option.
Well, that's about it. I know compiling is one of the hardest things to get to grips with in mapping, but hopefully this tutorial has given you a starting point.
Just like to say thanks to MASTeRmiNd for providing the inspiration and some of the information that went into this tutorial.
- Categories
- Tutorials
- Beginner Tutorials
- Goldsource Tutorials
- Mapping
- Article Credits
-
 atom
–
Original author
atom
–
Original author
4 Comments
You must log in to post a comment. You can login or register a new account.
VMF is the format used by Hammer 4.X, the source versions of Hammer. It is similar to RMF.