VERC: Half-Life's In-Game Visibility Determination Last edited 5 years ago2019-04-14 11:33:07 UTC
You are viewing an older revision of this wiki page. The current revision may be more detailed and up-to-date.
Click here to see the current revision of this page.
Where would we be without visibility determination? I'm not sure. Actually, yes, I am sure; we'd be stuck at 5 fps on an empty server. And we certainly wouldn't want that.
"So, what is this visibility determination thing, anyway?" you say. Well, it's the process that every single 3D game under the sun (and over it) goes through. It's the process that determines what is visible, and what is not, and therefore whether to spend time sending all the polygonal data to the renderer. There's no point sending a 1,000 triangle object to the renderer if the object is off the screen, and won't be visible anyway, so why waste the time doing it?
This article will talk you through the processes Half-Life goes through every frame to determine what is visible, and what is not. Note that it will not tell you how the VIS process works; there have been hundreds of white papers published on efficient methods of BSP tree leaf visibility determination, and it would take ages to describe how Half-Life does it! I will, however, give a basic overview of what VIS actually does, for the purposes of understanding just what the heck I'm on about later on in this article.
When compiling a map, it is first split up into a Binary Space Partition tree, or BSP tree for short. This is basically a method of splitting the world up into manageable chunks which can then be dealt with individually, and are vital in speeding up collision detection, lighting calculations and doing visibility determination. Essentially, the map is first of all split into two parts (figure 1, stage 1) by placing a 3D plane to split the world in half. One side is called the positive side, or the front side, the other the negative side, or the back side. Then, the process happens again, except this time it is done on each of the two new segments treating each segment like a different map, rather than doing it across the entire map (figure 1, stage 2). This keeps happening until the world is split up enough (determined by the compiler) and you end up with your BSP tree. If you keep a track of what was split up from what, you can create a tree of what encloses what, and so do some major speed-ups (figure 2).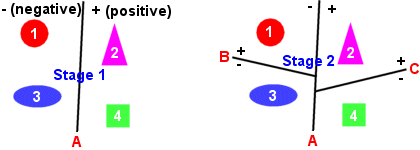 Figure 1
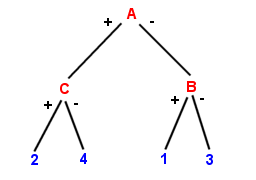 Figure 2Game programmers will probably lynch me for this woefully inadequate description of a BSP tree, but it will suffice for this article. (If you want to learn more about BSP trees, you can try the BSP tree FAQ.)
So what does this have to do with visibility determination? Well, when the world has been split into a BSP tree, it's in collections of polygons. Each collection of polygon is called a "BSP leaf", and it's with these that VIS does its work. For each leaf, it generates a list of every other leaf in the world, which simply contains whether that leaf could be seen if you were within the current leaf - this list is called the Potentially Visible Set, or PVS. As you can appreciate, this is a complex process, which is why VIS takes a long time in compilation with complicated maps.
So, after VIS, we've already got some very important visibility determination done, and we're not even into the per-frame loop yet. However, after this, we progress into the heart of the game, and see exactly what it does each frame.
Every frame, the game loops through the BSP leaves to find out which leaf the player is currently standing in. Once it's found it, it uses the PVS to find out what leaves might be seen from where the player currently is, and tosses out the leaves that can't be seen under any circumstance. This is a very crude, but very effective, form of visibility determination. Now that the game is only dealing with the leaves that could be seen from the current viewpoint, it moves onto the second type of visibility determination - frustum culling.
The view frustum is basically the volume in which the player can see. Anything outside of this volume cannot be seen by the player. In 3D, it looks like a pyramid with the top chopped off (with the new surface being the screen, and the base of the pyramid the far clipping plane). However, we don't have 3D monitors, so I'll take the 2D analogy - an isoceles triangle with the top corner chopped off. What the game does is to find out whether, out of the potentially visible leaves, any of them are outside of the view frustum; if they are, they get tossed out too. Figure 3 has an example of this in 2D.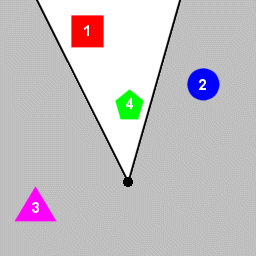 Figure 3Figure 3 - The black blob is the player. Objects 1 and 4 are within the view frustum and therefore visible, but objects 2 and 3 cannot be seen by the player.
After this simple but effective visibility determination method, there isn't very much left that isn't totally invisible to the player from his/her current position and orientation. However, one more, much finer, process is applied to the triangles making up each visible leaf - backface culling.
In 3D, every triangle has a 'normal' vector - this represents the direction that the triangle is facing. All that backface culling does is simply remove every triangle that is facing away from the viewer, as they probably wouldn't (and shouldn't) be visible anyway. This can sometimes chop the amount of triangles to draw by as much as 50%, which is a dramatic decrease.
After these 3 methods are applied - usage of the PVS, frustum culling, and backface culling - the remaining triangles can be rendered by the graphics API (OpenGL, Direct3D or software) with a minimal amount of polygons being drawn that are not visible. You can see what an effect not being able to do the first stage has when you have a large map with a leak - VIS cannot calculate its PVS, and so it is assumed that ALL leaves are visible before the 2nd and 3rd stages are applied.
This concludes our whizz tour of how Half-Life does visibility determination in-game. Hopefully this may give you some ideas as to how to improve your maps' frame-rate performance, or encourage you to read further about the above methods - GameDev.net has some great tutorials should you want to read more. If you have any questions, then feel free to contact me about them.
"So, what is this visibility determination thing, anyway?" you say. Well, it's the process that every single 3D game under the sun (and over it) goes through. It's the process that determines what is visible, and what is not, and therefore whether to spend time sending all the polygonal data to the renderer. There's no point sending a 1,000 triangle object to the renderer if the object is off the screen, and won't be visible anyway, so why waste the time doing it?
This article will talk you through the processes Half-Life goes through every frame to determine what is visible, and what is not. Note that it will not tell you how the VIS process works; there have been hundreds of white papers published on efficient methods of BSP tree leaf visibility determination, and it would take ages to describe how Half-Life does it! I will, however, give a basic overview of what VIS actually does, for the purposes of understanding just what the heck I'm on about later on in this article.
When compiling a map, it is first split up into a Binary Space Partition tree, or BSP tree for short. This is basically a method of splitting the world up into manageable chunks which can then be dealt with individually, and are vital in speeding up collision detection, lighting calculations and doing visibility determination. Essentially, the map is first of all split into two parts (figure 1, stage 1) by placing a 3D plane to split the world in half. One side is called the positive side, or the front side, the other the negative side, or the back side. Then, the process happens again, except this time it is done on each of the two new segments treating each segment like a different map, rather than doing it across the entire map (figure 1, stage 2). This keeps happening until the world is split up enough (determined by the compiler) and you end up with your BSP tree. If you keep a track of what was split up from what, you can create a tree of what encloses what, and so do some major speed-ups (figure 2).
Figure 1Figure 2So what does this have to do with visibility determination? Well, when the world has been split into a BSP tree, it's in collections of polygons. Each collection of polygon is called a "BSP leaf", and it's with these that VIS does its work. For each leaf, it generates a list of every other leaf in the world, which simply contains whether that leaf could be seen if you were within the current leaf - this list is called the Potentially Visible Set, or PVS. As you can appreciate, this is a complex process, which is why VIS takes a long time in compilation with complicated maps.
So, after VIS, we've already got some very important visibility determination done, and we're not even into the per-frame loop yet. However, after this, we progress into the heart of the game, and see exactly what it does each frame.
Every frame, the game loops through the BSP leaves to find out which leaf the player is currently standing in. Once it's found it, it uses the PVS to find out what leaves might be seen from where the player currently is, and tosses out the leaves that can't be seen under any circumstance. This is a very crude, but very effective, form of visibility determination. Now that the game is only dealing with the leaves that could be seen from the current viewpoint, it moves onto the second type of visibility determination - frustum culling.
The view frustum is basically the volume in which the player can see. Anything outside of this volume cannot be seen by the player. In 3D, it looks like a pyramid with the top chopped off (with the new surface being the screen, and the base of the pyramid the far clipping plane). However, we don't have 3D monitors, so I'll take the 2D analogy - an isoceles triangle with the top corner chopped off. What the game does is to find out whether, out of the potentially visible leaves, any of them are outside of the view frustum; if they are, they get tossed out too. Figure 3 has an example of this in 2D.
Figure 3After this simple but effective visibility determination method, there isn't very much left that isn't totally invisible to the player from his/her current position and orientation. However, one more, much finer, process is applied to the triangles making up each visible leaf - backface culling.
In 3D, every triangle has a 'normal' vector - this represents the direction that the triangle is facing. All that backface culling does is simply remove every triangle that is facing away from the viewer, as they probably wouldn't (and shouldn't) be visible anyway. This can sometimes chop the amount of triangles to draw by as much as 50%, which is a dramatic decrease.
After these 3 methods are applied - usage of the PVS, frustum culling, and backface culling - the remaining triangles can be rendered by the graphics API (OpenGL, Direct3D or software) with a minimal amount of polygons being drawn that are not visible. You can see what an effect not being able to do the first stage has when you have a large map with a leak - VIS cannot calculate its PVS, and so it is assumed that ALL leaves are visible before the 2nd and 3rd stages are applied.
This concludes our whizz tour of how Half-Life does visibility determination in-game. Hopefully this may give you some ideas as to how to improve your maps' frame-rate performance, or encourage you to read further about the above methods - GameDev.net has some great tutorials should you want to read more. If you have any questions, then feel free to contact me about them.
Comments
You must log in to post a comment. You can login or register a new account.