VERC: Real-Time "TRON 2.0" Glow in Half-Life Last edited 5 years ago2019-04-21 12:37:17 UTC
You are viewing an older revision of this wiki page. The current revision may be more detailed and up-to-date.
Click here to see the current revision of this page.
I'm sure many of us have seen screenshots of TRON 2.0 and noticed the glowing effect that's overlaid onto everything bright. Well, it's possible to have the same effect in Half-Life, too, using vertex and pixel shaders with OpenGL. This article will walk you through the steps in getting it working, and will suggest some alternative effects that could be done using the system we set up here.
To whet your appetite, here's a comparison of scenes before and after the glow is applied. The images on the left are without the effect, and the images on the right are with the effect: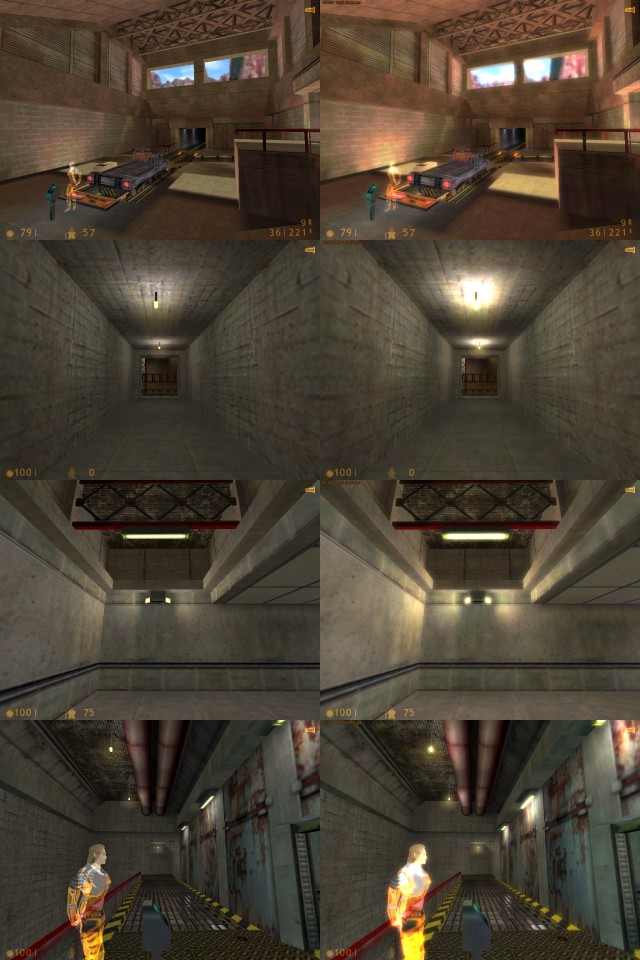 Also, here's an example of a "TRON 2.0"-esque map with four bars of bright colour without the glow and with the glow:
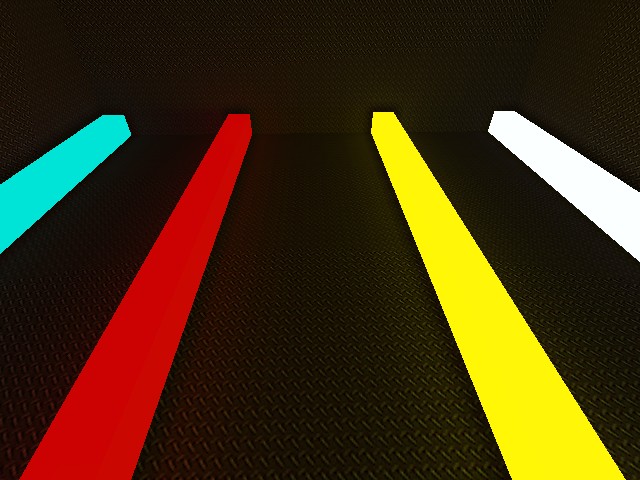 Without the glow
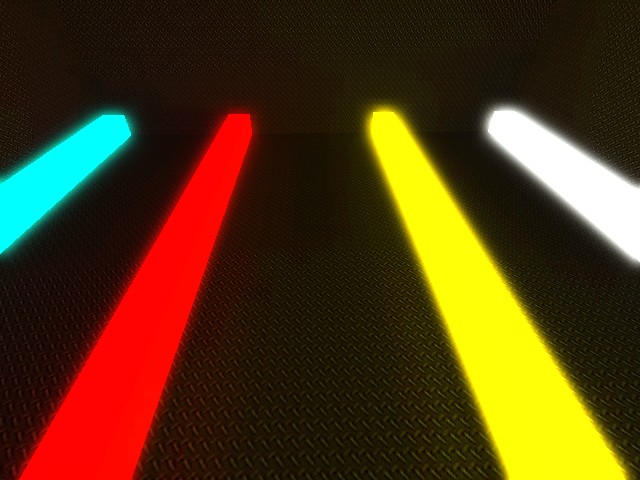 With the glow
Due to the way that this effect is being done, it will only work if the user is using OpenGL as their rendering API. In addition, their graphics card must have support for 4 texture units and fairly primitive vertex and pixel shaders. The effect was tested on an NVIDIA GeForce4 Ti 4200, and should work on the equivalent hardware of ATI.
With the glow
Due to the way that this effect is being done, it will only work if the user is using OpenGL as their rendering API. In addition, their graphics card must have support for 4 texture units and fairly primitive vertex and pixel shaders. The effect was tested on an NVIDIA GeForce4 Ti 4200, and should work on the equivalent hardware of ATI.
Now, onward. To do the grunt work of the effect, we will be using vertex and pixel shaders written in Cg (C for graphics), a high-level shading language developed by NVIDIA. You'll need the Cg Toolkit to be able to compile and run the effects. Make sure you configure Visual C++ to look for include and library files in the appropriate directories of the Cg Toolkit installation.
First things first, we'll create the vertex and pixel shaders that we'll be using to do the effects. Create a folder within your mod directory called "cgshaders" - we'll be putting the shaders inside this folder. Download the 6 .cg files and place them inside this folder. They do the following operations:
Now, open up the client DLL project and go into tri.cpp. You'll need to add the following include directives:
Now we're ready to create the initialization function. I'll give the code in sections and describe what they're doing as we go along.
Also notice that the blur texture is half the dimensions of the scene texture, in order to save on fillrate. The effect does not suffer, as we are blurring the image anyway - we don't need exact details.
Now that's done, we can move onto the rendering functionality that is called every frame to actually do the glow effect. Firstly, a couple more utility functions to make our life a bit easier in the rendering function itself. The next function we'll add is one that simply draws a quad with dimensions of 1x1 across the screen:
The other utility function we'll add is one that performs a blur pass:
How this function is used will become apparant when we go through the function that does the actual effect, which is what we need to specify next. As for the initialization function, I'll go through it step-by-step, explaining as we go.
All that's left now is to call the function from the right place. There are a few places that we can do it, but the only place where everything in the scene will get blurred is if we place it just before the HUD is rendered. Open up
The multi-pass system employed here is suitable for a variety of effects. Here are some suggestions for other effects that could be done:
To whet your appetite, here's a comparison of scenes before and after the glow is applied. The images on the left are without the effect, and the images on the right are with the effect:
Without the glowWith the glowNow, onward. To do the grunt work of the effect, we will be using vertex and pixel shaders written in Cg (C for graphics), a high-level shading language developed by NVIDIA. You'll need the Cg Toolkit to be able to compile and run the effects. Make sure you configure Visual C++ to look for include and library files in the appropriate directories of the Cg Toolkit installation.
First things first, we'll create the vertex and pixel shaders that we'll be using to do the effects. Create a folder within your mod directory called "cgshaders" - we'll be putting the shaders inside this folder. Download the 6 .cg files and place them inside this folder. They do the following operations:
- glow_darken_vp/fp.cg - Makes the dark areas of the supplied texture much darker whilst leaving bright areas relatively unaffected by multiplying the texture by itself twice.
- glow_blur_vp/fp.cg - Blurs the supplied texture by sampling it at 4 points, depending on the X and Y offsets specified.
- glow_combine_vp/fp.cg - Combines the blur texture with the original scene texture.
Now, open up the client DLL project and go into tri.cpp. You'll need to add the following include directives:
#include <windows.h>
#include <gl/gl.h>
#include <gl/glext.h>
#include <cg/cg.h>
#include <cg/cgGL.h>extern "C" { ... } block, add the following include and global variables:
#include "r_studioint.h"

extern engine_studio_api_t IEngineStudio;

bool g_bInitialised = false;

PFNGLACTIVETEXTUREARBPROC glActiveTextureARB = NULL;
PFNGLMULTITEXCOORD2FARBPROC glMultiTexCoord2fARB = NULL;

CGcontext g_cgContext;
CGprofile g_cgVertProfile;
CGprofile g_cgFragProfile;

CGprogram g_cgVP_GlowDarken;
CGprogram g_cgFP_GlowDarken;

CGprogram g_cgVP_GlowBlur;
CGprogram g_cgFP_GlowBlur;

CGprogram g_cgVP_GlowCombine;
CGprogram g_cgFP_GlowCombine;

CGparameter g_cgpVP0_ModelViewMatrix;
CGparameter g_cgpVP1_ModelViewMatrix;
CGparameter g_cgpVP1_XOffset;
CGparameter g_cgpVP1_YOffset;
CGparameter g_cgpVP2_ModelViewMatrix;

unsigned int g_uiSceneTex;
unsigned int g_uiBlurTex;bool LoadProgram(CGprogram* pDest, CGprofile profile, const char* szFile)
{
const char* szGameDir = gEngfuncs.pfnGetGameDirectory();
char file[512];
sprintf(file, "%s/%s", szGameDir, szFile);
*pDest = cgCreateProgramFromFile(g_cgContext, CG_SOURCE, file, profile, "main", 0);
if (!(*pDest)) {
MessageBox(NULL, cgGetErrorString(cgGetError()), NULL, NULL);
return false;
}
cgGLLoadProgram(*pDest);
return true;
}Now we're ready to create the initialization function. I'll give the code in sections and describe what they're doing as we go along.
void InitScreenGlow(void)
{
     if (IEngineStudio.IsHardware() != 1)
          return;

gEngfuncs.pfnRegisterVariable("cg_blur_steps", "4", 0);// OPENGL EXTENSION LOADING
glActiveTextureARB = (PFNGLACTIVETEXTUREARBPROC)wglGetProcAddress("glActiveTextureARB");// TEXTURE CREATION
unsigned char* pBlankTex = new unsigned char[ScreenWidth*ScreenHeight*3];
memset(pBlankTex, 0, ScreenWidth*ScreenHeight*3);
glGenTextures(1, &g;_uiSceneTex);
glBindTexture(GL_TEXTURE_RECTANGLE_NV, g_uiSceneTex);
glTexParameteri(GL_TEXTURE_RECTANGLE_NV, GL_TEXTURE_MIN_FILTER, GL_LINEAR);
glTexParameteri(GL_TEXTURE_RECTANGLE_NV, GL_TEXTURE_MAG_FILTER, GL_LINEAR);
glTexImage2D(GL_TEXTURE_RECTANGLE_NV, 0, GL_RGB8, ScreenWidth, ScreenHeight, 0, GL_RGB8, GL_UNSIGNED_BYTE, pBlankTex);
glGenTextures(1, &g;_uiBlurTex);
glBindTexture(GL_TEXTURE_RECTANGLE_NV, g_uiBlurTex);
glTexParameteri(GL_TEXTURE_RECTANGLE_NV, GL_TEXTURE_MIN_FILTER, GL_LINEAR);
glTexParameteri(GL_TEXTURE_RECTANGLE_NV, GL_TEXTURE_MAG_FILTER, GL_LINEAR);
glTexImage2D(GL_TEXTURE_RECTANGLE_NV, 0, GL_RGB8, ScreenWidth/2, ScreenHeight/2, 0, GL_RGB8, GL_UNSIGNED_BYTE, pBlankTex);
delete[] pBlankTex;
g_bInitialised = true;Also notice that the blur texture is half the dimensions of the scene texture, in order to save on fillrate. The effect does not suffer, as we are blurring the image anyway - we don't need exact details.
// CG INITIALISATION

g_cgContext = cgCreateContext();
if (!g_cgContext) {
     MessageBox(NULL, "Couldn't make Cg context", NULL, NULL);
     return;
}// VERTEX PROFILE
g_cgVertProfile = cgGLGetLatestProfile(CG_GL_VERTEX);
if (g_cgVertProfile == CG_PROFILE_UNKNOWN) {
MessageBox(NULL, "Couldn't fetch valid VP profile", NULL, NULL);
return;
}
cgGLSetOptimalOptions(g_cgVertProfile);// VP LOADING
if (!LoadProgram(&g;_cgVP_GlowDarken, g_cgVertProfile, "cgprograms/glow_darken_vp.cg"))
return;
if (!LoadProgram(&g;_cgVP_GlowBlur, g_cgVertProfile, "cgprograms/glow_blur_vp.cg"))
return;
if (!LoadProgram(&g;_cgVP_GlowCombine, g_cgVertProfile, "cgprograms/glow_combine_vp.cg"))
return;// VP PARAM GRABBING
g_cgpVP0_ModelViewMatrix = cgGetNamedParameter(g_cgVP_GlowDarken, "ModelViewProj");
g_cgpVP1_ModelViewMatrix = cgGetNamedParameter(g_cgVP_GlowBlur, "ModelViewProj");
g_cgpVP1_XOffset = cgGetNamedParameter(g_cgVP_GlowBlur, "XOffset");
g_cgpVP1_YOffset = cgGetNamedParameter(g_cgVP_GlowBlur, "YOffset");
g_cgpVP2_ModelViewMatrix = cgGetNamedParameter(g_cgVP_GlowCombine, "ModelViewProj");// FRAGMENT PROFILE
g_cgFragProfile = cgGLGetLatestProfile(CG_GL_FRAGMENT);
if (g_cgFragProfile == CG_PROFILE_UNKNOWN) {
MessageBox(NULL, "Couldn't fetch valid FP profile", NULL, NULL);
return;
}
cgGLSetOptimalOptions(g_cgFragProfile); // FP LOADING
if (!LoadProgram(&g;_cgFP_GlowDarken, g_cgFragProfile, "cgprograms/glow_darken_fp.cg"))
return;
if (!LoadProgram(&g;_cgFP_GlowBlur, g_cgFragProfile, "cgprograms/glow_blur_fp.cg"))
return;
if (!LoadProgram(&g;_cgFP_GlowCombine, g_cgFragProfile, "cgprograms/glow_combine_fp.cg"))
return;
}Now that's done, we can move onto the rendering functionality that is called every frame to actually do the glow effect. Firstly, a couple more utility functions to make our life a bit easier in the rendering function itself. The next function we'll add is one that simply draws a quad with dimensions of 1x1 across the screen:
void DrawQuad(int width, int height)
{
     glBegin(GL_QUADS);

     glTexCoord2f(0,0);
     glVertex3f(0, 1, -1);
     glTexCoord2f(0,height);
     glVertex3f(0, 0, -1);
     glTexCoord2f(width,height);
     glVertex3f(1, 0, -1);
     glTexCoord2f(width,0);
     glVertex3f(1, 1, -1);

     glEnd();
}The other utility function we'll add is one that performs a blur pass:
void DoBlur(unsigned int uiSrcTex, unsigned int uiTargetTex, int srcTexWidth, int srcTexHeight, int destTexWidth, int destTexHeight, float xofs, float yofs)
{
     cgGLBindProgram(g_cgVP_GlowBlur);
     cgGLBindProgram(g_cgFP_GlowBlur);

     glActiveTextureARB(GL_TEXTURE0_ARB);
     glEnable(GL_TEXTURE_RECTANGLE_NV);
     glBindTexture(GL_TEXTURE_RECTANGLE_NV, uiSrcTex);

     glActiveTextureARB(GL_TEXTURE1_ARB);
     glEnable(GL_TEXTURE_RECTANGLE_NV);
     glBindTexture(GL_TEXTURE_RECTANGLE_NV, uiSrcTex);

     glActiveTextureARB(GL_TEXTURE2_ARB);
     glEnable(GL_TEXTURE_RECTANGLE_NV);
     glBindTexture(GL_TEXTURE_RECTANGLE_NV, uiSrcTex);

     glActiveTextureARB(GL_TEXTURE3_ARB);
     glEnable(GL_TEXTURE_RECTANGLE_NV);
     glBindTexture(GL_TEXTURE_RECTANGLE_NV, uiSrcTex);

     cgGLSetParameter1f(g_cgpVP1_XOffset, xofs);
     cgGLSetParameter1f(g_cgpVP1_YOffset, yofs);

     glViewport(0, 0, destTexWidth, destTexHeight);

     DrawQuad(srcTexWidth, srcTexHeight);

     glBindTexture(GL_TEXTURE_RECTANGLE_NV, uiTargetTex);
     glCopyTexImage2D(GL_TEXTURE_RECTANGLE_NV, 0, GL_RGB, 0, 0, destTexWidth, destTexHeight, 0);
}How this function is used will become apparant when we go through the function that does the actual effect, which is what we need to specify next. As for the initialization function, I'll go through it step-by-step, explaining as we go.
void RenderScreenGlow(void)
{
     if (IEngineStudio.IsHardware() != 1)
          return;

     if (!g_bInitialised)
          InitScreenGlow();

     if ((int)gEngfuncs.pfnGetCvarFloat("cg_blur_steps") == 0)
return;// STEP 1: Grab the screen and put it into a texture
glActiveTextureARB(GL_TEXTURE0_ARB);
glEnable(GL_TEXTURE_RECTANGLE_NV);
glBindTexture(GL_TEXTURE_RECTANGLE_NV, g_uiSceneTex);
glCopyTexImage2D(GL_TEXTURE_RECTANGLE_NV, 0, GL_RGB, 0, 0, ScreenWidth, ScreenHeight, 0);// STEP 2: Set up an orthogonal projection
glMatrixMode(GL_MODELVIEW);
glPushMatrix();
glLoadIdentity();
glMatrixMode(GL_PROJECTION);
glPushMatrix();
glLoadIdentity();
glOrtho(0, 1, 1, 0, 0.1, 100);
glColor3f(1,1,1);// STEP 3: Initialize Cg programs and parameters for darkening mid to dark areas of the scene
cgGLEnableProfile(g_cgVertProfile);
cgGLEnableProfile(g_cgFragProfile);
cgGLBindProgram(g_cgVP_GlowDarken);
cgGLBindProgram(g_cgFP_GlowDarken);
cgGLSetStateMatrixParameter(g_cgpVP0_ModelViewMatrix, CG_GL_MODELVIEW_PROJECTION_MATRIX, CG_GL_MATRIX_IDENTITY);// STEP 4: Render the current scene texture to a new, lower-res texture, darkening non-bright areas of the scene
glViewport(0, 0, ScreenWidth/2, ScreenHeight/2);
glActiveTextureARB(GL_TEXTURE0_ARB);
glBindTexture(GL_TEXTURE_RECTANGLE_NV, g_uiSceneTex);
DrawQuad(ScreenWidth, ScreenHeight);
glBindTexture(GL_TEXTURE_RECTANGLE_NV, g_uiBlurTex);
glCopyTexImage2D(GL_TEXTURE_RECTANGLE_NV, 0, GL_RGB, 0, 0, ScreenWidth/2, ScreenHeight/2, 0);// STEP 5: Initialise Cg programs and parameters for blurring
cgGLBindProgram(g_cgVP_GlowBlur);
cgGLBindProgram(g_cgFP_GlowBlur);
cgGLSetStateMatrixParameter(g_cgpVP1_ModelViewMatrix, CG_GL_MODELVIEW_PROJECTION_MATRIX, CG_GL_MATRIX_IDENTITY);// STEP 6: Apply blur
int iNumBlurSteps = (int)gEngfuncs.pfnGetCvarFloat("cg_blur_steps");
for (int i = 0; i < iNumBlurSteps; i++) {
DoBlur(g_uiBlurTex, g_uiBlurTex, ScreenWidth/2, ScreenHeight/2, ScreenWidth/2, ScreenHeight/2, 1, 0);
DoBlur(g_uiBlurTex, g_uiBlurTex, ScreenWidth/2, ScreenHeight/2, ScreenWidth/2, ScreenHeight/2, 0, 1);
}// STEP 7: Set up Cg for combining blurred glow with original scene
cgGLBindProgram(g_cgVP_GlowCombine);
cgGLBindProgram(g_cgFP_GlowCombine);
cgGLSetStateMatrixParameter(g_cgpVP2_ModelViewMatrix, CG_GL_MODELVIEW_PROJECTION_MATRIX, CG_GL_MATRIX_IDENTITY);
glActiveTextureARB(GL_TEXTURE0_ARB);
glEnable(GL_TEXTURE_RECTANGLE_NV);
glBindTexture(GL_TEXTURE_RECTANGLE_NV, g_uiSceneTex);
glActiveTextureARB(GL_TEXTURE1_ARB);
glEnable(GL_TEXTURE_RECTANGLE_NV);
glBindTexture(GL_TEXTURE_RECTANGLE_NV, g_uiBlurTex);// STEP 8: Do the combination, rendering to the screen without grabbing it to a texture
glViewport(0, 0, ScreenWidth, ScreenHeight);
DrawQuad(ScreenWidth/2, ScreenHeight/2); // STEP 9: Restore the original projection and modelview matrices and disable rectangular textures on all units
glMatrixMode(GL_PROJECTION);
glPopMatrix();
glMatrixMode(GL_MODELVIEW);
glPopMatrix();
cgGLDisableProfile(g_cgVertProfile);
cgGLDisableProfile(g_cgFragProfile);
glActiveTextureARB(GL_TEXTURE0_ARB);
glDisable(GL_TEXTURE_RECTANGLE_NV);
glActiveTextureARB(GL_TEXTURE1_ARB);
glDisable(GL_TEXTURE_RECTANGLE_NV);
glActiveTextureARB(GL_TEXTURE2_ARB);
glDisable(GL_TEXTURE_RECTANGLE_NV);
glActiveTextureARB(GL_TEXTURE3_ARB);
glDisable(GL_TEXTURE_RECTANGLE_NV);
glActiveTextureARB(GL_TEXTURE0_ARB);
}All that's left now is to call the function from the right place. There are a few places that we can do it, but the only place where everything in the scene will get blurred is if we place it just before the HUD is rendered. Open up
cdll_int.cpp and add the following just before the InitInput prototype:
// IMAGE-SPACE GLOW
extern void InitScreenGlow(void);
extern void RenderScreenGlow(void);HUD_Redraw and add this just before gHUD.Redraw is called:
// IMAGE-SPACE GLOW
RenderScreenGlow();HUD_VidInit and add this after VGui_Startup is called:
// IMAGE-SPACE GLOW
InitScreenGlow();The multi-pass system employed here is suitable for a variety of effects. Here are some suggestions for other effects that could be done:
- Blurring - Rather than blurring to make a glow, simply blur the current scene and then render that to the screen. If you activate this when the player has received damage from a melee attack or falling (when the screen is skewed) it could create an interesting disorientation effect. Combine it with rendering two copies of the screen offset from one another for an interesting double-vision effect.
- Emboss - For the more wacky mods, you could have an embossed effect. A convolution filter can be applied to the image Google it) to do this with just one pass, such as the 3x3 filter given in this article on GameDev.net.
- Inverse - Another simple-but-wacky effect would be to invert the image's colours, giving a feel as if it was a negative image. You could render an image of a film frame over the top to make it feel like a processed roll of film.
- One of the above plus application map - You can blend one of the above effects with the original image in differing amounts by using another texture map that defines the opacity of the original effect. Simply multiply the effect at that pixel by the opacity at that pixel and add the original image multiplied by one minus the opacity.
Comments
You must log in to post a comment. You can login or register a new account.