Vlatitude Archive: Understanding the Clip Tool Last edited 5 years ago2019-04-25 09:54:36 UTC
You are viewing an older revision of this wiki page. The current revision may be more detailed and up-to-date.
Click here to see the current revision of this page.
Just to let you know up front, that this is not to be confused with the clip brush, which is used to block the player from certain areas, like an invisible wall. There is a tutorial on this site that Vlad wrote if that's what you're looking for. No, the clip tool is used in WC to cut brushes. Think of a knife cutting an apple into two halves. When you have to halves, you have the choice to either keep the first half and throw the second half away, keep the second half and throw the first half away, or keep both halves. These would be the three different clipping modes I mentioned.
Now let's get it on! To be sure, the clip tool is the button that looks like this on the map tools bar.
1. Okay, start up WC and open a new project. We won't get too fancy since we're just going to worry about understanding clipping better.
2. Create a block. It doesn't matter what size it is or how you want to make it. You can just make one like I did below. Be sure and give it a better texture than that AAATRIGGER texture. After you've made it, select it.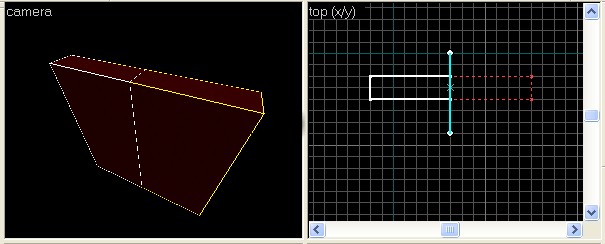 3. Now select the clip tool from the map tools bar. The resize handles on your selected block should have disappeared and the block should now be depicted as dotted red lines. Now what we're going to do is cut that block in half. In the top view, your going to click right above the blocks middle and then drag straight down until you have created a white line with two little white endpoints on each end. Notice how these endpoints snap to the grid? Size the grid down if you have to, because these endpoints will always stick to the grid and it is important to deal with a grid size that you are comfortable with when working with clipping.
4. Now that you have made the line, you are free to click-drag those endpoints wherever you want. If you wanted to make a new clip line, you can press and hold the SHIFT key and then left-click drag again wherever you want and the old line will disappear and a new line will show up where you drag. Note though, you can only have one clip line at a time. Now take a look at the picture above, or on your own WC screen. Do you notice that one side of the block has white around it? If the entire block has white around it, then press SHIFT + X once or twice until you have white on the left side, like above.
5. Press the enter key on your keyboard. What happened?? Well, you have just clipped your brush. You've probably already figured it out, but I'll go over it anyway just in case. Remember the apple analogy I made above in the introduction to this tutorial? Well, think of the white line we made as the knife. The white trim around the section of the block represents what will be kept. Get it?
6. Press CTRL + Z to undo what you just did (or go up to edit > undo on the menu bar, but I made it a point to get used to shortcuts). Now reselect the block and click the clip tool again. Draw a clip line down the middle again, only this time don't press enter just yet. This time, we're going to switch to a different clip mode. You can go about this two ways. The way I prefer, is to press SHIFT + X to cycle to the next mode. The other way you can do it is to simple click the clip tool icon again and this will automatically cycle through the clip modes. Go to the mode where the whole block is selected in white, with the line going through the middle of the block like in the picture to the left. Press enter. See what happened? In this case, you only split the block into two separate halves. I'm sure you can figure out what the other clip mode does; the exact same thing as the first, just with the opposite side.
What good is this? How is this going to make you a better mapper? Well, if you're ready to understand this, read on to some of the more advanced uses for the clip tool.
IMPORTANT NOTE: WC v3.3 and below has a bug in it that causes a brush to turn black after being clipped by the clip tool. This will probably get very annoying for you as it did for me. The only way to fix this is to select the brush and then click the to Entity button and then the to World button, to turn it back into a worldbrush. This will make the brush to back to normal. The Hammer edition doesn't seem to be affected by this problem, so the other alternative is to download Hammer and upgrade to that.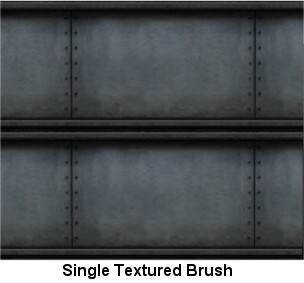
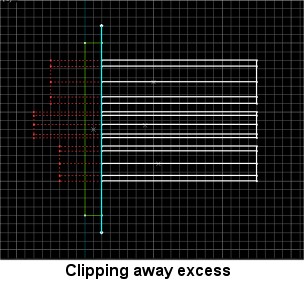
You would make your objects (or whatever) a little bit longer than they are supposed to be. The reason you would do this is so that a little bit of that object passes into the wall, as seen in the below picture on the left. After that, you will select the objects that you need to flush to the wall and you will clip away the excess. Draw a clip line down the front face of your wall, as shown in the picture below on the right. Now the pipes meet the wall seamlessly.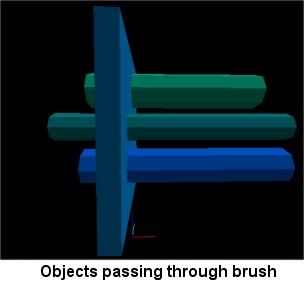
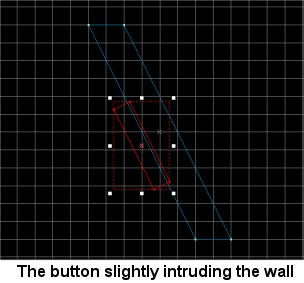
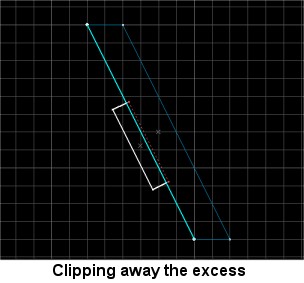
 Okay, you can get that same result simply by simply resizing right? Why would you need to do that? Well, in certain cases, resizing may not be an option. Say for example, you want to place a button on the wall, but the catch is that the wall is slanted. Now you want that button to be flush with the wall, but you can't get it right, even with vertex manipulation. What would you do? The biggest problem with this type of thing is that the grid won't allow you to flush it by resizing or moving the object. By making the button intrude into the wall slightly, and then clipping away the intrusion, you can guarantee that the button will flush with the wall. You can use the vertex point on the front part of the wall to make sure that everything is consistent (that's assuming that you made it so the points of the wall snap to the grid). See the pictures below to understand what I mean. Also notice that the endpoints of the clip segment on the right picture are on the points of the wall brush.

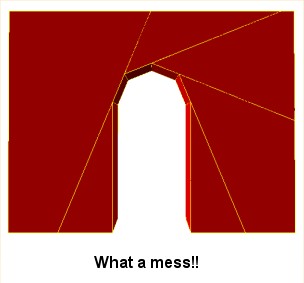 What would happen if we used the carve tool? Well, let me show you. I made an object in the shape of the hole I wanted to create, which looks like the picture on the left. Now I used that shape to carve out a hole in a wall. See what happened in the picture to the right.
What a big mess that made. This is murder on the framerate and the polycount. There is fortunately a better way to do this. How you ask? By doing what I say, you silly people!
First, create a standard block, that would be a good wall. This will be the frame of your door. Next, cut it like you would a standard rectangular door. When you make the cut for the middle block (the top of the door frame) make those cuts vertically, not horizontally. Confused? Well, that's where pictures are most useful. Look at the one below to understand what I mean.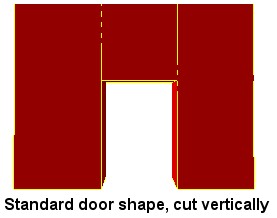 Okay, so now you hopefully get the picture (yes, the pun was intended). Now what? Well, there are a couple of ways that you can go about this. One with a visual aid, and one without. So that you'll understand better, I'll do the one with the visual aid. I still use a visual aid myself sometimes, because it helps keep you in line, much like a ruler will help you measure accurate sizes. This visual aid, will guide you in the process of cutting the top frame of your arched doorway. This will be, of course, where the arch comes in. Your visual guide is going to be a cylinder block. I want the top of my archway to have four cuts in it, so I'm going to make an eight sided cylinder. Don't worry if you're confused, the picture should help out. What you're going to do, is use that cylinder as a template by placing half of it inside of your doorframe top. Change the proportions so that the cylinder is the width of the doorframe and looks right.
Now, if you made an eight sized cylinder and it's proportions are even, each vertex of the cylinder template should snap to a point on the grid (shrink your grid size down if it doesn't). This is where you are going to cut your doorframe top. See, what we're doing here, is cutting the doorframe top block into four separate brushes. These will be vertical made at the vertex of the cylinder. Don't worry about cutting the cylinder or anything, because we're just using it as a guide, and we won't keep it in the end anyway. Look at the picture to understand what I mean.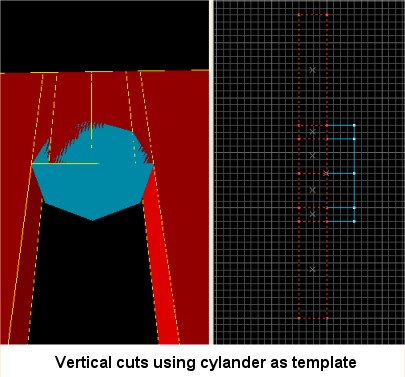 Okay, now we're going to cut our angles. Again, we'll be following the cylinder as a template. Some of you may see how this is working already, and some may still be a little confused. Don't worry, just follow along and you'll understand when you finish.
Now you will select each individual cut block you made, and you will clip off the ends with the clip too, in the same angle as the cylinder template. Just follow the vertexes of the cylinder! Make sure the doorframe block that you want to cut is selected, and now it is just a matter of drawing a line from point A to point B. Vertex to vertex if you will. Look at the picture below, you'll understand (I love pictures).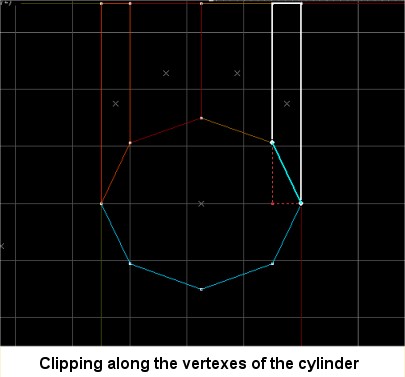 Note that the grid size is a little big. This is only so that you can see the picture better, but your gridsize should be much tighter so that all the vertices will align to the grid.
Now you're pretty much done. Select your cylinder template and delete that sucker! We don't need it anymore. Take a look at what you've done. Aren't you special?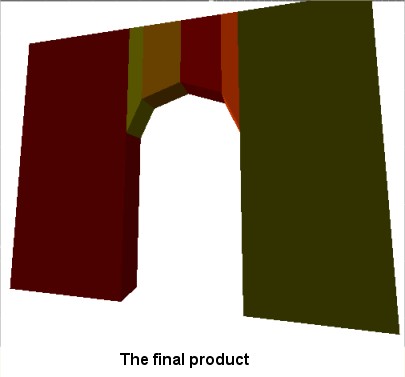 And there you have it. Hopefully now, you'll understand just how important this tool is. I couldn't get by without it. As you get comfortable with it, you'll find endless uses for it. For example, when I create a map, I only use the block creation tool once, for the very first block. From then on, when I need additional blocks, I simply extend and existing block, cut the excess piece off with the clip tool and resize it or reuse it how I see fit. This method makes me much faster and more productive. I'm sure you'll find all sorts of methods you can use too. Now go and make some art.
Now let's get it on!
The Basics
1. Okay, start up WC and open a new project. We won't get too fancy since we're just going to worry about understanding clipping better.
2. Create a block. It doesn't matter what size it is or how you want to make it. You can just make one like I did below. Be sure and give it a better texture than that AAATRIGGER texture. After you've made it, select it.
4. Now that you have made the line, you are free to click-drag those endpoints wherever you want. If you wanted to make a new clip line, you can press and hold the SHIFT key and then left-click drag again wherever you want and the old line will disappear and a new line will show up where you drag. Note though, you can only have one clip line at a time. Now take a look at the picture above, or on your own WC screen. Do you notice that one side of the block has white around it? If the entire block has white around it, then press SHIFT + X once or twice until you have white on the left side, like above.
5. Press the enter key on your keyboard. What happened?? Well, you have just clipped your brush. You've probably already figured it out, but I'll go over it anyway just in case. Remember the apple analogy I made above in the introduction to this tutorial? Well, think of the white line we made as the knife. The white trim around the section of the block represents what will be kept. Get it?
6. Press CTRL + Z to undo what you just did (or go up to edit > undo on the menu bar, but I made it a point to get used to shortcuts). Now reselect the block and click the clip tool again. Draw a clip line down the middle again, only this time don't press enter just yet. This time, we're going to switch to a different clip mode. You can go about this two ways. The way I prefer, is to press SHIFT + X to cycle to the next mode.
What good is this? How is this going to make you a better mapper? Well, if you're ready to understand this, read on to some of the more advanced uses for the clip tool.
IMPORTANT NOTE: WC v3.3 and below has a bug in it that causes a brush to turn black after being clipped by the clip tool. This will probably get very annoying for you as it did for me. The only way to fix this is to select the brush and then click the to Entity button and then the to World button, to turn it back into a worldbrush. This will make the brush to back to normal. The Hammer edition doesn't seem to be affected by this problem, so the other alternative is to download Hammer and upgrade to that.
Intermediate Uses
Multiple textured walls:
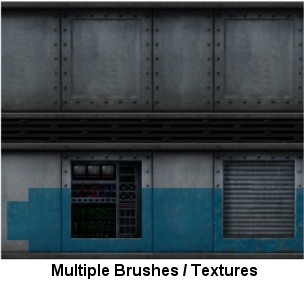
The simple fact is that giving a wall more than one texture will make your wall look less boring. It's often also necessary and essential to your maps aesthetic success. Make sense? Good. Now how do you do it? It's a simple matter of splitting a brush into two separate brushes and giving them two separate textures. These textures should somehow work with each other. Just look below to understand what I mean. This is just an example so you walls don't necessarily have to be as busy as the one on the right.Flushing objects:
Say you wanted to butt a pipe up into a wall. How would you do that? You could just measure the units or resize, but what would you do if you have several objects that need to be flush with the wall, or complex objects? This is where the clip tool will save a lot of trouble.You would make your objects (or whatever) a little bit longer than they are supposed to be. The reason you would do this is so that a little bit of that object passes into the wall, as seen in the below picture on the left. After that, you will select the objects that you need to flush to the wall and you will clip away the excess. Draw a clip line down the front face of your wall, as shown in the picture below on the right. Now the pipes meet the wall seamlessly.
Advanced Use
Making archways:
Okay, you should already know how to make a standard doorway. Now say you want something a little more interesting. Many people would like to use arched doorways but have no idea how to go about it, or do it very wrong. The wrong way is to use the carve tool. You should never use the carve tool for something like this. You can really only get away with using the carve tool to make square holes. Personally though, if you know how to use the clip tool, then it's best to always use that whenever you can (and you really should). You will have more control over what you're doing and you won't get any unexpected results.What a big mess that made. This is murder on the framerate and the polycount. There is fortunately a better way to do this. How you ask? By doing what I say, you silly people!
First, create a standard block, that would be a good wall. This will be the frame of your door. Next, cut it like you would a standard rectangular door. When you make the cut for the middle block (the top of the door frame) make those cuts vertically, not horizontally. Confused? Well, that's where pictures are most useful. Look at the one below to understand what I mean.
Now, if you made an eight sized cylinder and it's proportions are even, each vertex of the cylinder template should snap to a point on the grid (shrink your grid size down if it doesn't). This is where you are going to cut your doorframe top. See, what we're doing here, is cutting the doorframe top block into four separate brushes. These will be vertical made at the vertex of the cylinder. Don't worry about cutting the cylinder or anything, because we're just using it as a guide, and we won't keep it in the end anyway. Look at the picture to understand what I mean.
Now you will select each individual cut block you made, and you will clip off the ends with the clip too, in the same angle as the cylinder template. Just follow the vertexes of the cylinder! Make sure the doorframe block that you want to cut is selected, and now it is just a matter of drawing a line from point A to point B. Vertex to vertex if you will. Look at the picture below, you'll understand (I love pictures).
Now you're pretty much done. Select your cylinder template and delete that sucker! We don't need it anymore. Take a look at what you've done. Aren't you special?
Comments
You must log in to post a comment. You can login or register a new account.