Tutorial: Texture Application Last edited 2 years ago2022-10-10 23:01:21 UTC
Far too many questions on this topic, so I am going to make a simple guide. There is more than one way to apply texture so this isn't going to show you all of them, just the basics.
What I am going to discuss is the best way to avoid Bad Surface Extents and weird texture placement.
The Map
Open Hammer.Open a new map.
On the top Tool Bar click View. Highlight Screen Elements and make sure that Texture Bar is ticked.
Your Screen should look something like this:
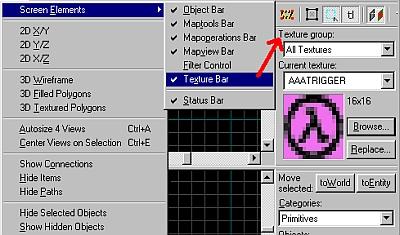 The Screen
Now Click on the Browse button in the Texture Group: shown above you should now be able to see all the textures you have listed in the Tools>Options>Texture Tab that you added when you set Hammer up.
Every time you open a new map, you need to make sure that the textures listed in the setup are the one's you want to use. Hammer does not save previous texture listings, so you can't switch between them. (Lot's of people have asked for this to be included!!).
If you want to Browse a single .wad file that is in your texture list, just click the down arrow where it say's All Textures and choose the .wad file you want to browse.
To select one of the textures from the Browse screen (I used OUT_HCW2A because it is a 128 x 128 texture), just double click on it and you will be returned to the main map screen. Notice how the texture you double clicked on is now shown in the Texture group: It also tells you how big it is.
Right Click on your white dotted box in the 2D views and select Create Object. You are now the proud owner of a textured cube. Select the cube and hollow it to a wall thickness of 2.
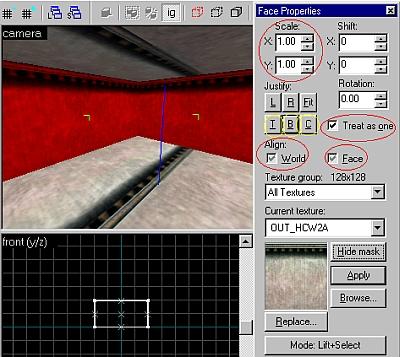
First thing to do is click on Ignore Group and select each of the walls. Now bring up the Toggle Texture Application by clicking the tool or using Shift+A.
 The Walls
Click on B (Bottom), C (Center) or T (Top) to align the texture. Sometimes it is useful to use the Hide Mask button, to get rid of the red and see what your doing, the brushes will be identifyable by there own little orientation arrows. This texture works well with Top because it is a 128 unit texture.
With the Face Properties box open, you can just click the floor and add your floor texture. But this will only change the face of the floor, not the whole brush. To texture the whole brush, closed the Face Properties box and select the brush, then open it again and do the same as above.
Doors
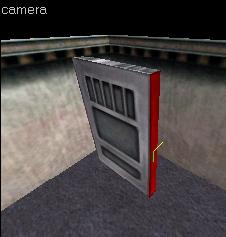
The easy way to texture doors is to find a door texture you like, and build a brush the size of the texture. For this example I have chosen the LAB1_DOOR7 texture. Make a brush 64 x 96, browse to the texture, and create the textured brush the same as you did before.Great, the texture is all over the place... Bring up the Texture Application Tool. Notice how the texture is already shown in the tool, that is because you used the texture group Browse to find it. Now click on the face of the door so that only that face is higlighted. Click on the Fit button, and the texture will fit the face. This is important way to get textures to look right if your door brush is not the same size as the texture.
So why didn't I just FIT the whole door as one? becasue the texture tool will then fit the whole door texture onto each face, so there will be a really weird door texture on the sides and top and bottom.
 The alignment
Things to remember
Try to apply texture at Scale 1:1 initially.Don't use the Fit button to texture to a whole brush, just do the face you need.
Spend some time using the settings on the texture tool to find out what they do. Try selecting multiple faces and using the Treat as Onesetting to do lot's of brushes at once. Great for getting Hallways to look good.
If all else fails, read the Hammer Help file (Texture Application Mode). Which is what you should have done in the first place!
- Article Credits
-
 Andy
–
Original author
Andy
–
Original author
3 Comments
Xale
Commented 14 years ago2010-03-08 07:02:51 UTC
Comment #100659
anyone know with sometimes you can't switch from face to world ? That create a mirrored texture and is very annoying... I have to rotate my brush like 3 or 4 times, or recreate a brush to get this working... d'oh...

Alabastor_Twob
Commented 10 years ago2014-07-31 12:47:03 UTC
Comment #100660
It's not mentioned here, and it should be. If you have a face selected, and while holding the Alt key you right click on another face, it 'wraps' the texture around seamlessly. It's an extremely useful tool.

kimilil
Commented 5 months ago2024-06-08 11:32:14 UTC
Comment #106197
Needs JACK-specific enhancements like Alt+[L/R]click
You must log in to post a comment. You can login or register a new account.