RUST: Chairs, Scientists and Barneys Last edited 2 years ago2022-09-29 07:48:26 UTC
Throughout these tutorials you may notice me paying an obsessive amount of attention to unit-precise placement of entities and brushes. This is necessary to avoid your scientists and barneys ending up stupidly embedded in the furniture.
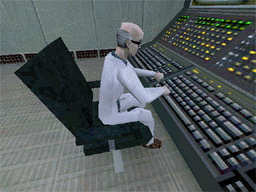
1.) As promised, I will first just show you how to make scientists simply sit in chairs, industriously typing away or something. First make yourself a nice chair. 99% of the time this seems to be the 'Chair, black' prefab in the 'random objects' prefab library of WorldCraft. This is all right for some themes, but remember you can always make your own chair! If you want a scientists feet to rest on the floor and his arse to be firmly planted on the seat, make the top of the seat (ie: the surface that you would sit on) 18 units above the floor. The 'Chair, black' prefab is 22 units from bottom to top of seat, but its only worth shortening if you are really pedantic!
2.) Now we will create the scientist who sits in the chair. There are two ways of doing this. One is to use the convenient monster_sitting_scientist. The other is to use a scripted_sequence and an ordinary monster_scientist. A monster_sitting_scientist will cycle randomly through about 3 sitting animations in which he types, looks thoughtful and is generally hard at work. This is probably what you will want most of the time. The scientist model has only one other sitting animation, in which he is supposedly drinking coffee. If you wanted a scientist to play this animation you would use a scripted_sequence and monster_scientist.
When using the monster_sitting_scientist for the first time, the main cause of frustration is that the origins of his sitting animations are screwed up. Besides this, they seem to sink through brush entities. This usually causes the sitting scientist to end up half buried in the floor, even after many futile attempts to shift the chair a bit, move the scientist higher up etc.
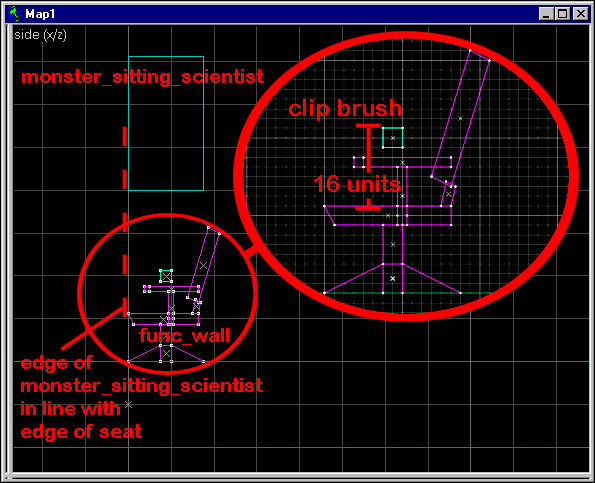
To stop this happening, we will use a small clip brush, taking care in its placement and that of the scientist. First place the chair where you want it and turn it into a func_wall. This is not always necessary but saves us time and patience because the scientist will not get stuck on it where we don't want him to. Create a monster_sitting_scientist and place him high enough above the chair to be clear of it. Now move him so that the edge of his bounding box is in line with the edge of the seat (see screenshot).
Now for the clip brush. Create a brush in the shape of a small cube or similar (eg: 4x4x4) and cover it with the CLIP texture. This will make the brush invisible in-game, but it will however block the monster_sitting_scientist so that he rests on the clip brush. Make sure you leave the clip brush as a world brush (ie: don't make it an entity). Move the clip brush so that its upper surface is exactly 16 units above the upper surface of the seat. Any higher and the scientist will float slightly above his seat, any lower and the scientist will be more noticeably buried in the seat (he will already be slightly buried). Check that the monster_sitting_scientist is facing the right direction, if not adjust his Pitch Yaw Roll (angles) accordingly. Then you are done! The screenshot below shows more clearly what I have said:3.) If you want a scientist to sit with one of the animations not shown in a monster_sitting_scientist, you will need a monster_scientist in combination with a scripted_sequence. First create a monster_scientist and place him out of the way, it does not matter where but the player should preferably not be able to see him when the map loads. Give him a Name (targetname) such as sitting_scientist (it's late and I'm tired
 .
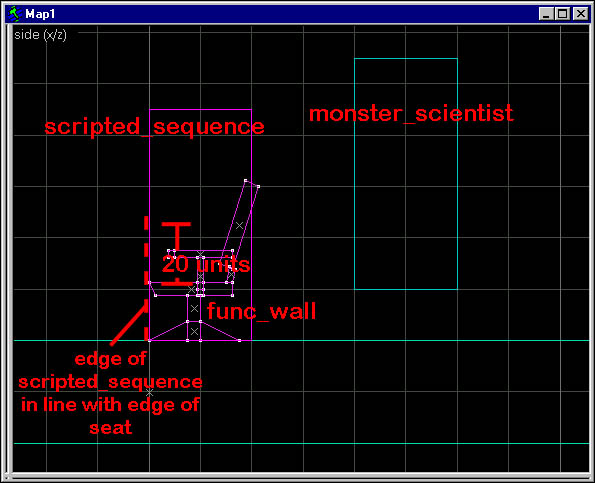
.Create a scripted_sequence and place it so that the edge of its bounding box is in line with the edge of the seat (see screenshot). The animation 'coffee' does not have its origin displaced like the other sitting animations. This makes things somewhat simpler. Place the scripted_sequence so that the center of its bounding box is exactly 20 units above the upper surface of the seat (see screenshot).Give the scripted_sequence the following keyvalues:
- Target Monster (m_iszEntity): this will be the Name (targetname) of the target monster_scientist, in this case sitting_scientist
- Idle Animation (m_iszIdle): this is the name of the animation to play, probably 'coffee' (see note below)
- Search Radius (m_flRadius): you should not place the target monster_scientist too far from the scripted_sequence, so that it is within, say 512 units. But if you have to place it further away then increase this accordingly
- Move to Position (f_MoveTo): set this to Instantaneous (4)
- Pitch Yaw Roll (angles): set this to the direction you want the scientist to face when he is sitting down. In Worldcraft you can also set this with the 'compass'.

Note on the animations: As I have said, the only sitting animation of the scientist model besides those used by the monster_sitting_scientist (and a couple of turning animations which would look stupid looped) is the one named 'coffee'. But if you apply one of the monster_sitting_scientist animations (eg: 'sitscared', 'sitting2', 'sitting3') to the scripted_sequence, you will get a different effect from just simply having used a monster_sitting_scientist. Unlike 'coffee' these animations are not looped, so the animations will play once and then get 'frozen' on the last frame. This looks slightly wierd close up to see a scientist not even breathing, but these poses might add interest and variety, so it might be worth it, from a distance anyway. Anything else I should mention? Oh yeah, if you have added your own sitting animations to the scientist model, you could have them play with the scripted sequence, but then you probably don't need telling anyway.
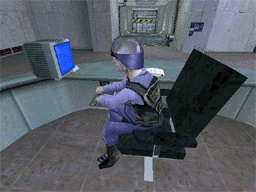
4.) Well by now you should be an expert on adding sitting scientists to your map, so I will move on to barneys. The only sitting animation which the barney model has is the one named 'sit1'. This is the one we will be using to create our sitting, rotating barney.
What we are going to create is a setpiece which utilises an animation that has been precisely choreographed to fit into a particular area in the original game (its near the beginning). You don't have to recreate this exact area when you include the rotating barney in your map, but it will have to fit the animation. So its probably not going to be vastly different after all.
5.) First I will describe the animation in detail. Our barney will be rotating 90 degrees anticlockwise and back again (from the direction you specify in a scripted_sequence). During the part of his animation in which he is facing the direction you specify, he is reading a book in front of him (well thats the idea, anyway). After rotating 90 degrees anticlockwise he does some typing on a keyboard. Try to picture this in the area of your map in which you want the setpiece to occur. You must decide on the direction in which you want the setpiece to be orientated, (eg: does the barney move from facing North to facing West and back again, or from facing South to facing East and back again). You can then get on with creating the surrounding brushwork to which the animation has been choreographed.
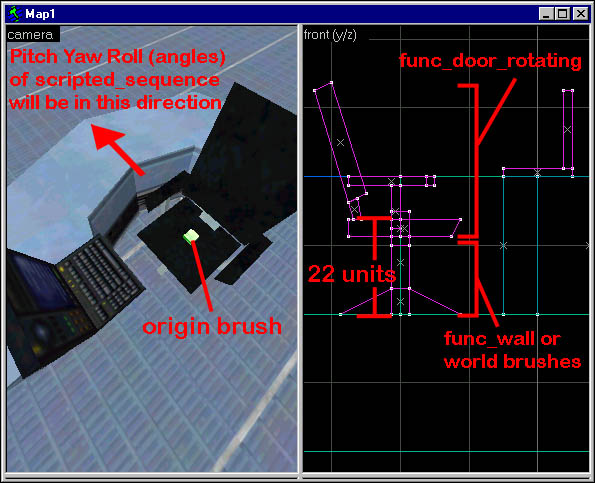
6.) Its time to create the chair. If you want the barneys feet to rest on the floor as he sits, it should be 22 units between the top of the surface he will sit on and the floor on which his feet will rest. The 'Chair, black' prefab, seems to have been optimised for barneys in this respect, fitting this dimension exactly. The chair is going to be a rotating entity (func_door_rotating) and for this reason it is going to need an origin brush. This is a small brush which you incorporate into the chair. It is covered completely with the ORIGIN texture, and is invisible in game. However, its position, (or rather the position of its centre) will tell the game which part of the chair the axis of rotation should pass through. In our case this is the 'stem' of the chair, (see next screenshot).
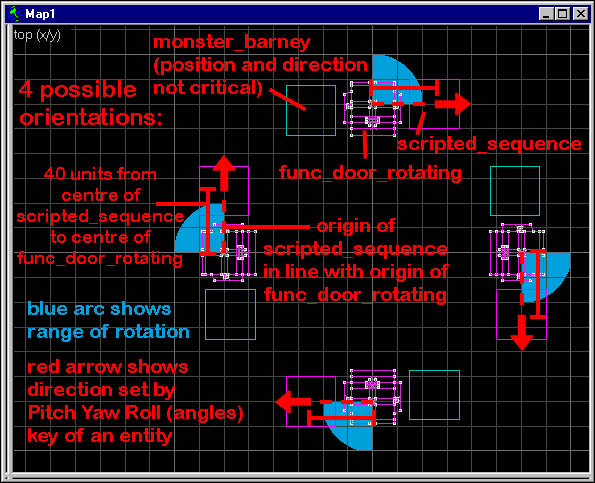
You should build (or rotate) the chair so that, in your map editor it faces the direction in which the barney will face after he has rotated 90 degrees anticlockwise, (if you are confused, see the next screenshot and the diagram at the very bottom of this tutorial).
When you have finished creating the chair, select the part of the chair which you want to rotate, (for example, you may want to not select the base of the chair). Make sure you include the origin brush in your selection. Then turn your selection into a func_door_rotating.
Now for the surrounding furniture in which he is working. If you were paying attention to my description of the animation, you will know that some sort of keyboard may be required which should be in front of the barney after he has rotated 90 degrees anticlockwise (alternatively you could attach the keyboard to the rotating chair). Give our barney ample legroom to rotate.Give the func_door_rotating chair the following keyvalues:
- Name (targetname): this must be set to introchair. It is imperative. If you name it anything else, the func_door_rotating chair will not rotate with the barney. This is because it is the barneys animation that calls introchair on the frames in which he begins to rotate. We are not going to be calling the chair to rotate with other entities
- Speed (speed): set the rotation speed to something like 65
- Delay before close (wait): set this to -1, so that the chair will not rotate unless called to
- Distance (distance): this must be -90 if the chair rotation is to be synchronised with that of the barney
7.) Create a monster_barney and place him in the vicinity of the chair. Again, you probably don't want the player to be able to see him just after the map loads or the player might see the barney flash spookily for a second before he is teleported to his scripted_sequence. Give the barney a Name (targetname) of something like sitting_barney.
8.) Create a scripted_sequence. I will deal with its positioning in a minute (it's weird, I can tell you). Give the scripted_sequence the following keyvalues:
- Target Monster (m_iszEntity): this will be the Name (targetname) of the target monster_barney, in this case sitting_barney
- Idle Animation (m_iszIdle): this is the name of the animation to play, which is 'sit1'
- Search Radius (m_flRadius): you should not place the target monster_barney too far from the scripted_sequence, so that it is within, say 512 units. But if you have to place it further away then increase this accordingly
- Move to Position (f_MoveTo): set this to Instantaneous (4)
- Pitch Yaw Roll (angles): set this to the direction you want the barney to face (before he rotates 90 degrees anticlockwise). This direction should be 90 degrees clockwise from the direction the chair is facing in your map editor. In Worldcraft you can set this direction with the 'compass'.
9.) Now its time to position the scripted_sequence. In this case a picture really is worth a thousand words, hence the diagram. This diagram should tell you everything you need to know about the relative positioning of the func_door_rotating (chair) and the scripted_sequence, apart from the vertical separation of the two entities. This I will tell you now. The lower edge of the scripted_sequence bounding box should be 14 units above the upper surface of the seat.Once you have got that, you are sorted!
If you browse through the animations of many of the models in the Half-Life pak file (use a model viewer like Half-Life Model Viewer), you will notice many long choreographed' animations. The one we have just added is an example. Others include dives through windows, rolls and other action-packed stunts. Some are part of coordinated sets of animations from different monsters (the zombie dragging two victims is one cool example!) All require precise positioning and careful construction of the 'set', but if done well give amazing results!
- Categories
- Archived Articles
- RUST Archive
- Tutorials
- Mapping
- Article Credits
- Venomus – Author
This article was originally published on Gamedesign.net RUST.
The original URL of the article was http://www.gamedesign.net/node/3.
The archived page is available here.
TWHL only publishes archived articles from defunct websites, or with permission.
For more information on TWHL's archiving efforts, please visit the
TWHL Archiving Project page.
Comments
You must log in to post a comment. You can login or register a new account.

