Tutorial: Adding effects to Source textures Last edited 6 years ago2018-06-25 10:04:34 UTC
You are viewing an older revision of this wiki page. The current revision may be more detailed and up-to-date.
Click here to see the current revision of this page.
Introduction
This tutorial assumes that you have a basic knowledge of the VMT file (can create a simple texture). If not, I will briefly give an example below. This also assumes that you can create a VTF. I will mention some programs for creating VTF's and will also explain how to compile with them. I will first explain the differences between a basic and Decal texture. I will then explain what the bump map effect is and how to apply it to your texture, and then continue onto Env Mapping, Detail Textures, and Phong Shading model textures. I will then explain how to make specialized textures for displacement geometry. After that I will include an example map that will showcase the different texture effects. I will then finish the tutorial by discussing three tools for making VTF's and VMT's; Nem's Tools, GIMP, and Paint.NET.What VTF/VMT files are
Right about now you may be wondering what VTF's and VMT's are. If you aren't, skip this paragraph. A VMT or (Valve Material Type) is a text document that is used to 'program' your texture. It will take all the parts of your texture and put them together using the values you supply. They range from extremely simple to very complex. (If you want to see a complicated VMT file look at a water VMT)A basic VMT looks like this:
// Comment: This is a comment and does nothing. Everything after '//' is ignored
// A comment can be used to disable parts of a VMT without deleting all the text

LightmappedGeneric //The shader type (Usually is LightmappedGeneric)
{
    $basetexture "MyFile/MyTextureName" // Location of VTF relative to the 'materials' folder
}
VMT surface properties
A real simple way to make any texture more interesting is the$surfaceprop modifier. This will cause the texture to behave as if it is made out of a certain material. This changes what sound the player's footsteps make, what sound collisions with the texture make, the mass of the texture, may add sound effects like echo, what sound bullets hitting the texture make, and what debris (if any) are emitted when the surface is shot.To change the surface properties of a material simply include $surfaceprop in the VMT. Like this:
LightmappedGeneric
{
    $basetexture "YourFolder/YourTextureName" // VTF that will become the texture
    $surfaceprop "brick" // Will make the texture act like it's made out of brick
}
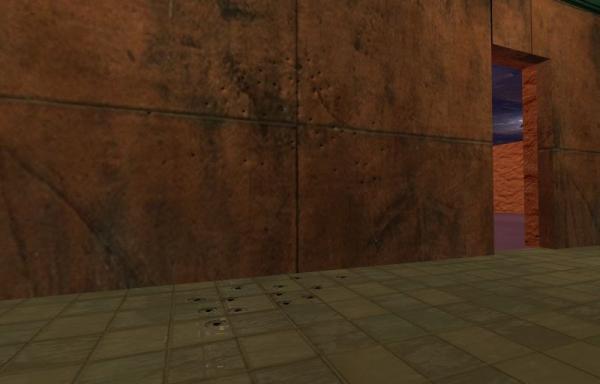 Example of holes in a 'metal' texture vs. holes in a 'tile' texture.
Basic and decal textures
Basic textures are just pictures that are used to 'paint' geometry in game, like models or walls. Decal textures could be thought of as the second layer of 'paint' on your map geometry. They are basically textures that are projected ONTO your other textures. The Valve Developer Community describes decals in this way "[They] can be used to add detail, break repetition, and create effects you cannot with standard textured surfaces alone". Some possible decals are blood, paint splatter, graffiti, road lines, and manholes. There is one type of decal texture, but two different ways to include decal textures in your map. One is the Decal Tool and the other is the Overlay Tool. I will not discuss these in this tutorial but more information can be found at the Valve Developer Community.In order to make a decal you must first have alpha in your VTF file. To do this you would basically surround the portion of the texture you want displayed with black alpha values. Different programs have different ways of editing alpha values. In Paint.NET you would just select the parts of the texture you don't want and 'delete' them.
To make a simple decal for use in mapping you will only need these three commands:
$decal <bool>- Set this to 1 for true, meaning this is a decal texture.$decalscale <float>- This can be a decimal number it changes how big the decal will be. If set to 1; one pixel = one game unit (or inch). A 128 pixel texture with a $decalscale of 0.1 would be about a foot in game.$translucent <bool>- Usually set to 1 for true, this allows the alpha channel to be used and allows non-square decals.
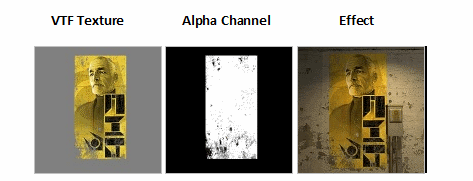 Make up of a decal texture
LightmappedGeneric
{
    $basetexture "decals/YourDecal" // VTF that will become the texture
    $decal 1                       // Makes the texture a decal
    $decalscale 0.1                // Sets the scale of the decal ( '1' means  1 pixel = 1 inch. In this case 10px = 1in)
    $translucent 1                 // Causes the alpha channel to be used as transparency
}
Another type of decal can be used to mimic dents or pock marks. Instead of 'painting' over your texture this will lighten and darken the texture. This type of decal also requires a specially edited VTF. Your VTF will need to be a grayscale image. Every pixel over mid-range gray (RGB 128,128,128) will make the underlying texture lighter while every pixel under mid-range gray will darken the underlying texture. The alpha channel is used to control which parts of the decal will affect the underlying texture. If the alpha channel is left unedited "bordering" can occur around the edges of the decal, creating a well defined square. The VMT for this type of decal is the same as above except the
DecalModulate shader is used instead of the LightmappedGeneric shader, and the $translucent and $decal values are not used.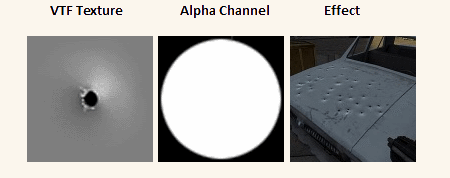 Another Type Of Decal
DecalModulate //This shader is used instead of the 'LightmappedGeneric'
{
    $basetexture "decalsYourDecal" // VTF that will become the texture
    $decalscale 0.1 // Sets the scale of the decal ( '1' means  1 pixel = 1 inch. In this case 10px = 1in)
}
Bump mapping
Bump Mapping or Normal Mapping is a texture effect used to cause 2-D surfaces to appear to be 3-D. It does this by allowing the Source engine to generate specialized shadows and highlights that simulate a surface that isn't flat such as a brick wall or a sandy beach. Bump maps can also be applied to models to add more detail like a woven basket, or a knotted wood desk.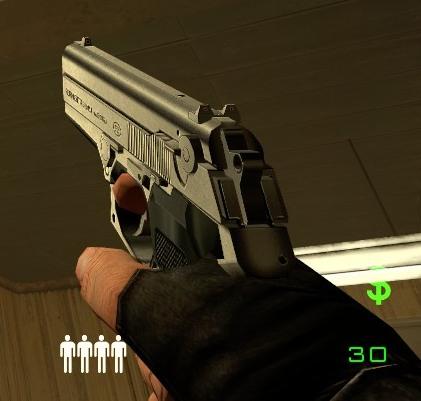 Bump Map on a model
First you will have to create the bump map from your texture. It is possible to create one manually, but it is extremely difficult. However, there are several free tools for creating normal maps. For Photoshop or Paint Shop pro (the tool works for both) go here. For GIMP go here. For Paint.NET go here. Or you can use other programs to generate the Bump Maps such as Nem's Tools, XSI, Blender, NVIDIA Melody, Cinema 4d, xNormal.
The tools above will take a VTF file and generate a bump map for the texture. Normally bump maps are saved with the name "BaseTextureName_normal". So, if I had a texture named "brickWall01" I would create a bump map named "BrickWall01_normal" this is just to avoid confusion.
When using the tools you may have to change a few settings to get the effect you want. Just remember two things: The bump map will be reverse what your texture will look like (the indented parts will appear raised on your texture), and too high of a raised section will cause part of your texture to not receive any light making it constantly black.
 An example bump map generated from image on left
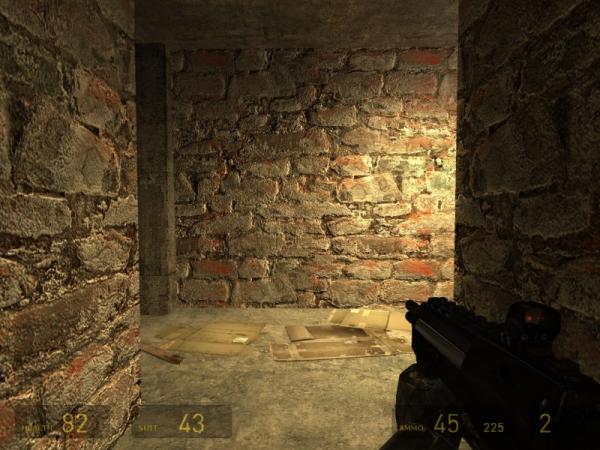 Above Texture in a Game
LightmappedGeneric
{
    $basetexture "YourFolder/YourTextureName" // VTF that will become the texture
    $bumpmap "YourFolder/YourBumpMapName" // VTF that will become bump map
}
$bumpscale <float> (accepts a decimal or non-decimal number that will change the size of the bump map texture). Look here for more info.
Environment mapping
This is probably one of the more advanced texture effects. This will make a texture or model appear to be reflective or just help tint the model/texture to better match the room. This also doesn't require a new VMT, just a VTF and several variables.Unlike bump maps, the VTF files used for Environment Mapping (env mapping) are simple to create. Just create a grayscale image and increase or decrease the brightness until the desired effect is achieved. Darker areas are more reflective and lighter areas are less reflective. However, if you are using a bump map you will need to take your end result and put it into the alpha channel of the bump map VTF using an image editing program. I suggest the free image editor GIMP or the non-free Paint Shop Pro.
After you have your VTF the more difficult part begins. There are several variables you need to use. And
$envmap (this will almost always be set to env_cubemap, any other values are too advanced for this tutorial)
$envmapcontrast <normal>- This changes how bright certain colors are. 0 is normal while 1 is the color squared. To set the values use a number between 0 and 1.- $envmapsaturation <normal>` - Changes whether color is used in the cube map. 0 means it will be grayscale and 1 will be normal. Values between 0 and 1 will scale beween grayscale and full-color
$envmapmask <texture>- The VTF you created above, unless you are using a bump map. Generally these environment mask textures are named by adding "_ref" to the end of the base texture name. (ex. The env mask for "Tile01" would be "Tile01_ref"). If you are using a bump map put the VTF in the alpha channel of the bump map and use$normalmapalphaenvmapmask <bool>(set it to 1 and don't set a$envmapmask).$envmaptint <color>- It looks like this[0,0,0]- the first is red, second is green, third is blue, and each value is between 0 and 1. Tints the reflection with the specified color. Default is [1,1,1]
LightmappedGeneric
{
    $basetexture     "YourFolder/YourTextureName" // VTF that will become the texture
    $envmap env_cubemap  // Leave this way
    $envmapcontrast 0  // changes the contrast
    $envmapsaturation 1 // This will cause the reflection to be full color
    $envmapmask "YourFolder/YourTextureName_env"
    // Use "$normalmapalphaenvmapmask 1" instead of above if using a bump map
    $envmaptint "[1,1,1]" // Normal tint
}
buildcubemaps into the developer console. After this the screen will go black and you will see a bunch of pictures flash across your screen as your cube maps are rendered. After this the map will automatically restart, and your textures will be env mapped. (Note: you will need to do this before you give out your map or else everyone you give your map to will have to run the buildcubemaps command. It's better to run it once and give out your cubemapped version of the map.)This is the VMT for the tile floor shown below:
LightmappedGeneric
{
    "$basetexture" "CustomText/GC Textures/Tile/Tile_Medium01"
    "$surfaceprop" "tile"
    "$bumpmap" "CustomText/GC Textures/Tile/Tile_Medium01_normal"
    "$envmap" "env_cubemap"
    "$envmaptint" "[ .56 .56 .56 ]"
    "$envmapcontrast" 1
    "$envmapsaturation" 1
    "$normalmapalphaenvmapmask" 1 // Because I have a bump map
}
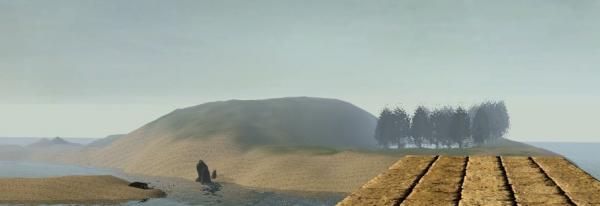
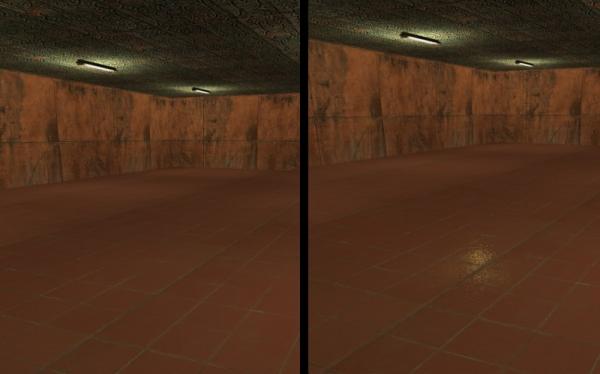 <- Before 'buildcubemaps' (No Env_Map) & After 'buildcubemaps' (With Env_Map) ->
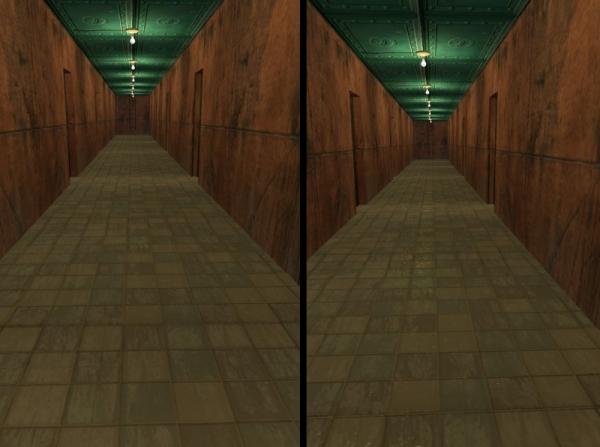 <- Before 'buildcubemaps' (No Env_Map) & After 'buildcubemaps' (With Env_Map) ->
Detail textures
Detail textures simply add detail to textures. The detail texture is a grayscale image that is used to darken a texture when the player looks at it from a short distance. This causes the texture to appear to have fine details.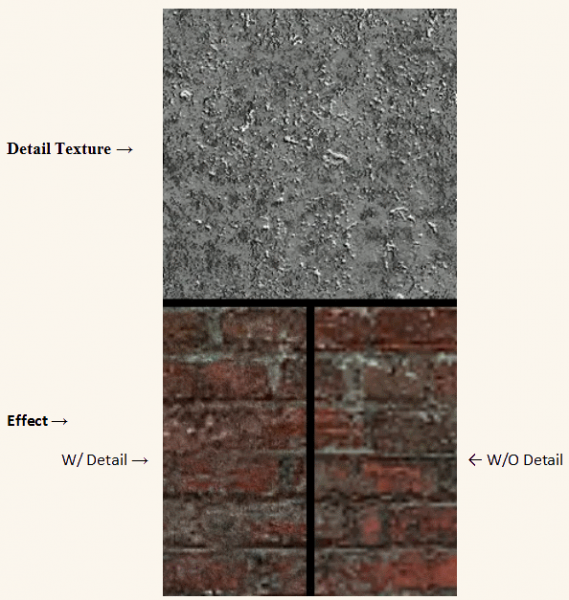 Example of Detail Texture from Half-Life 2 Episode 2
To add the detail texture to your main texture, open the .vmt and add this line to it:
$detail FileNameTextureName$detail command has six modifying commands I will only discuss the three simpler ones.
$detailscaleis the number of times your detail texture will be repeated for every one time your main texture is repeated. So if it was set to the default of 4 your detail texture would be repeated 4 times in your main texture square. This accepts floating-point numbers which means that it accepts decimals like 4.7 or 3.3 but it also accepts 4 or 3. According to the Valve Developer Community 7 or 8 is a good number for a 128 pixel detail texture.$detailblendfactoris a number between 0 and 1 that affects how much your detail texture darkens your main texture. A value of .1 would mean that your detail texture would be almost invisible, while .98 would be almost full visibility. This value will change depending on the detail texture and main texture you are working with. I suggest looking at a few of the default Valve detail textures below and starting with those numbers before using trial and error to find the one that works best for you.
$detailblendmode is either the number 1 or 0 with 0 being the default. All the Valve developer community says about this is to set it to 1 to darken the texture more. However, when I was experimenting with it, looked like a value of 1 would apply the detail image to the normal map of the texture (Make it bumpy) while 0 would apply the detail image to the visual texture (make it darker). I don't have any examples with this set to 1 because the extra bumpiness make all my textures look worse. Experiment with it on your own.Here are some of Valve's default detail textures:
For brickwork & concrete
$detail detail/noise_detail_01$detailscale 7.74
$detailblendfactor 0.8
$detailblendmode 0
For scratched metal
$detail detail/metal_detail_01$detailscale 4.283
$detailblendfactor .65
$detailblendmode 0
For rock
$detail detail/rock_detail_01$detailscale 11
$detailblendfactor 1
$detailblendmode 0
For plaster
$detail detail/plaster_detail_01$detailscale 6.783
$detailblendfactor .8
$detailblendmode 0
Textures for Displacements
See also: Tutorial: Displacements • Tutorial: Creating blend textures for DisplacementsDisplacement textures (also known as blends) are some of the simplest textures to make if you have learned how to use all of the effects above. These textures are simply two textures in one VMT. When placed onto a displacement you can fade from one texture to the other. This is useful for creating effects such as dirt paths on grassy displacements.
To create a blend texture just use all the VMT commands discussed above twice and the "WorldVertexTransition" shader instead of the "LightmappedGeneric" shader. However, the second time you will need to put a 2 after the command. (NOTE: The only commands you cannot do this with are the Detail Texture commands. You can only have 1 detail texture.) So "$basetexutre" would be used first then "$basetexture2". Generally all the commands for the first texture are grouped at the top of the VMT while all the commands for the second texture are grouped at the bottom. This is just to avoid confusion and is not necessary.
Below is an example of a simple blend texture:
"WorldVertexTransition"
{
    "$basetexture" "CustomText/GC Textures/Grass/Grass04"
    "$bumpmap" "CustomText/GC Textures/Grass/Grass04_normal"
    "$surfaceprop" "Grass"

    "$basetexture2" "CustomText/GC Textures/Sand/Sand03"
    "$bumpmap2" "CustomText/GC Textures/Sand/Sand03_normal"
    "$surfaceprop2" "Dirt"

    "%tooltexture" "CustomText/GC Textures/ToolTexture/Blend72_tooltexture"
}
 Above texture in a game.
This command is used in this way:
"%tooltexture" "ThumbnailPath"This texture is a VTF file normally around 64 - 128 pixels square, and it usually fades from the first base texture to the second. Below is an example of what the tooltexture VTF would look like for the above VMT:
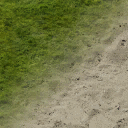 A sample tooltexture
Phong shading
Phong shading is one of the more complicated texture effects to explain, and can only be used on models. Phong shading basically makes something shiny, and there are quite a few settings in the vmt. Below are some pictures of Alyx that demonstrate phong shading in action.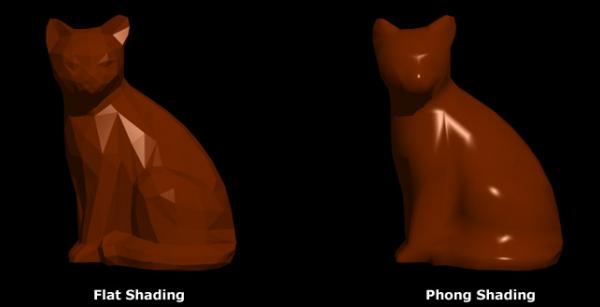 The effect of phong shading.
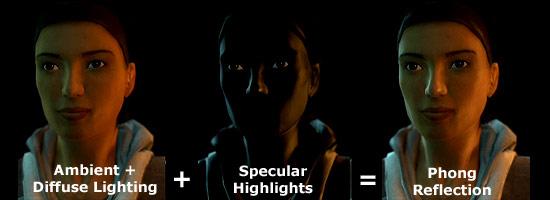 The second picture is phong shading; there are just a bunch of effects that go with it. All of these effects together are called the specular shading.
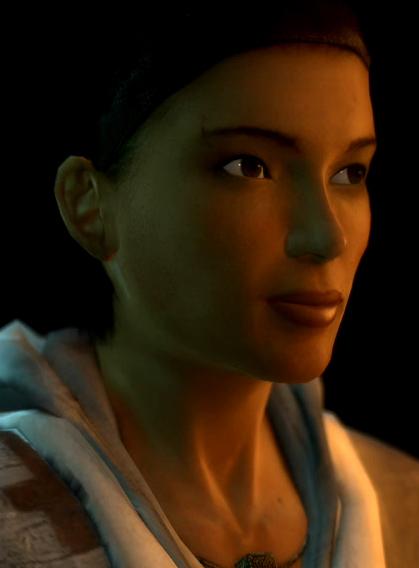 A larger picture of Alyx. Notice the phong shading on her nose and lips.
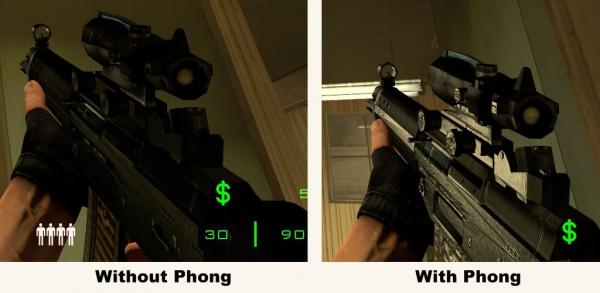 Some other examples of phong
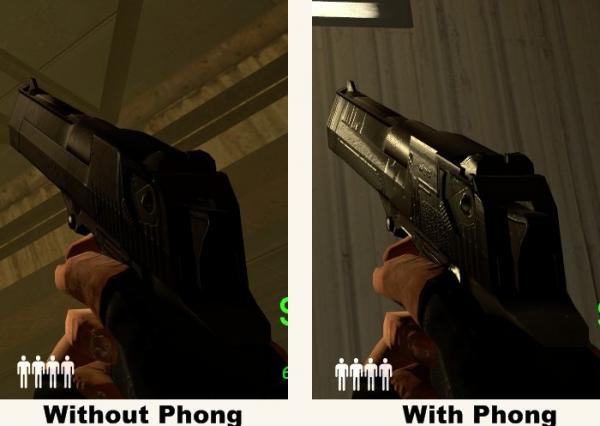 Some other examples of phong
$model 1- This is a boolean value (1 for ON 0 for OFF). You will need to use this every time you make a texture for a model.$phong 1- This is a boolean value (1 for ON 0 for OFF). Set it to 1.$phongexponenttexture TextureFile/TextureName- This is a greyscale texture that affects how the 'shininess' on your model will look. Darker values will cause the shine to be more diffuse (spread out like rubber) lighter values will cause the shine to be more compact (like metal or shiny plastic). This is stored in a separate VTF file. Below is an example of the exponent texture used for the Alex model.$phongexponent 33- This is some number between 0 and 255. It has the same effect as the exponent texture, however instead of defining an exponent value for each pixel the entire model has the same exponent value. So, don't use both an exponent texture and an exponent value. Also, this shouldn't be set above 150. According to the Valve Developer Community it could cause some aliasing (Blocky looking phong effects).$phongboost 1.0- This is some number 0 and above floating point values included (numbers like 2.3 or 56.254). This does what it says; boosts the phong. This will make it brighter. 1 is the default value; you'll have to experiment to see what works best for your models.- `$phongfresnelranges "[0.05 0.5 1]"` - This is 3 numbers inclosed in brackets. This will set the angle at which the player will begin to see a fresnel affect on your model. An example of a fresnel affect can be seen below:
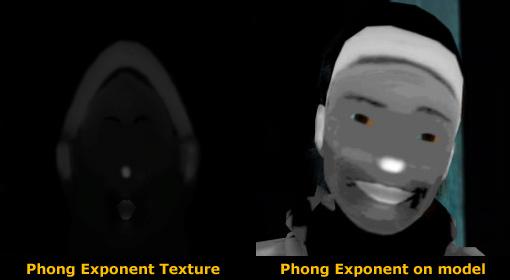 The exponent texture for the Alex model
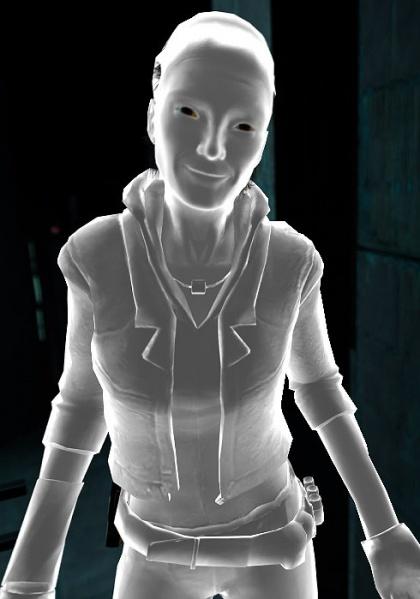 Alyx model with a fresnel of [0.05 0.5 1
Again, you'll just have to experiment with the values for your model. I would suggest copying some of Valve's values for starting points. Then if the values look nice on your models you can just stop there.
Below is an example of Alyx's .vmt from HL2 Episode 1:
vertexlitgeneric // Notice this is not 'LightmappedGeneric' - model textures are vertex lit
{
    "$basetexture" "models/Alyx/alyx_faceandhair"
    "$bumpmap" "models/alyx/alyx_head_normal"
    "$halflambert" 1
    "$nodecal" "1"
    "$model" "1" //This is necessary because the texture is for a model
    "$phong" "1"
    "$phongexponenttexture" "models/Alyx/alyx_head_exponent"
    "$phongboost"    "6"
    "$phongfresnelranges"    "[0.05 0.5 1]"
}
Also one other thing that you cannot see from the VMT file is the PhongMask. This is another grayscale texture stored in the alpha channel of the BumpMap. (This means that you must have a bump map texture. If it isn't used just make it flat.) The PhongMask, like the envmask, controls how much of the phong effect actually appears on your model. Darker values mean lighter phong, and whiter values mean brighter phong. (Note completely black values will cause the phong to disappear completely.)
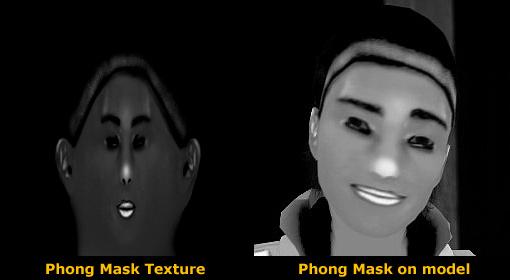 The PhongMask used on the Alyx model.
- Use the phongmask as both a phongmask and envmask, or
- Invert (Turn white to black and black to white) your envmask and put it into your base texture's alpha channel and then use the $basealphaenvmapmask 1 command.
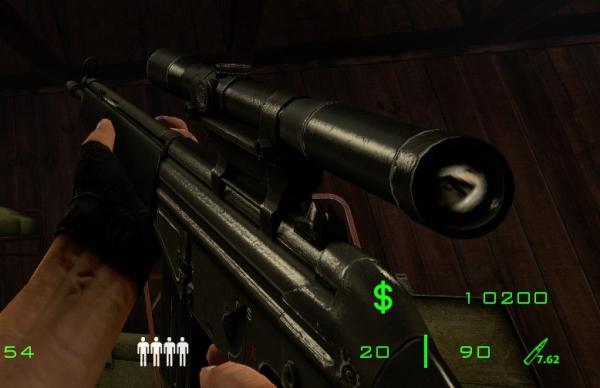 A phong shaded model. The fresnel values were copied from the smg1 in HL2.
Useful Programs
During my time texturing I have come across three very useful free programs. The programs are:Paint.NET
Paint.NET is a free image editing program somewhat like photo shop. It is very simple to use. I will not explain how to use it. I just want to point out that it has a Normal Map Generator plugin (Though I suggest using a program like XNormal) and can save files in the .VTF format with another plugin. (NOTE: There is a bug with this plug-in that causes it to not work on most 64-bit systems.)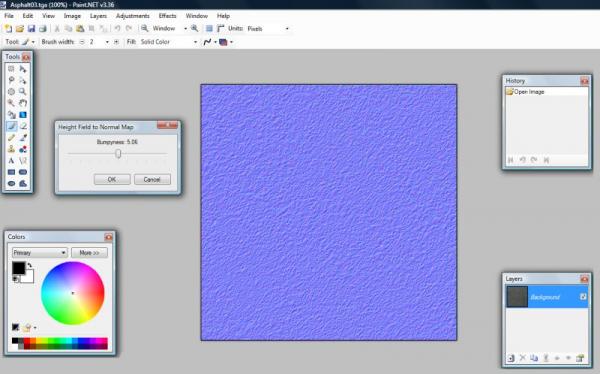 Paint.NET (NOTE: The workspace wasn't this cramped when I took the screen shot. I just compressed it to make the image file smaller.)
GIMP
This is another free image editor. However, unlike Paint.NET, I do not think that it is as easy to use, but it does give you a lot more control over your image. This program is useful for pasting things into the alpha channel of textures. I will explain how to do this.First open two textures. The base texture and the one that will be placed into its alpha channel.
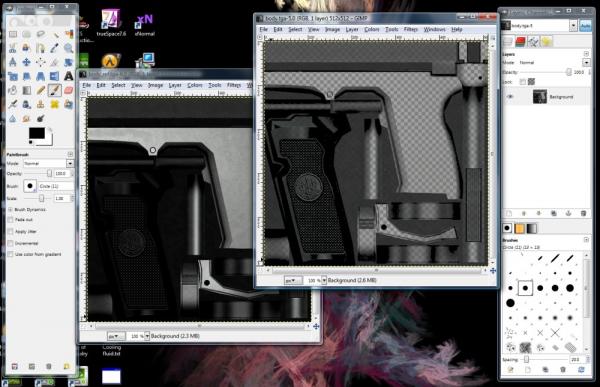 Open the Two textures.
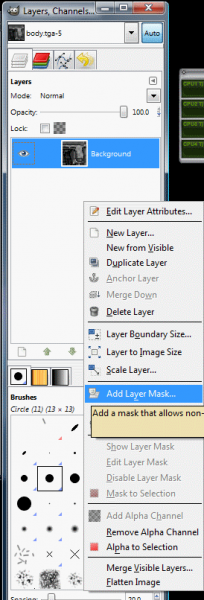 Select "Add Layer Mask"
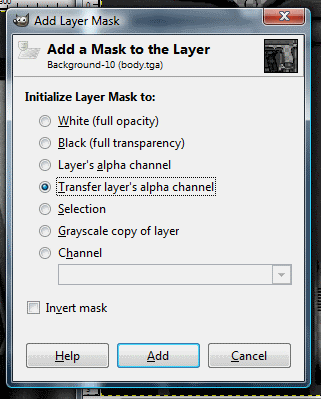 Select "Transger Image Alpha Channel".
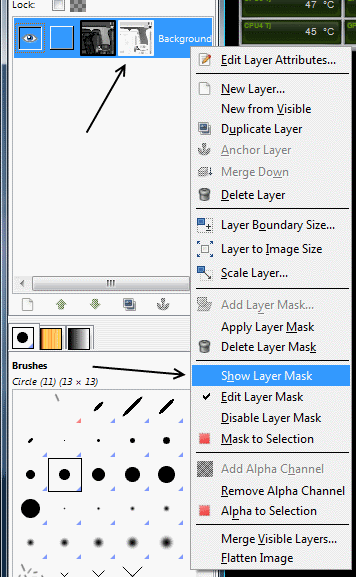 Select "Show Layer Mask". (NOTE: The arrows are for emphasis and will not be seen in the program.)
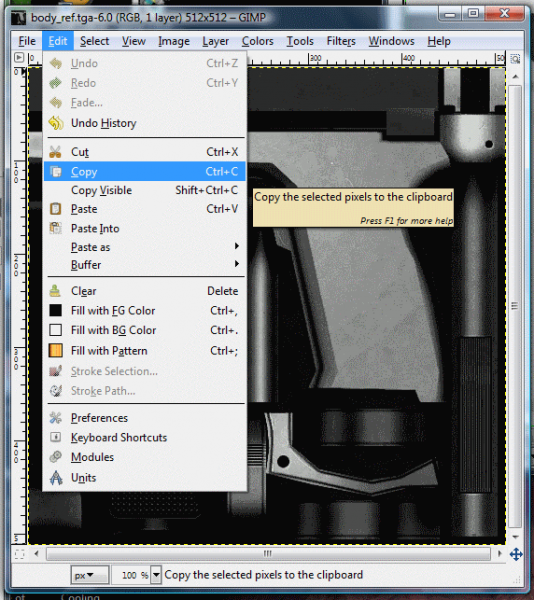 Copy the image you want to paste into the alpha channel of the other.
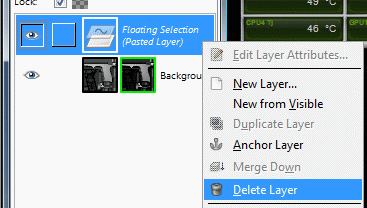 Hit 'paste' twice and delete the floating selection layer.
After this you will want to deselect "Show Layer Mask".
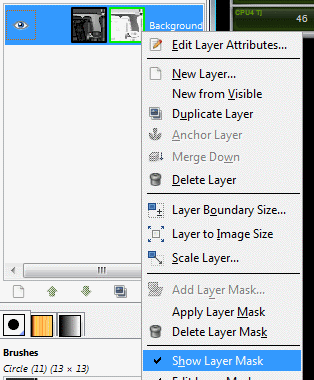 Deselect "Show Layer Mask"
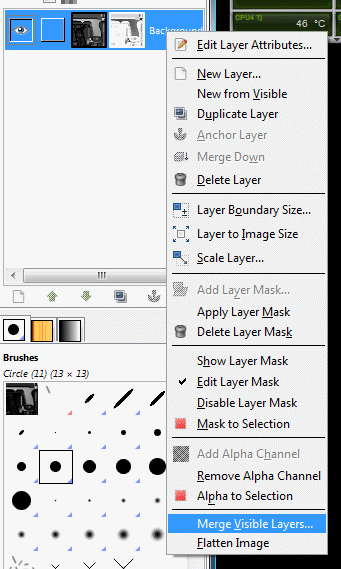 Select "Merge Visible Layers" and hit OK.
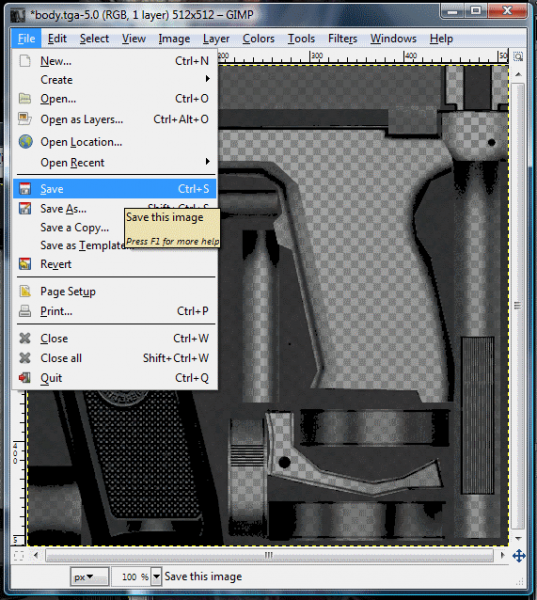 You are finished! Save the image as a TGA.
Nem's Tools
Nem's Tools are a bunch of useful programs for editing VMT, VTF, GCF, and other Valve-related files. The VMT (Called VTFEdit) editor is especially useful. You can use it to view VTF files, create VMT files using a wizard, edit VMT files, and batch convert folders of TGA files to VTF files and vice-versa. More information can be found at the Nem's Tools website.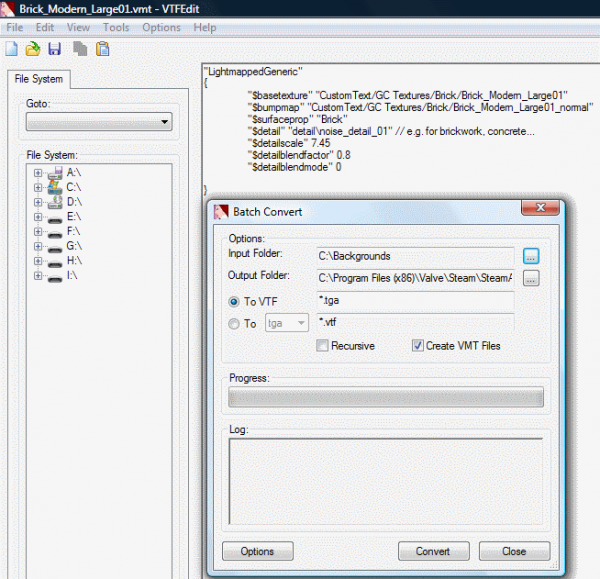 A screen shot of a VMT file in the editor and the Batch Converter.
- Categories
- Tutorials
- Beginner Tutorials
- Source Tutorials
4 Comments

Lex4art
Commented 15 years ago2009-01-28 18:08:41 UTC
Comment #100897
Serios and large work, my respect ^_^.

Daubster
Commented 15 years ago2009-07-03 14:57:30 UTC
Comment #100898
Indeed, great stuff.

Skals
Commented 12 years ago2012-06-05 21:18:51 UTC
Comment #100899
Actually it's not a bump map, it's a normal map :/

EthanGameDev
Commented 4 months ago2024-08-08 05:47:32 UTC
Comment #106289
Thanks!
You must log in to post a comment. You can login or register a new account.