Tutorial: Displacements Last edited 3 months ago2024-09-20 03:09:54 UTC
Displacement Basics
✔️ Download example VMFSee also: Tutorial: Creating blend textures for Displacements
One of the best improvements in the Source engine from the original Half-Life was the addition of displacements. Without displacements, HL2 wouldn't look half as good as it does. This tutorial will explain how to use them, as well as tips and tricks on using them.
What is a Displacement?
- A displacement is a four-sided plane which has been 'split' into a grid of triangles.
- The triangle grid is shown in your hammer 3D view with lines going horizontally, vertically, and diagonally across the plane. The points made by 2 or 3 crossing lines can be moved up and down - freely to the other points.
- Displacements are not entities. They are solid, as in you can walk on them.
- They don't seal your map (i.e. you still need to close your map to the void with a brush to avoid leaks), although if a displacement happens to be in the void, it wont cause a leak.
- They can only be seen from one side.
- You can only edit displacements in the 3D view (except for normal 2D size-adjustment)
What do you use displacements for?
Displacements are generally used for realistic looking terrain like the ground and cliffs, But they have other uses. Look at some of the coast levels in hl2 to see liberal use of displacements.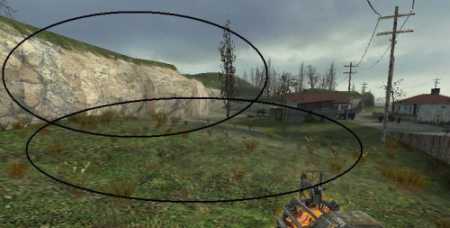 Displacements can be used as cliffs as well as ground
 Examples of displacements in HL2
How to make a displacement
Displacements are fairly easy to make, so here is a quick step-by-step guide to make a displacement.Step 1: Make a brush
Get out your brush tool and draw out your brush in the 2d views, and press enter. Put the top of the brush where you want your displacement to be (or in the case of cliffs, the side). Your brush should be a cube/block, as displacements must have 4 sides.
Step 2: Texture your brush
Select your brush, and click the texture application tool.
 The Texture Application tool
Now, select the top face. Displacements can use normal textrures like everything else, but they have special textures made especially for them. They are 'blend' textures - to find them filter for 'blend' in the material browser. Pick one and apply it - I'll pick blendgrassdirt001a. Keep the texture application window open and your newly textured displacement plane selected.
NOTE: Texturing non-displaced surfaces with blend textures does work at the moment. Although Valve states when you load up a map with a blend texture on a non-displaced surface that they are 'removing this soon', there doesn't seem to be a timeframe set for when this will happen. As well as this, Valve have used blend textures on non-displaced surfaces in their own maps, so for the time being, you can assume it's ok to do.
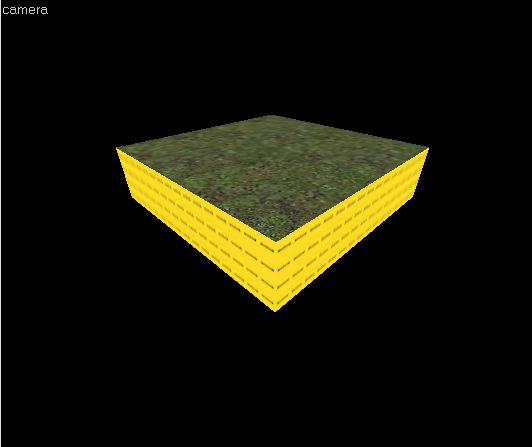 A brush with a blend texture, ready to go
In the texture application window, there is a displacement tab. Click it. This is your main window for displacement-ing.
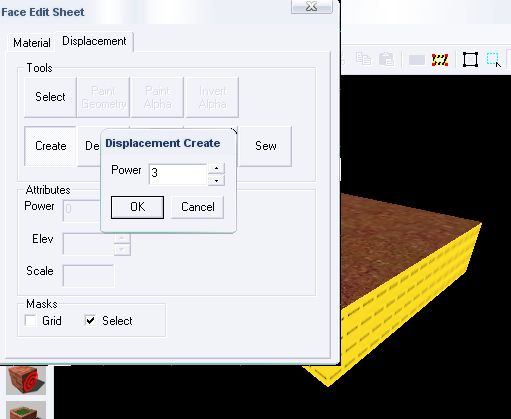 Creating a displacement
Click ok in the box and you will see two things happen:
- Lines form on your top plane
- The 5 NODRAW faces disappear!
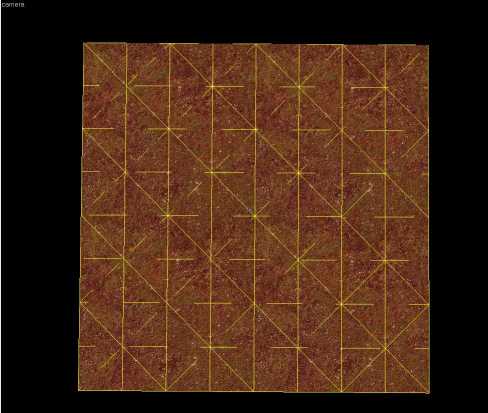 A top-down view of the newly created displacement
With the displacement window still open, select the 'Paint Geometry' button. The new window that opens up lets you raise and lower points in the displacements.
 Painting the geometry
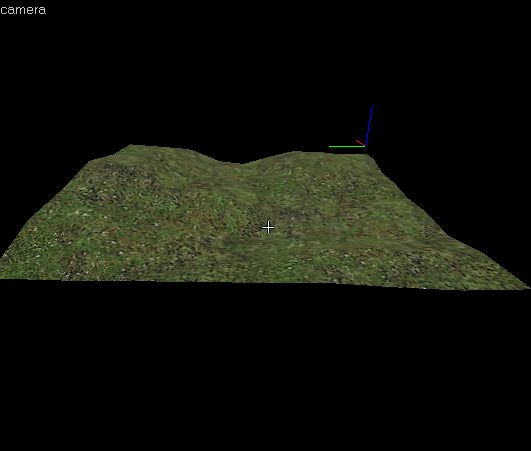 Curvy.
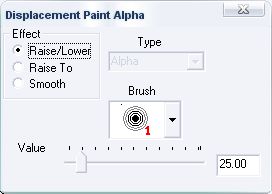 The Paint Alpha tool
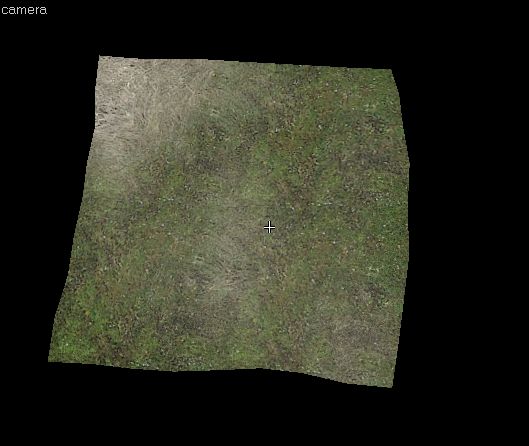 Blended...
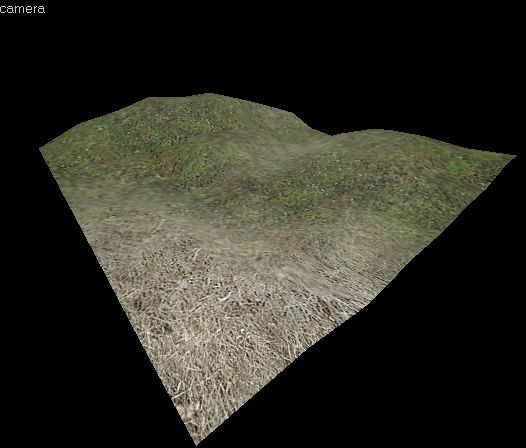 ...and served
The Displacement Edit Form
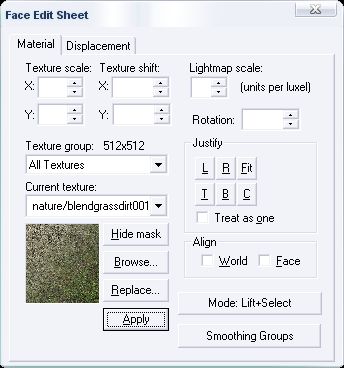
Here is a summary of each feature on the displacement window.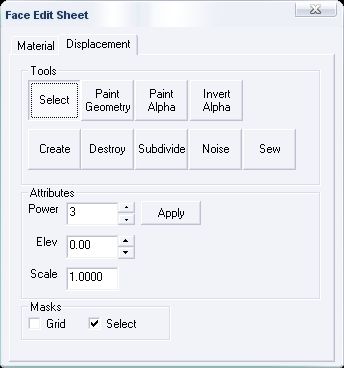 The displacement "Face Edit Sheet"
Create
You know how to use this one if you followed the first tutorial, the Create button is what you use to create a displacement. You must select a side or sides of your brush to be a displacement, and click the create button. Then the 'power' box pops up. 2 is the largest grid for low-detail work, 3 is average - use it in most cases. 4 is high, avoid using it except in special cases or on extra large faces.Destroy
The complete opposite of Create, select the displacement and click the destroy button to return the displacement back to its original brush form.Select
Nothing very involved, click this button to get the select tool to select displacements or displacement candidates (faces). Not used very often, as most of the other buttons open windows which, when closed, select the select button by default.Paint Geometry
Used to manipulate points of the displacement. The Distance slider changes the distance moved in units by the point each click, and the Radius slider lets you change the area of the effect. The axis box lets you change whether the point is moved along the x, y, or z axis. Face normal means that it will move at a 90 degree angle to the displacement plane. Click and drag the point for greater effect. Left click to raise, right click to lower.Paint Alpha
Used to change the texture of the displacement if it is textured with a 'blend' texture. The Value slider lets you change the speed the texture will change. The Brush drop-down box lets you change the size of the 'Paintbrush', letting you change a large (or small) amount of texture at one time. Click and drag for greater effect. Left click to increase alpha texture, right click to decrease.Invert Alpha
This switches all alpha textures to their direct opposites. I have found no use for it yet, but hey, you never know.Noise
Lets you make your displacements all randomly bumpy in one click. It raises or lowers each point of the displacement to a random height within a range that you specify. Dont make the numbers too far apart or the displacement will look really strange.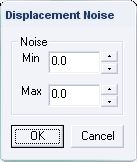 The noise popup box
Sew
Displacements can be connected together flawlessly: Before sewing
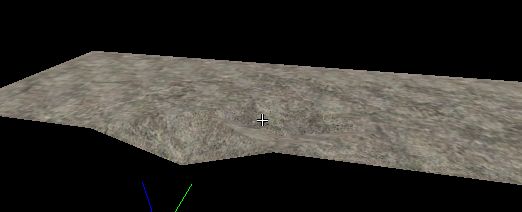 After sewing
1. 2 vertices from one displacement share the exact same points with 2 vertices from another displacement (i.e. they share an edge)
 Two displacement edges touching
 Displacement edge touching a brush edge
 Displacement edge half the width of the one it's touching
Subdivide
A very powerful tool which smooths a displacement so it is round, but retains the original vertices of the extremities of the displacement or group of displacements. 2 displacements can only be subdivided if they are also sew-able. This tool is best used with 'sacrifical' displacements (sounds evil huh?). This technique is best learnt through use, so more info in a later tutorial. For a quick look at what this tool can do, make a perfect cube, make all 6 sides displacements (select all and click create), and, with all 6 selected, click subdivide. Ta-da! A perfect sphere!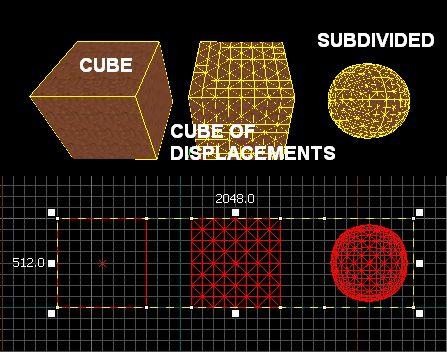 Subdivide can easily create complex surfaces.
Other Resources
Beginner
VDC's Displacement Page - The VDC always has a good range of articles, and since it is a wiki, it is usually the most helpful and accurate information resource. This article has a very detailed and easy-to-read explanation of displacements and how to use them.Snarkpit - Snarkpit has some basic tutorials on displacements. Part 2 is here.
Interlopers - Another tutorial on displacement basics.
The VDC, again - A more detailed look at the displacement face edit window.
Holes in Displacements - Learn how to make holes in displacements.
Grass on Displacements - Grass sprites show up automatically on some alpha blend textures! Find out about them.
Intermediate
Displacement Cliffs - Shows you how to make cliffs with displacements.Rock Formations - Make realistic looking rock formations with displacements.
Subdivide - The Subdivide tool, general tutorial.
Tunnels and Caves - Making realistic tunnels and caves with displacements.
Subdivide & Vertex Manip - Using Vertex Manipulation in combination with the Subdivide tool.
Curved Pipes - Make curved pipes with displacements. See Part 4 on how to make hollow curved pipes.
Blend Textures - How to make your own blend textures.
- Categories
- Tutorials
- Beginner Tutorials
- Mapping
- Source Tutorials
- Article Credits
-
 Penguinboy
–
Original author
Penguinboy
–
Original author
6 Comments
You must log in to post a comment. You can login or register a new account.
LeFtY
thank you very much
)