Tutorial: Elevator Doors that move Last edited 5 years ago2019-04-22 04:58:47 UTC
You are viewing an older revision of this wiki page. The current revision may be more detailed and up-to-date.
Click here to see the current revision of this page.
Elevators with Moving Doors
There have been a lot of questions about elevator doors. The main one being "Why can't I have the doors that move with the elevator, you know like a normal one?". The main reason is that Half-Life wasn't coded to include entities that move with other entities.Q. "But Day of Defeat and NS have moving entities, that are combined?".
A. Yeah, these Modifications use Spirit and that allows mappers a greater choice of how to use their entities. But that doesn't solve the problem.
Just imagine that you arrive at the elevator, the doors are open, step inside and press the call button, the doors close behind you. When the elevator reaches the bottom, the doors open again. The doors moved with the elevator and opened and closed like a real elevator. How is that done in Half-Life?....
The Elevator
So how do I get the doors to move with the elevator?The trick to this is to make the doors follow their own path_corners just the way the elevator does.
If you haven't built an elevator before have a look at Atom's 'Elevator's using func_train' tutorial.
This tutorial is not a beginners guide to elevator building, it assumes you have an understanding of a lot of things....And if you don't quite get it first time, try it again, check the settings and ask yourself "What the entities are doing?". This tutorial is designed to make you think!
Build a basic elevator by making a cube brush the size you want (although it has to be bigger than the player, so I have used a 128 x 128 unit cube). Hollow the cube at a wall thickness of 4 but don't turn it into a func_train just yet. Using a square shape will make it easier until you understand the concepts involved. In your map place the first path_corner directly in the center of the box you have created. You can use the center points as a guide. Select the box and look in the 2D views, see how there is a small grey cross in the center of the box in each view?, well that is the actual center of the box, and that is where the path_corner needs to be.
No need to assign attributes to the path_corner just yet, as we haven't created the elevator. For the time being, I want the path_corner there to help with the placement of the door paths.
Q.Why did I make the Elevator a cube?
A.Because things move at different speeds, depending on the distance they have to travel. Distance to path_corners is critical...... physics!
Select the side of the elevator you want as the entry doors. Highlight the brush and clip it in half, making sure the doors are now the same dimensions. Dont forget to ungroup the doors after clipping, alternately you can create seperate brushes. I find it easier to make the doors cover the whole front area of the Car Cube, and recess the wall and ceiling brushes to fit.
Now select Door 1 and assign it to the func_train entity. Name it door1 and give it a first stop target of door1_pc2. Do the same with the other door, calling it door2 with a first stop target of door2_pc2.
Place path_corners at the dead center of each door, then move one door to the place you want it to be in the open position and place another path_corner at the dead center of the door in the open position. In the image below I have left one of the doors in the open position to illustrate the path_corner positioning.
 Elevator Setup
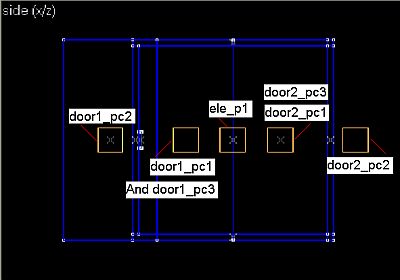 Elevator path_corners
You should have 7 path_corners placed in your map, 6 for the doors and one for the elevator. I am going to cheat slightly, because we are going to create an elevator that you can only access from one side. (The rmf has two examples, this one and a walk through type).
Select all the path_corners and copy them. Then move them down your map and align them directly below the original one's.
You will also need to add a small trigger brush tied to the func_button or func_rot_button entity, that will act as the call button.
Place a normal brush inside the elevator, where you want the button to be, and texture it with a button texture. Place the func_button in the same space as the imaginary textured button.
Copy all these and position them in the same relative position with the lower path_corners. Their position isn't critical, but the trigger brush is. Make sure it is in the same position as it's upper counterpart. I have placed mine in the middle of the elevator wall.
The reason I didn't make the elevator a func_train was that I wanted to have the button in place, because the button will move with the elevator. Select all the elevator brushes (Not the doors), including the fake call button and tie them to the func_train entity. Give it a Name (targetname) of ele and a First Stop target of ele_p1. The func_button should not be part of the elevator group!
The path_corners
Time to sort out the path_corners. We have two distinct groups of entities. Let's start with the top ones.Elevator PC (path_corner)
Name: ele_p1
Next Stop Target: ele_p2
Fire on pass: eg_upper1 [eg_lower1 for the bottom path_corner].
Flag: Wait for retrigger: checked
Door1 PC 1
Name: door1_pc1
Next stop target: door1_pc2
Flag: Wait for retrigger: NOT checked
Door1 PC 2 This is the path_corner that controls the open door.
Name: door1_pc2
Next Stop Target: door1_pc3
Flag: Wait for retrigger: CHECKED
Door1 PC 3 This is the path_corner that is in the same position as PC 1.
Name: door1_pc3
Next Stop Target: door1_pc4
Fire on Pass: elemm
Wait here (secs): 0.1 [Note: door2_pc3 also has a 0.1 delay, door1_pc6 and door2_pc6 have a 0.15 delay]
Flag: Wait for retrigger: NOT checked
Ok, Now duplicate the same properties and attributes and flags for Door 2, and name the lower path_corners starting with the PC that is in the same place as PC 1, naming it doorX_pc4 and so on, until you get to PC 6 which will have a next stop target as doorX_pc1.
Managing the elevator and the call buttons
To get everything to work correctly, you need to set up 3 multimanagers, 1 globals and 1 multisource.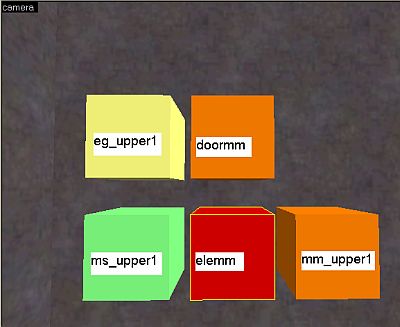 Lots of Control Entities
These settings assume that you are going to enter the elevator from the top of the shaft:
Upper env_global: Name: eg_upper1
Global State to Set: egupper1
Trigger Mode: Toggle
Initial State: On
[If you are going to call the elevator from the bottom button, this should be off and the lower global should be set to On.]
FLAG: Set Initial State: CHECKED
Upper multisource Name: ms_upper1
Global State Master: egupper1 [The state set by the upper global]
Upper door multimanager Name: doormm
Key: door1 , Value: 0.1
Key: door2 , Value: 0.1
Upper elevator multimanager Name: elemm
Key: ele , Value: 0.1
Upper state multimanager Name: mm_upper1
Key: eg_upper1 , Value: 0.1
Key: doormm , Value: 0.1
Upper Call button The upper func_button must have it's target set as mm_upper1 so that it triggers the upper Multimanager, and it's Master as ms_upper1 so it takes it's State from the upper Multisource. You might want to adjust it's attributes for Render Mode to Texture and FLAG it as Not Solid.
Lower Settings
On the lower set of entities, you should have the same number of path_corners. The major difference this time is that there is no need to get the lower path_corner door1_pc6 or door2_pc6 to fire the elemm. We are going to do this with the func_button.Lower env_global: Name: eg_lower1
Global State to Set: eglower1
Trigger Mode: Toggle
Initial State: OFF
[If you are going to call the elevator from the bottom button, this should be ON and the Upper global should be set to OFF.]
FLAG: Set Initial State: CHECKED
Lower multisource Name: ms_lower1
Global State Master: eglower1 [The state set by the lower global]
Lower state multimanager Name: mm_lower1
Key: ele , Value: 1.1
Key: eg_lower1 , Value: 0.1
Key: doormm , Value: 0.1
Lower Call button The lower func_button must have it's target set as mm_lower1 so that it triggers the lower Multimanager, and it's Master as ms_lower1 so it takes it's State from the lower Multisource. You might want to adjust it's attributes for Render Mode to Texture and FLAG it as Not Solid.
What is happening?
The main reason I stuck the multisources and globals in was that if you are thinking multiplayer, then you don't want people stopping the elevator half way down. You want to shoot them when the doors open.. Oh, I just heard someone say, but the physical button is in the elevator, and the illusionary one won't be seen. True, but they will know where it is, and if they press it using the normal set up, it will stop the elevator... the doors on the other hand will keep going, and there is a good chance that they will never be in sync again.Q. My Brain has exploded, how do you follow all this stuff?
A. I don't, I was hoping you could explain it to me?
Seriously, what happens is that when you press the elevator call button, the func_button hiding behind it calls mm_upper1 the upper multimanager, toggeling the upper env_global to disable the button you just pushed and fire the doors. When the doors close they fire the elemm elevator multimanager which triggers the elevator to move down.
The same sequence of events occurs at the bottom of the shaft because the elevator has triggered the lower env_global via the lower path_corner and enabled it's button.
Sound
Getting the doors to make sound isn't as easy as it looks. I have tried various ways of adding sound and nothing seemed to ... well... sound good. Using the sound option on the door properties will cause them to produce that sound as they travel..and that is a little weird. Because they are a func_train and not a door, means that to get them to make a closing sound would involve setting up a seperately triggered ambient_generic and using that to produce the sound... I didn't add it to this tutorial because my head was hurting anyway. So is someone out there feels creative, just modify the .rmf, add the sound and send it too me. I will immortalise your name in print for all to see.Important Things...
DO NOT change the speed of the elevator using the New train Speed property of the path_corners. It produces really weird effects, like creeping doors. Even if you match the New speed with the original elevator speed the doors will behave weirdly. just leave the path_corners set to 0.Make sure that the elevator and the door have the same speed settings.
Once you get it running, you might have to adjust the timing of the multimanagers depending on the size of your elevator. If the doors are moving too fast, delay their firing with the door multimanager or increase the delay on the elevator multimanager. Or you can adjust the Wait Here (secs) value of the path_corners. There are probably better ways to do this, but this works.
One thing that you might also consider is using multisources and globals to control the doors using the path_corners as triggers. If the player get's stuck in the doors all the other sequences will fire, leaving things in a bit of a mess.
If the size of your door's are not the same as the size of the front of your elevator, they might reach their path corners quicker, and start their travel before the elevator. You will need to play with the delays on the path_corners to get them in sync.
Q.My button texture wont work?
A.That is because it is part of the elevator func_train and not part of a trigger. You might be able to solve this with the info_texlights side of Zoners, but I never got around to it.
If you want the inside of your elevator to be lit, then you need to place a suitable light inside.
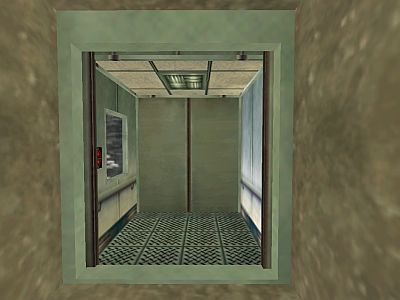 The Final Product
So what is with the other shaft in the .rmf
Just showing off..... Keep an eye on the window....Maybe I should have entered this in the Scripted contest...- Categories
- Tutorials
- Advanced Tutorials
- Goldsource Tutorials
3 Comments
Bahurs1
Commented 14 years ago2010-03-08 20:11:37 UTC
Comment #100566
awesome!
sluggard
Commented 4 years ago2020-01-09 14:46:16 UTC
Comment #102497
Oh my god this is too complicated for my tiny brain

kimilil
Commented 3 months ago2024-09-04 15:43:29 UTC
Comment #106365
I think different paradigm is possible: a single func_train elevator cab with built-in doors, and func_wall_toggle cabs that are stationary at each level. doors would be local to each level.
You must log in to post a comment. You can login or register a new account.