Tutorial: Keys Last edited 21 years ago2003-11-15 05:00:00 UTC
You are viewing an older revision of this wiki page. The current revision may be more detailed and up-to-date.
Click here to see the current revision of this page.
Download attachment
Have you ever wondered why Half-Life doesn?t have a key system, where keys have to picked up in order to open this or that door? As far as I can remember, most of our favourite first person shooters (from Id?s magnum opus DOOM and Wolfenstein 3d to Quake and not forgetting Duke Nukem, Blood, Heretic, Hexen...) all had some kind of key action like this: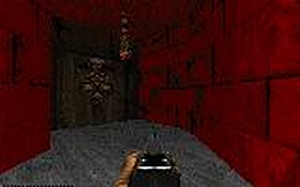 We've come a looooong way
Looks a lot like Doom, doesn?t it? Well, I know that this kind of mapping is boring compared to the quick action and breath-taking design of Half-Life maps but still, whatever happened to keys?
As far as I can remember, there are no keys in the original game. What if we want to add some key action? Well, we can take a look at the Security Cards tutorial that shows us how to use a keycard to open a door. This is cool but, what if we want to use more than one keycard, just like in DOOM? We could use the same keycard over and over although it would always look the same and could be a bit confusing.
But this would only work with a keycard-compatible theme. Maybe you are mapping an old castle or an ultra modern complex where those keycards would be a little bit out of place and an actual key would be more accurate. I wonder how Xen doors are closed: what do Xen keys look like? I am pretty sure they don?t look like they need a keycard!
And this is where we want to get. In this tutorial we will learn how to do the following stuff:
- Create our brush based key (or new keycard, or whatever you want to use to open the door).
- Create our closed door or doors.
- Set some messages and sounds (to tell us when a door is closed, which key have we picked up and anything else you can think of).
Somewhere to work
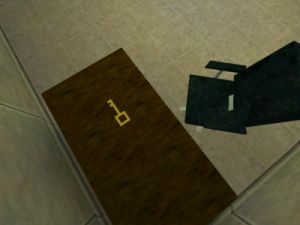
You need to create an environment for the key to work. In the example are two rooms separated by a door. In the first room is a desk, chair and the key. In the second room, you?ll find, Barney, an armchair and a shotgun.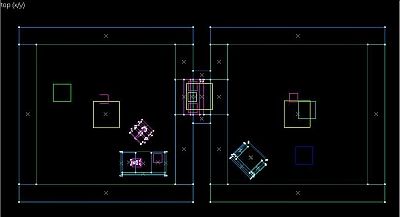 Top View
Step One - Creating Our Key
First of all, we need a key we can use to open the door. There are two ways of making it:- Using a Key model like the one I provide with in this tutorial.
- Using a Brush-Made key.
We will have to model the key ourselves. If you don?t know how and don?t want to learn either, drop a message in the General Mapping Forum, maybe someone will help you with the task.
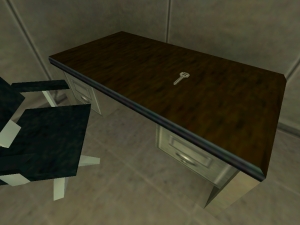 Key model
Model your key and export it into Half-Life model format so you can use it, or use mine from the example download.
Once this is done, we need to put our model key where the game engine will find it. Half-Life will normally look for models in the models folder: no surprises there. If you are making keys for your new Mod, just add a models folder with a Key folder in it. For this tutorial, I have added the folder Mykey to the models folder and placed mykey.mdl inside that.
IMPORTANT NOTE: Before you run the example map, create the Mykey folder and copy the mykey.mdl to Half-LifeValveModelsMykey.
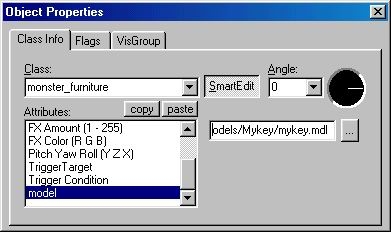
Now open your .rmf in Worldcraft/Hammer and decide where you want to place your key. We are going to use the monster_furniture entity to bring our key to the world. However, you can use a monster_generic or a cycler_weapon. Placement of the monster_furniture isn't all that critical. If you place the entity a few units above the desk, so that none of it is stuck in the desk, then the key will float down to the first solid brush when the game runs. If you don't place it correctly, and it is spawned in a brush, you will get an error and yellow dots buzzing around the desk. All you need to do is adjust the entity's position to fix this.
Enter the following values for our Monster_furniture:
Name: myfirstkey
Model: ModelsMykeymykey.mdl
You don't have to check any Flags
 Settings
For those of you using Hammer 3.5, it is even simpler. You will be presented with an actual shot of the model so placement is really easy.
Now you can run your map and see your key just where you placed it, but your key does nothing. It can?t be picked up. We will look at this in Step Two.
Now let?s look at how a brush model is made.
2. - The Key Brush
Create your key or keycard with brushes and texture it to suit your door. It may look like this:
 Brush Key
Select all the brushes of the key and group it (Ctrl+G) and then tie it to a func_wall_toggle.
Assign only this property to your key:
Name : keypick
You can run your map now and marvel at the brilliance of your newly formed key.
Step Two - Getting Our Key To Work
The first thing we need to know is that there are two little differences in getting our key to work depending on if it is Brush-Based or Model-Based. These differences will be treated separately.We want our key to do the following:
- Be picked up when we walk over (I also make them pickable with the use key over them but thay have a funny bug to be fixed).
- Play a sound when picked up.
- Shows us a text in order to know that we have picked it up (just like "Picked up the blue key").
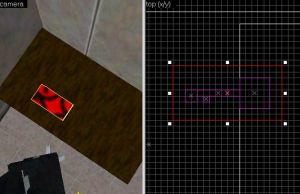 Trigger position
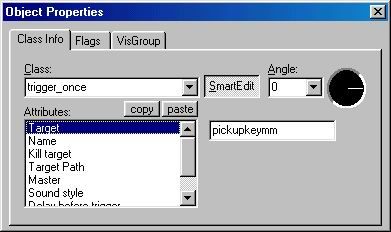 Values
Place a Multi Manager in your map and open its properties dialog box and Name it pickupkeymm, then click the SmartEdit button. You will need to add all these keys and values:
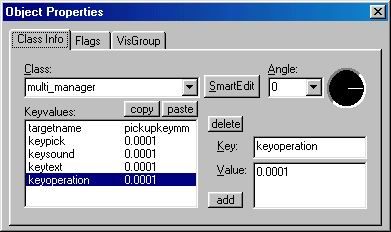 MM Values
keypick?????0.0001 This one will make our key dissapear.
keysound??0.0001 This one will trigger a sound when it dissapears.
keytext?????0.0001 This one will show a text to tell us it has dissapeared.
keyoperation? 0,0001 This one will allow the door to be opened.
Making the key dissapear
We can make it dissapear in two ways.
Model Key: Our model key is not pickupable. In fact, it is not coded to be, so all we can do with it is HIDE it from the player?s view. Create an outside hollowed area outside your map or find a place where the key can fit and can?t be seen by the player. Place a scripted_sequence in the box as it will makes our key move there when we want it to, more info in Scripts.
Name your Scripted Sequence keypick and add these values:
TargetMonster : myfirstkey
Move to Position : Instantaneous
Leave other fields as they are, as well as flags. In our example map, the hiding place is built outside the main map.
Now you can run your map and see that when you walk over your key it dissapears! Well, it does not dissapear, but it's taken to the place that the player cannot see. In fact, if you go there, you'll see your key, but hey, our player doesn?t have to know this so let?s keep it a secret.
Brush Key: If your key is a brush, it is solid, and therefore a part of the world. We want it to dissapear when we walk over it. When you named your Key keypick and assigned it to a func_wall_toggle entity that it is activated by a Multi Manager, you solved the problem. Run your map and check it out, just walk over the key and it?s gone. Why? Simple, func_wall_toggle makes itself dissapear when triggered, so our key is not there when we walk over it and activate our trigger_once!
Making the key provide a sound
We want sound played when we picked up the key, don?t we?
To do this we need:
- The sound itself: a MONO .WAV file... You can get it from the own Half Life sounds or you can record it yourself or use anything you already have, even your boring Windows TADA.WAV sound will work once you turn it to MONO (this can be done with the Windows default recorder).
- The sound placed in the correct folder.
In order to play the sound in the game, we need add an ambient_generic near the key. Name it keysound so it is triggered by our Multi Manager when the key dissapears.
You need to add the path to the sound .wav like this:
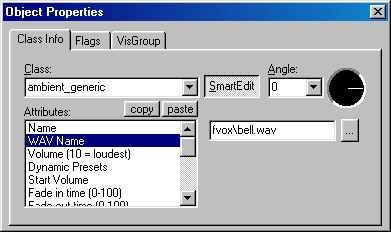 Ambient Generic
Flags that need to be checked are:
Small Radius
Starts Silent
Not Toggled
You can run your map and pick up the key. You will see it makes a nice sound as it dissapears!
Making text appear when the key is picked up
Create a game_text near the key and name it keytext (it will be triggered by the Multimanager).
The rest of the properties are reasonably flexible. All you need to do is add the text. If you want to change the properties, then have a look at the Entity guide to find out what each setting does. Now our key tells us that we have picked it up when we play our map. Half of our work is done. Now we got to make our key work!
Making it open the door
To make sure the door is locked and can only be opened with the key we need to add a multisource entity and name it keyoperation. You can find more information in the Multisources tutorial. Don?t worry about the door now, ok? If you run the map, the door will open anyway and you will yell "I?ve been fooled!" so please, be patient. Still, we haven?t worked on the door, but I want you to check out and to understand what you have done:
- YOU TOUCH OR WALK OVER THE KEY.
- IT MAKES SOMETHING HAPPEN.
- KEY DISSAPEARS.
- SOUND PLAYS.
- TEXT DISPLAYED.
- LOCK OPERATES.
Step Three - Creating and Locking the Door
I suppose you know how to do a door. If you don?t, take a look at the Doors tutorial.Anyway, create your door and adjust the door's properties. No need to give your door a name, just set the door locked sounds as you want, as well as the stop and moving sounds. But the important setting is changing the Master field to keyoperation.
But we don?t want to end up here. What if (I am sure you HATE this!) the player does not find the key and skips the door forever? It would be disastrous! We need something to tell the player that this is a special door and that it MUST be opened for our mapping skills to be taken into consideration (and in most cases, for our map to be played). We are going to set text again, but this time it will be a little different. We will:
- Set a text to tell us the door is closed.
- Set a text to tell us the door has been opened.
- Play texts as many times as necessary.
Create a trigger brush very close to the door, texture it as AAATRIGGER and then set it as a trigger_multiple entity. You may want to modify the size of the brush so the message triggers at different distances of the door. This entity works so it will trigger something each time we walk through it. In our case, we want to trigger the text whenever the player tries to open the closed door without the key.
Fill the fields as following:
Target : closedtxt
Name : doorclosedtxt
Next create a game_text entity near the door and name it closedtxt and enter the message "This door will be closed until you find a key".
Run your map: each time we are near the door it tells us that it?s closed, but it also tells us that when we have opened it! We?re gonna fix this!
2 - The Opened text
Create a trigger brush covering the previous one but slightly larger. (If you are unsure of the position, just have a look at the .rmf included in the download.) Texture it as AAATRIGGER. This brush will inform us that we?ve got the key and we have opened the door with it, so assign it to a trigger_once entity. With this trigger, we are going to make the closed text trigger invalid.
You will need to add these properties to the trigger_once:
Target : openedtxt
Kill target : doorclosedtxt
Master : keyoperation
You don't need to Name the trigger!
Add a game_text with the name openedtxt. And the message "This door has been opened with the Key", or something like that.
What have we done? Simple: once we walk into it, it will activate "openedtxt" displaying the message and making the other Closed trigger and text inactive. By adding the Master to the Opened trigger, it will only be active when the multisource is.
Run your map and play around: now we?re done! Realise what you?ve done? If you don?t have the key, text will appear telling you to look for the key. Once you've got it, it activates the lock so when you walk near the door, you activate the trigger_once (hence the size, a bit larger than the other one so it?s triggered first once you activated the Multisource lock) that shows text about your newly acquired key and also prevents the other text from showing by just making its trigger invalid. A work of pure genius is what you?ve done.
Step Four (Optional) - Little Bits of Detail Here and There
There are more things to do, but I?m not explaining them there, only giving the ideas for you (and your brain) to work. You can do lots of great effects such as:- Glows around the Key (read the Sprites tutorial).
- Change the light settings (read In the Beginning: Part 4: lighting).
- The door being operated by a console at its side, which you can only use once you've got a keycard (just think about func_buttons, use them a bit and learn. By the way, this one would look cool with text for the door and another for the console.
Well, that?s about it. If you?ve got any doubts, just drop them in the General Mapping Questions Forum for the community to answer and to share everything you come up with.
PS: I wish to thank the TWHL community for their help and support in my map initiation two months ago. Guys, you?re real cool! These words are dedicated to my girlfriend, who doesn?t like mapping, but loves me anyway. Tutorial done while listening to Dimmu Borgir and Michael Jackson.
Comments
You must log in to post a comment. You can login or register a new account.