Tutorial: Setting up a Mod: Addendum Last edited 10 months ago2024-01-02 19:12:04 UTC
You are viewing an older revision of this wiki page. The current revision may be more detailed and up-to-date.
Click here to see the current revision of this page.
This is an addendum to the original tutorial series, concerning other things to consider for your mod that is not covered in previous articles, and outside the realm of actual mapping, modelling, programming, etc.
Custom GUI scheme –
This file defines the UI scheme for GoldSrc's Steam UI, but you can have a custom one for your mod. Things such as UI colours, fonts for various elements, and borders, are defined here.
To customize your mod's UI scheme, copy the original from
The following block, for example, defines the font properties for the game menu.
This file is executed at some point in the game initialization, and is a way to have a default command list that is not managed by the game (config.cfg gets overwritten by the game when cvars and keybinds change.)
A common use case for autoexec.cfg is to ensure a certain set of cvars are set as default. For example, if a mod's art style demands the unfiltered pixelated textures look, it can define
Another use case for autoexec.cfg is to define aliases, which is not possible with config.cfg. These are strings of commands you can execute in a single command, and bindable to keys. Aliases prefixed with + or - work as a pair, and used for keybinds (the + alias is executed on key down, the - one on key up). You can use this, and some script-fu, to have, for example, the Ctrl key toggle ducking, or a "bullet time" key.Cvar config pages –
 Multiplayer Advanced dialog with a custom user.scr
See also: settings.scr and user.scr
Multiplayer Advanced dialog with a custom user.scr
See also: settings.scr and user.scr
This pair of files is a way of mapping the GUI to cvars in ways not covered by the standard engine GUI.Keyboard bindings page –
This file, located in
If your mod has custom code that adds new keybinds, you need to edit this file with the new entries, and ship this file.
 A commandmenu in game.
Half-Life and many first-party mods supports
A commandmenu in game.
Half-Life and many first-party mods supports
You can use this feature, for example, to add a chapter selection menu, change cvars on the fly, or add a dev menu.
However, you'd need to edit
This file manages the skill system, defining NPC's health, ammo pickup, and damage dealt. Although it is strongly advised against editing these, it is one way of modifying the balancing of a mod without diving into code.
A Mod, or an Addon Pack? The
Post-SteamPipe GoldSrc supports the [over]loading of files without overwriting the base file through the
Thus, some circumstances where separate mods were required before, might now be a simple drop-in into the
Is my content a Mod or an Addon Pack?
Your content might fit the case of being an Addon Pack if: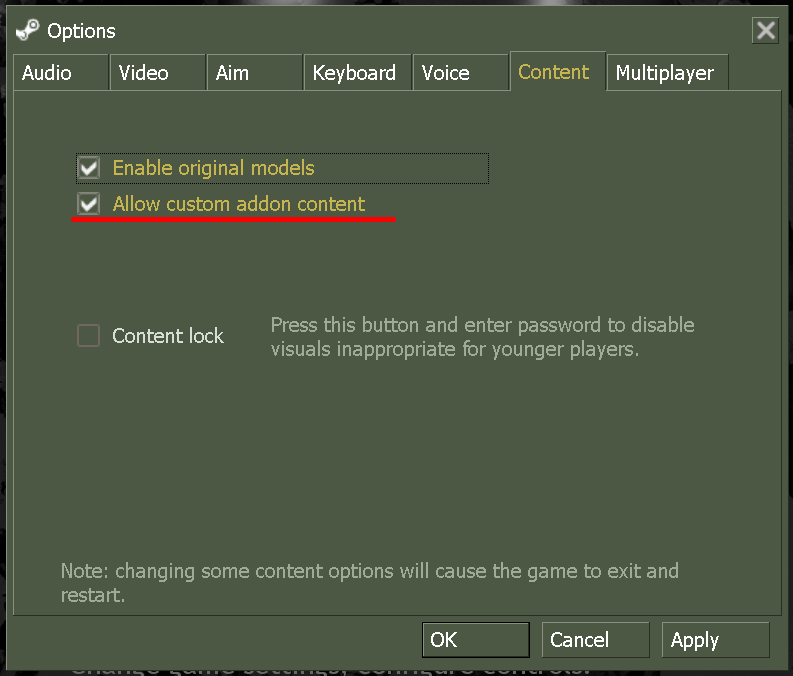 Enabling addons on the 25th Anniversary branch
So, what changed?
Enabling addons on the 25th Anniversary branch
So, what changed?
An addon pack installs differently to a mod. Firstly you don't need the liblist.gam just to add, say, custom models to Half-Life. Secondly, players can mix and match other things in their games, and they can toggle them on or off (details below), or otherwise jump between vanilla and modded setup quickly.
Other things about addons
To toggle the loading of this folder:
The kitchen sink approach of this system is not great (compared to HL2's
For a general release, you wouldn't want to include the working files or file sources (e.g. the PSDs for the textures, or the source code*); only the end products needed for the game engine would suffice. These would be the files with extensions that includes but isn't limited to: bsp, res, mdl, wav, spr, tga, txt, mp3. Use a RES generator to double check that you have didn't miss anything.
A useful workflow to have is a mod folder for development, a separate folder for finalized mod files, and a script that copies over only relevant file formats from the former to the latter.
For a full source release that includes file sources, consider putting your mod files in a GitHub repository instead.
TL;DR:
It's the last thing on your mind when you're in the zone. You might assume it'd be one of "here's the files, do whatever" or "credit me if you do stuff with it" and you'll be correct, but the platforms you distribute your mod under has other assumptions, and you may not want to go with the default.
The website https://choosealicense.com/ can help you decide which license you want to distribute your mod under. Then, select the appropriate license type on the hosting website's upload form.
A few pointers:
Hopefully the series has been helpful in assembling and getting your stuff out into the world, for other people to enjoy.
Other things you can customize
Custom music
Whereas WON GoldSrc spins up your physical CD drive looking for the soundtrack, they're included in the Steam version in themedia/ folder, comprised of a bunch of mp3 files. Customizing these simply involve adding mp3 files of the same name in the same location in your mod.
Custom GUI scheme – TrackerScheme.res
This file defines the UI scheme for GoldSrc's Steam UI, but you can have a custom one for your mod. Things such as UI colours, fonts for various elements, and borders, are defined here.To customize your mod's UI scheme, copy the original from
<Half-Life>/platform/resource/TrackerScheme.res into <Half-Life>/<your_mod_here>/resource/TrackerScheme.res.The following block, for example, defines the font properties for the game menu.
"MenuLarge"
{
    "1"
    {
        "name"      "Verdana"
        "tall"      "18" // increase this to make menu items larger
        "weight"    "1000"
        "antialias" "0"  // set to 1 to enable anti-aliasing (why wouldn't you want anti-aliased texts?)
    }
}InGameDesktop
{
"MenuColor" "200 200 200 255"
"ArmedMenuColor" "255 255 255 255"
"DepressedMenuColor" "192 186 80 255"
"WidescreenBarColor" "0 0 0 0"
"MenuItemVisibilityRate" "0.03" // time it takes for one menu item to appear
"MenuItemHeight" "28" // should be larger than the font size
"GameMenuInset" "32"
}autoexec.cfg
This file is executed at some point in the game initialization, and is a way to have a default command list that is not managed by the game (config.cfg gets overwritten by the game when cvars and keybinds change.)A common use case for autoexec.cfg is to ensure a certain set of cvars are set as default. For example, if a mod's art style demands the unfiltered pixelated textures look, it can define
gl_texturemode with the appropriate value.Another use case for autoexec.cfg is to define aliases, which is not possible with config.cfg. These are strings of commands you can execute in a single command, and bindable to keys. Aliases prefixed with + or - work as a pair, and used for keybinds (the + alias is executed on key down, the - one on key up). You can use this, and some script-fu, to have, for example, the Ctrl key toggle ducking, or a "bullet time" key.
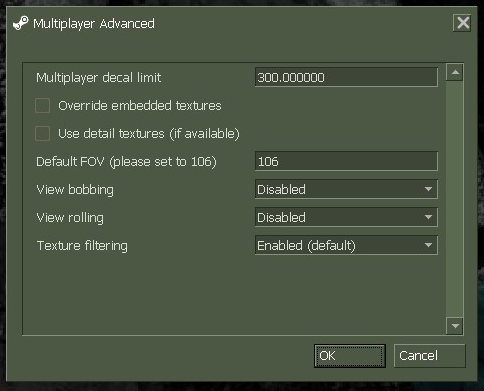
Cvar config pages – settings.scr and user.scr
Multiplayer Advanced dialog with a custom user.scrThis pair of files is a way of mapping the GUI to cvars in ways not covered by the standard engine GUI.
settings.scrcorresponds to the Create Server > Game dialog (for multiplayer server cvars)user.scrcorresponds to Options [> Multiplayer] > Advanced dialog (for client and singleplayer cvars)
r_wadtextures), a text box to set your FOV (default_fov), or a drop down that lets you select between filtered or pixelated textures a-la software mode (gl_texturemode). Do make sure that you add only server cvars to settings.scr, and only client cvars to user.scr.
Keyboard bindings page – kbd_act.lst
This file, located in gfx/shell/, is the list of keybindable commands, as seen in the Options > Keyboard dialog. You may want to customize this file to give yourself and other players easier means to bind keys to custom aliases you may have defined in autoexec.cfg.If your mod has custom code that adds new keybinds, you need to edit this file with the new entries, and ship this file.
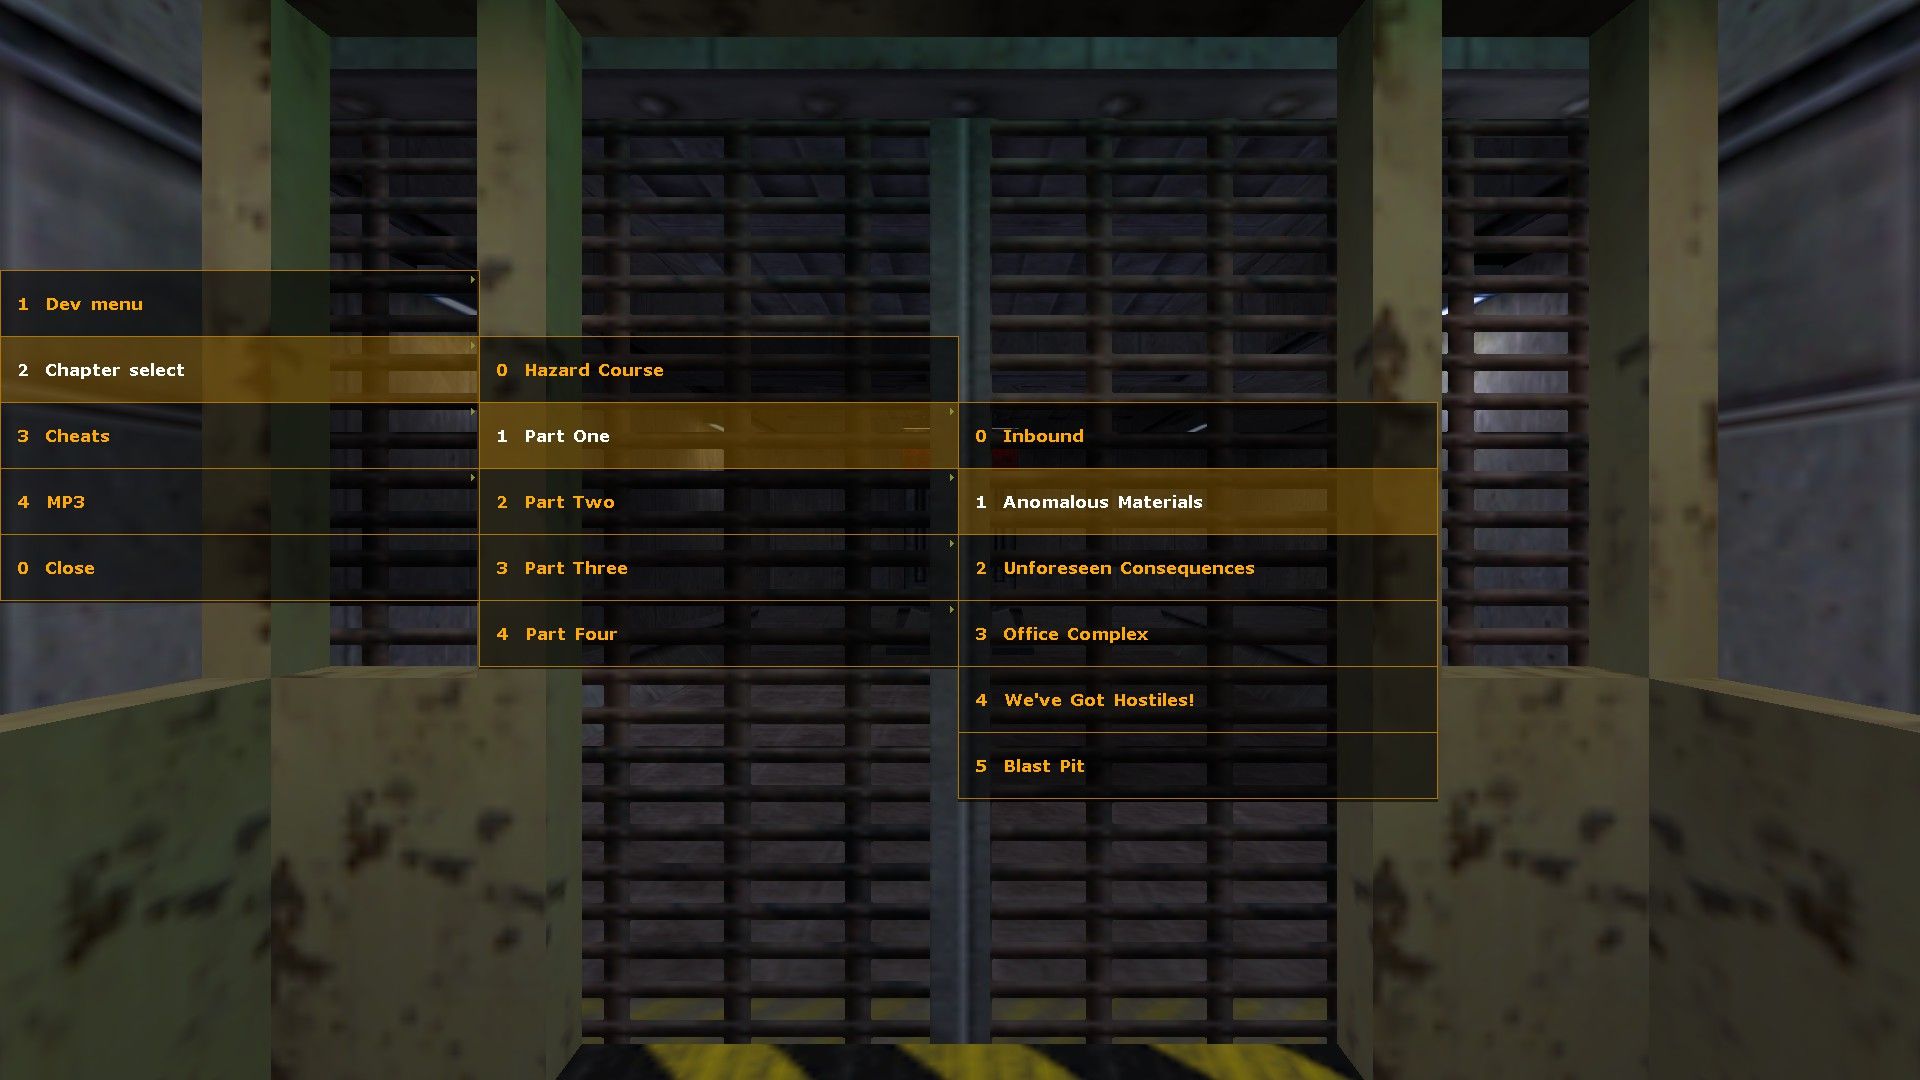
commandmenu.txt
A commandmenu in game.commandmenu.txt, though this feature is largely unknown outside of the Counter-Strike community.You can use this feature, for example, to add a chapter selection menu, change cvars on the fly, or add a dev menu.
However, you'd need to edit
gfx/shell/kbd_act.lst and add a keybind option for +commandmenu as per aforementioned.
skill.cfg
This file manages the skill system, defining NPC's health, ammo pickup, and damage dealt. Although it is strongly advised against editing these, it is one way of modifying the balancing of a mod without diving into code.
A Mod, or an Addon Pack? The <game>_addon folder
Post-SteamPipe GoldSrc supports the [over]loading of files without overwriting the base file through the <game>_addon folder. This is also the case for HD and server-downloaded content via the _hd and _downloads suffixes.Thus, some circumstances where separate mods were required before, might now be a simple drop-in into the
valve_addon folder, without the risk of permanently corrupting your game. To disambiguate, lets call the _addon folder use case as an Addon Pack instead of a Mod.Is my content a Mod or an Addon Pack?
Your content might fit the case of being an Addon Pack if:
- They are multiplayer maps.
- They are edits, additions, or upgrades to another base game/mod such as new background, custom models, etc.
- It's a short mission pack (but can still be considered a mod as otherwise people can't access your maps without typing in the console.)
- It's basically Half-Life but with a gimmick that doesn't involve custom maps.
- People might want to mix and match your content with other people's content.
- You have custom server/client code.
- Your content is entirely self-contained.
Enabling addons on the 25th Anniversary branchAn addon pack installs differently to a mod. Firstly you don't need the liblist.gam just to add, say, custom models to Half-Life. Secondly, players can mix and match other things in their games, and they can toggle them on or off (details below), or otherwise jump between vanilla and modded setup quickly.
Other things about addons
To toggle the loading of this folder:
- Pre-Anniversary branch: Options > Video > Enable custom content
- 25th Anniversary branch: Options > Content > Allow custom addon content
poke646_addon folder, and toggle them on and off.The kitchen sink approach of this system is not great (compared to HL2's
custom/ folder) but it beats needing to surgically remove files, or reinstalling whole mods and losing saves due to corrupted modifications.
Distributing your mod/addon pack
You have your mod (or an addon pack). You want others to play them. You need to send these files to them. This raises a question: how, where, and which files?What to [not] include
Firstly, it depends on whether you're distributing your content as a mod or an addon pack.
For mods:
- liblist.gam (and .dll/.so if using custom code) is required
- you're free to ship modified versions of titles.txt, sentences.txt, materials.txt, etc.
- you can have maps share textures in external WADs instead of packing them into the bsp files.
- custom assets can be organized however seems fit, but do consider how others might want to reuse them for addon packs of their own
- EXCLUDE: SAVE folder, config.cfg, Half-Life base files e.g. halflife.wad
For addon packs:
- mapname.res is required for custom multiplayer maps
- game files such as titles.txt, sentences.txt, and materials.txt ideally shouldn't be changed
- packing all custom textures into the BSP means not having to distribute any WAD files
- organize sounds/models/sprites used in maps into subfolders (usually the map's name or the author's name). This is strongly endorsed by mods such as Sven Co-op.
A useful workflow to have is a mod folder for development, a separate folder for finalized mod files, and a script that copies over only relevant file formats from the former to the latter.
For a full source release that includes file sources, consider putting your mod files in a GitHub repository instead.
TL;DR:
- ADD the sum of everything a resgen program reports to you, for every map
- SUBTRACT from the list files that comes with Half-Life or the base game/mod
- ADD liblist.gam (for mods only) and other modified game files
Packing the files
The best practice is to pack the files into a ZIP archive, as most OSes natively support it. Other archive formats would require players to have the associated archiver programs, and the compression improvements are generally insignificant for smaller mods.
For mods:
- With the Half-Life directory open, take the folder that contains your mod, and put it into an archive.
- Once the archive is created, check that inside the archive is that same folder, and the directory structure is preserved.
- If you have working files you wish to exclude, remove them at this stage.
For addon packs:
- With the addon folder open, select every file related to your content pack and add them to an archive.
- Once the archive is created, check that the archive contains your files and the directory structure is preserved (not flat.)
- If you have working files you wish to exclude, remove them at this stage.
Installation
To help would-be players, include a readme file in the archive directing them to extract the archive into the correct installation folder. Also provide them information to verify what a correct installation looks like.
Example install instruction for a mod:
INSTALLATION
1. In your Steam library, right click on Half-Life > Manage > Browse local files.
2. Extract the archive into that folder.
3. After extraction, find the folder <modfolder> inside the folder, which should also have the valve folder.
4. Restart Steam. The new mod should appear in your Steam library list.
Example install instruction for an addon pack:
INSTALLATION
1. In your Steam library, right click on Half-Life > Manage > Browse local files.
2. Inside that folder, create a new folder named "<gamefolder>_addon" if it doesn't already exist.
3. Extract the archive into the <gamefolder>_addon folder.
4. After extraction, you should find <example new file> inside <gamefolder>_addon/<path to new file>.Hosting the files
There are several places on the Internet that can host your mod/addon files, including:- ModDB
- GameBanana
- TWHL Vault (this site!)
- SCMapDB (Sven-Coop)
- General description and summary
- Installation directions
- Tools used
- Credits
- Licensing
Licensing
Note: this is not legal advice. IANAL.It's the last thing on your mind when you're in the zone. You might assume it'd be one of "here's the files, do whatever" or "credit me if you do stuff with it" and you'll be correct, but the platforms you distribute your mod under has other assumptions, and you may not want to go with the default.
The website https://choosealicense.com/ can help you decide which license you want to distribute your mod under. Then, select the appropriate license type on the hosting website's upload form.
A few pointers:
- GameBanana defaults to Creative Commons Attribution-NonCommercial-NoDerivatives 4.0 International (CC BY-NC-ND 4.0). The "NoDerivatives" clause may not be what you want if you're putting out things like prefabs; in general preventing others from having their own take on your stuff and sharing it legally.
- Use GameBanana's custom license checklist. It presents you with a checklist of what you want to allow.
- TWHL defaults to "All rights reserved." Use any other license, unless you're absolutely sure you want to keep it a sealed box.
- A GPL license means you need to include your source code*.
In The End
Congratulations! You've published your mod (or addon pack)!Hopefully the series has been helpful in assembling and getting your stuff out into the world, for other people to enjoy.
- Categories
- Tutorials
- Intermediate Tutorials
- Goldsource Tutorials
- Article Credits
-
 kimilil
–
Original author
kimilil
–
Original author
2 Comments
You must log in to post a comment. You can login or register a new account.
Also it's past midnight and I have to postpone integrating this to the rest of the tutorial's navigation.
-wadincludecompile command-line argument andgame_textentities. I think they are better suited for addon pack where you "can't" edit the original files and copying/pasting the original ones is not an option as if everyone was doing that, it would "overlap".For mods, shipping the WAD(s) and using titles.txt is fine since it's distributed as "standalone".