Tutorial: Setup Guide: Hammer Last edited 2 years ago2022-10-10 23:07:03 UTC
So, you've fired-up Hammer and nothing's working? "Where do I Start?" I hear you screaming. Well, here of course.
This tutorial covers the setting-up of the original game, CS, TFC and DoD. The indented bits give you alternative instructions for setting up mods, and as you'll notice, it's all pretty similar.
Game Configurations
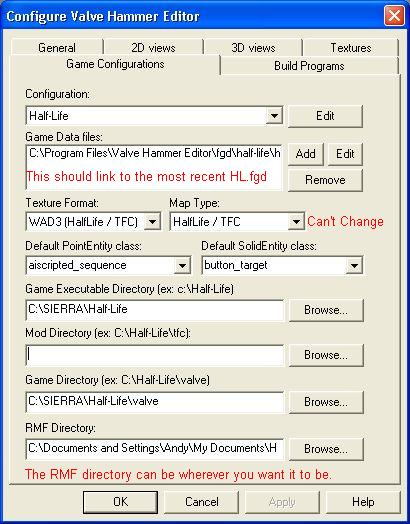
Hammer works with game configurations, because it was designed to be able to handle modifications of Half-Life as well as the original game.You need to create one of these configurations before you can make maps. After your first, making configs for mods will be easy. So, to begin, go to Tools -> Options and click the Game Configurations tab.
Click the Edit button.
Click Add, then type Half-Life and click OK.
Click Close, and Half-Life should be in the Configuration box.
- For CS, type CS instead of Half-Life.
- For TFC, type TFC instead of Half-Life.
- For DoD, type DoD instead of Half-Life.
Game Data Files
Game Data Files (FGDs) store information about the entities that are available for you to use in your maps. The original game has an FGD, and every mod has its own as well. You can usually download a mod's FGD from the mod's homepage, but you should already have some in your Hammer folder. FGDs get updated fairly regularly, so the ones that came with your copy of WorldCraft may be out of date, but use them for now anyway. You can always update them later.So, click Add under Game Data files and browse to your WorldCraft folder. If you have Hammer, your FGDs will be in your Hammer\fgd\Half-Life folder. Select the file called halflife.fgd and click Open.
- For CS, use halflfe-cs.fgd.
- For TFC, use tf15f.fgd. [or the latest one]
- For DoD, use halflife-dod4.fgd. [For DoD1.0 use dod1.0.fgd or dod1.fgd]
Texture Format and Map Type
Ignore these two settings. They were put there so that WorldCraft could later be adapted to work with other games, but they don't do anything yet.Default PointEntity and SolidEntity class
The entities specified here will be the ones selected by default when you go into entity creation mode. Choose info_player_start as your default point entitiy, and func_wall as your default solid entity. This saves time because the info_player_start is usually the first entity you place, and func_wall is a fairly generic and common solid entity.Game Executable Directory
Click Browse and find your main Half-Life folder, then click OK.Mod Directory
For the original game, select the Half-Life\valve folder.- For CS, select Half-Life\cstrike.
- For TFC, Half-Life\tfc.
- For DoD, Half-Life\dod.
Game Directory
It's getting a bit silly now, isn't it? Just stick Half-Life\valve in here. This setting and the one above are just used to find sprites (little 2D images) so that they can be displayed in the preview window. They're not vital.RMF directory
Here you can choose the folder that you want Hammer to be in by default when you save your maps.Build Programs
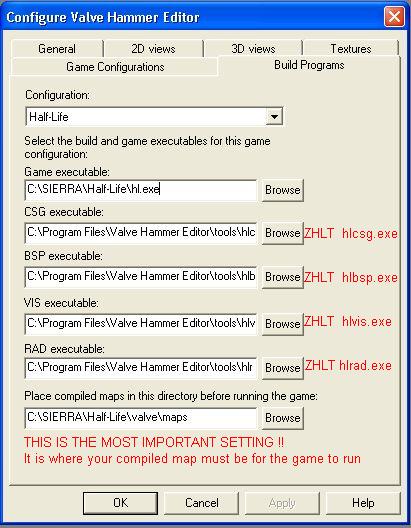
Now we move on to the Build Programs tab, where your newly-created Half-Life configuration should already be selected.For the Game Executable box, browse to your Half-Life\hl.exe file. CSG, BSP, VIS and RAD are the compile tools. They work together to turn your maps into .BSPs that can be played in Half-Life. WorldCraft wants to know where the tools are so that it can control them for you. If you look in your WorldCraft (or Hammer\tools) folder, you should find a bunch of programs that have names strangely similar to the four boxes you see in the Build Programs tab. Just match the filenames to the box labels. Later you'll want to consider getting better compile tools, but the ones that come with WorldCraft will do fine for now. Check out Tutorial: Compiling Introduced for a deeper look at compiling.
Place compiled maps in this directory...
This is where compiled maps (.BSPs) go before Half-Life is launched. It should be set to Half-Life\valve\maps, because that's where Half-Life looks when it's told to load a map.NOTE: If you do not have this set correctly to the place where your HL maps are, then you will get an error: Map Change Failed. Map not found on server.
- For CS, choose Half-Life\cstrike\maps or Counter-Strike\cstrike\maps
- For TFC, choose Half-Life\tfc\maps.
- For DoD, choose Half-Life\dod\maps.
Textures
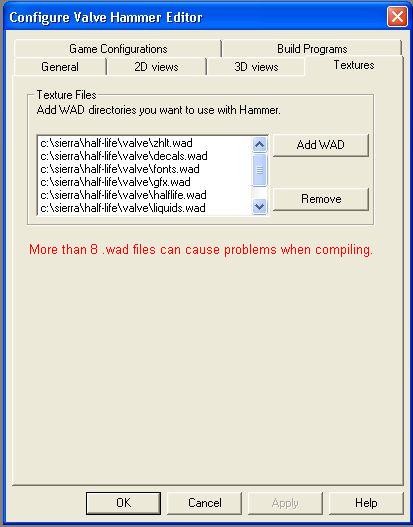
Finally, the Textures tab. Click Add WAD, browse to your Half-Lifevalve folder and select halflife.wad, decals.wad, liquids.wad and xeno.wad (you can hold down Ctrl to select them all in one go). Those are the only ones you'll need; ignore the others. Notice that there's no configuration selector on this tab. The set of WADs you choose apply to all configurations, so you'll need to keep the list up-to-date as you switch mods. All mods can use the original game's textures as well as any they have. So you don't need to remove the Half-Life textures when you switch from mod to mod, but do make sure you remove any for, say, DoD when you move over to CS.- For CS, select whichever WADs you want to use, except cached.wad.
- For TFC, select tfc.wad and tfc2.wad.
- For DoD, select the textures based on which version your using.
Done!
And that's it. Click OK on the Options window, and go File -> New. Then head over to the Tutorial: In the Beginning Part 1 tutorial and get mapping!- Categories
- Tutorials
- Beginner Tutorials
- Goldsource Tutorials
- Mapping
- Article Credits
-
 atom
–
Original author
Comments
You must log in to post a comment. You can login or register a new account.


