VERC: Creating Skys with Terragen Last edited 5 years ago2019-04-21 11:42:41 UTC
You are viewing an older revision of this wiki page. The current revision may be more detailed and up-to-date.
Click here to see the current revision of this page.
This tutorial was created by ADarcJedi and can also be found at his site Primordial Soup. You can find Terragen here. This is an archive link to Terragen classic, Planetside Software, the creators of Terragen, no longer provide a download link to this version.
This is not intended to be an in-depth lesson on the intricacies of Terragen, and I highly advise either reading the online tutorial at the Terragen homepage, or downloading the zip file and reading through it, and playing until you have a basic understanding of the program before you begin. It will make things much easier for you. That said, on with the lesson
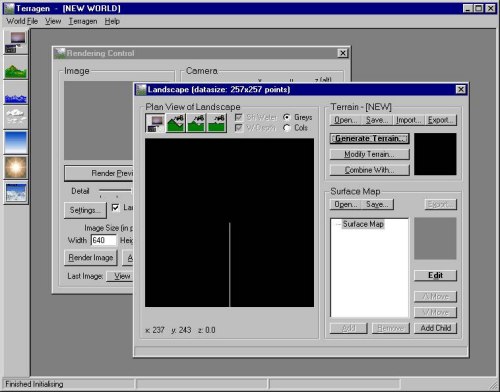
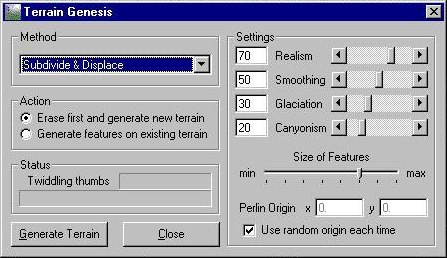
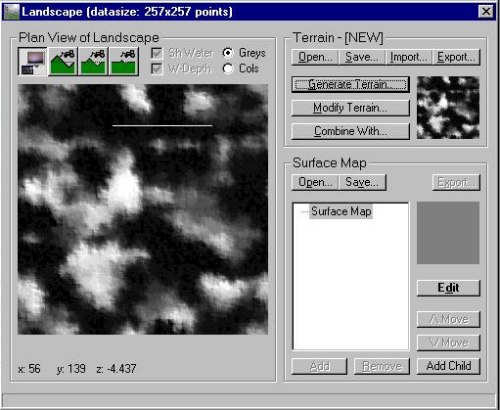
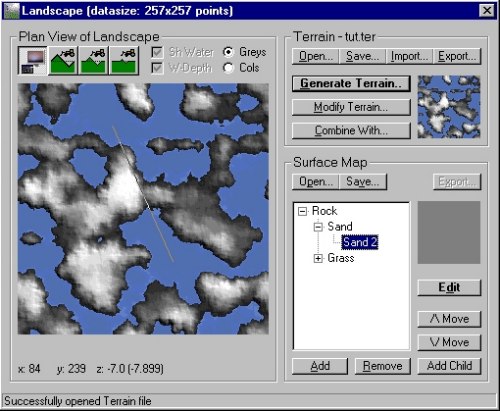
First off, fire up Terragen. you will get the main window, rendering control, and landscape dialog box onscreen.Now, unless you're doing a plain seascape, you need a land mass. Clicking on the Generate Terrain button in the landscape box will bring up the terrain genesis screen.There are a lot of options in there...some of which I don't know what they do yet. Play. Experiment with the settings, and then click the generate terrain button. You will now see your terrain represented in the landscape box.If you don't like it, play some more and generate some new terrain. If you like it, close the terrain genesis box.
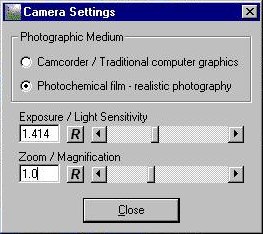
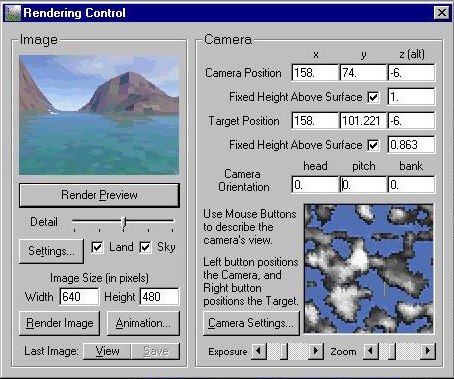
Click on the rendering control box, and do a quick render preview. this will give you a quick glance of what your basic terrain looks like so far. Leave the detail levels down where they are for now unless you want an EXTREMELY slow preview.Now, go back to the landscape window. In the lower right corner are surface map properties, either make up your own or a preset. for the sake of time, I'm loading a preset I picked desert and grass, and then did another preview to see how it looked so far. Since I'm fairly satisfied with my terrain, I closed the landscape box. Now comes the fun part.....once again, play around....add water, change the clouds, change the angle/color of the sun....add fog and haze...whatever your heart desires. Now, after you get everything looking good, go back into rendering control, and click on the camera settings button.I haven't really experimented with most of the settings here, but you need to make sure that the zoom/magnification is set to 1.0, to get the proper 90 degree field of view.
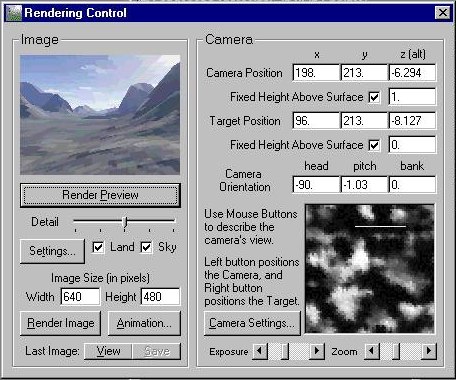
Now go back to rendering control. Notice the camera orientation settings. I usually start out with them all at zero. The head setting is for your front, back, right, and left shots. You're going to render 4 shots total, one at 0, one at 90, one at 180, and one at 270.Then reset head to zero, and move on to pitch. this controls the up/down. youre going to render one at 90, and one at -90. You shouldn't ever set bank to anything but zero, unless you want funky tilted renderings or you have a special effect in mind.
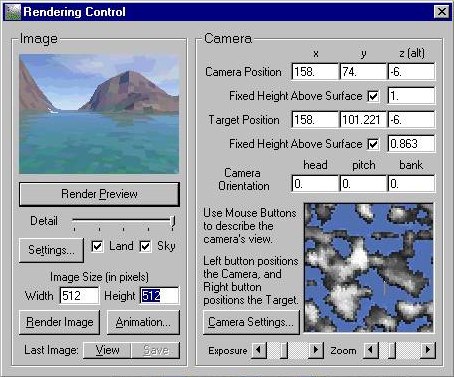
Now before you render your images, make sure you crank the detail up to maximum in the render control box, and set your image size to a square number, like so.I would suggest rendering them at 512x512, as Terragen doesn't do any anti-aliasing at this point, and then you can resample them to 256x256 in your favorite paint program which will also anti-alias them and get rid of any jaggies you might have in your renderings.
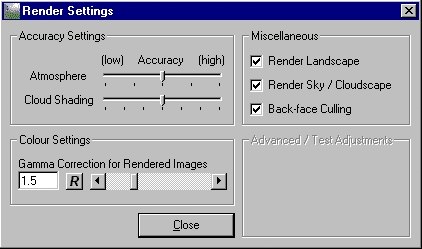
One other thing you may want to set is the gamma. Click on the settings button in the rendering control box.For some reason they have it set at 1.5 by default. Personally I feel this makes your images look washed out and I recommend setting it to 1, but you may want it lower or higher depending on what look you are trying to achieve.And there you have it. After you have all 6 images rendered, use Qsky or Skypaint to stitch them all together and touch up any spots that need fixing.
This tutorial by no means covers everything you can do in Terragen, and I am not an expert in it, by a long shot. If you want to know more about Terragen, go snoop around their homepage at http://www.planetside.co.uk. There's a lot of more detailed information there, as well as links to other Terragen user's pages and tutorials.
This is not intended to be an in-depth lesson on the intricacies of Terragen, and I highly advise either reading the online tutorial at the Terragen homepage, or downloading the zip file and reading through it, and playing until you have a basic understanding of the program before you begin. It will make things much easier for you. That said, on with the lesson

First off, fire up Terragen. you will get the main window, rendering control, and landscape dialog box onscreen.Now, unless you're doing a plain seascape, you need a land mass. Clicking on the Generate Terrain button in the landscape box will bring up the terrain genesis screen.There are a lot of options in there...some of which I don't know what they do yet. Play. Experiment with the settings, and then click the generate terrain button. You will now see your terrain represented in the landscape box.If you don't like it, play some more and generate some new terrain. If you like it, close the terrain genesis box.
Click on the rendering control box, and do a quick render preview. this will give you a quick glance of what your basic terrain looks like so far. Leave the detail levels down where they are for now unless you want an EXTREMELY slow preview.Now, go back to the landscape window. In the lower right corner are surface map properties, either make up your own or a preset. for the sake of time, I'm loading a preset
 I picked desert and grass, and then did another preview to see how it looked so far. Since I'm fairly satisfied with my terrain, I closed the landscape box. Now comes the fun part.....once again, play around....add water, change the clouds, change the angle/color of the sun....add fog and haze...whatever your heart desires. Now, after you get everything looking good, go back into rendering control, and click on the camera settings button.I haven't really experimented with most of the settings here, but you need to make sure that the zoom/magnification is set to 1.0, to get the proper 90 degree field of view.
Now go back to rendering control. Notice the camera orientation settings. I usually start out with them all at zero. The head setting is for your front, back, right, and left shots. You're going to render 4 shots total, one at 0, one at 90, one at 180, and one at 270.Then reset head to zero, and move on to pitch. this controls the up/down. youre going to render one at 90, and one at -90. You shouldn't ever set bank to anything but zero, unless you want funky tilted renderings or you have a special effect in mind.
Now before you render your images, make sure you crank the detail up to maximum in the render control box, and set your image size to a square number, like so.I would suggest rendering them at 512x512, as Terragen doesn't do any anti-aliasing at this point, and then you can resample them to 256x256 in your favorite paint program which will also anti-alias them and get rid of any jaggies you might have in your renderings.
One other thing you may want to set is the gamma. Click on the settings button in the rendering control box.For some reason they have it set at 1.5 by default. Personally I feel this makes your images look washed out and I recommend setting it to 1, but you may want it lower or higher depending on what look you are trying to achieve.And there you have it. After you have all 6 images rendered, use Qsky or Skypaint to stitch them all together and touch up any spots that need fixing.
This tutorial by no means covers everything you can do in Terragen, and I am not an expert in it, by a long shot. If you want to know more about Terragen, go snoop around their homepage at http://www.planetside.co.uk. There's a lot of more detailed information there, as well as links to other Terragen user's pages and tutorials.
Comments
You must log in to post a comment. You can login or register a new account.

