VERC: How To Make A Mod Last edited 5 years ago2019-04-17 09:24:24 UTC
You are viewing an older revision of this wiki page. The current revision may be more detailed and up-to-date.
Click here to see the current revision of this page.
HL SDK 2.2
This article was originally made available as part of version 2.2 of the Half-Life SDK. As such, all limitations, restrictions, license agreements, copyrights and trademarks from the original document apply here.How To Make A Mod
This is an overview document intended to answer the most basic question, "How do I make a mod?" This isn't to teach how to code, or create 3D models, but rather how to set up a mod so that it will run in Half-Life. Each mod has different components from other mods: some have new weapons, some new maps, some new monsters. There are just a few basic things that all mods must have, and this document is meant to outline what those are.Half-Life has introduced the Custom Game Browser into the interface for people to more easily find and download new game content. No longer do people have to scour the web to find out about your mod, they can now have notice of your mod show up for them instantly within the game. Updates to your mod can also be shown within the game automatically, so players never have to worry about whether or not they have the most current version of you mod.
How to get your mod (Custom Game) listed on the WON.net mod master server:
1. You must either:a.) place your mod on an ftp site which allows anonymous ftp access:
For instance, if I have created a Half-Life mod "Skirmish", I might place it at an ftp server having the following address:
www.valvesoftware.com/pub/downloads/mods/skirmish
Thus, www.valvesoftware.com is the ftp server host and pub/downloads/mods/skirmish is the main directory for my game.
or;
b.) you must compress your mod into a .zip file that exists on an http ( web) server:
For instance, if I have created a Half-Life mod "Skirmish", I might place it at an http server having the following address:
http://www.valvesoftware.com/mods/skirmish.zip
Thus, www.valvesoftware.com is the server host and skirmish.zip is the file that will be downloaded to install my game. Skirmish.zip will be placed into the game directory of the mod I have downloaded: e.g.: c:\sierra\half-life\skirmish\skirmish.zip.
The Half-Life mod browser knows how to unzip .zip files only. Less preferably, you can create a self-extracting archive ( extension .exe ) and the Half-Life mod browser will execute that .exe after downloading the archive.
Files having other extensions will simply be placed in the mod's game directory, but will not be acted upon.
2. If you are using method 1.) a.) above, then you must place a valid liblist.gam file at the ftp directory where your mod is being posted.
In the ftp directory for the mod, the author must expose the file liblist.gam. This file is used to control various mod specific settings used by Half-Life. The contents of the liblist.gam file are discussed below.
Thus, for the above example, I would create the file:
www.valvesoftware.com/pub/downloads/mods/skirmish/liblist.gam
When the Half-Life front end is told to "Install" (i.e., download and place files in the appropriate spots for) a mod, the ftp site listed with the mod master server is scanned for the liblist.gam file before downloading can continue. The existence of liblist.gam validates the mod site.
In addition, you must place your mod's .zip file in the same directory as the liblist.gam. The .zip file must be named gamedir.zip where gamedir is the game directory for your mod.
For example, www.valvesoftware.com/pub/downloads/mods/skirmish/skirmish.zip
3. Your mod must use a different game directory from other known mods.
Like predecessor Quake engine games, the key to running custom games is the use of a unique "game directory" for each mod. Mod authors will want to try and pick only names that are not currently in use by another mod for the game directory name. Thus, "Valve" and "TFC" are not valid game directory names, since we already have used those for Half-Life itself and Team Fortress Classic.
4. Once you have completed steps 1 - 4, you should contact Valve (sdk@valvesoftware.com) and provide the web site where your mod's downloadable files reside and a copy of the following information ( filled in for the above example ):
"gamedir" "skirmish"   // directory off of HL install for game
"game" "The Skirmish"    // name of game
"url_info" "www.valvesoftware.com"  // web site for game
"url_dl" "www.valvesoftware.com/downloads/mods/skirmish"  // download directory for the mod
"date" "April 5, 1999"
"version" "1"   // The version of your mod
"size" "512000"      // The download size in bytes
"rating" "0.0"  // on a 0.0 to 10.0 scale
"svonly" "0"    // Is the mod a server only mod?
"cldll" "0"     // Does the mod require a new client.dll?
"hlver" "1009"      // Version of HL the mod was last compiled for
"type" "multiplayer"       // Type of mod ( single, multiplayer, teamplay, etc. )
Information about the mod control file: Liblist.gam
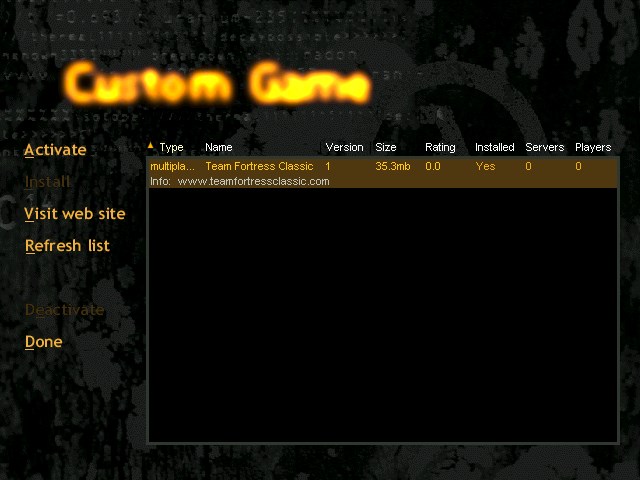
The liblist.gam file is the most important data file for a mod. It describes which game DLL to load, and other options for the mod. Here is the liblist.gam file for TFC, as an example:
// Team Fortress Classes Game .dll Listing File
// Load order is determined by file order.
game "Team Fortress Classic "
url_info "www.teamfortressclassic.com"
url_dl ""
version "1"
size "37000000"
svonly "0"
cldll "0"
hlversion "1009"
type "multiplayer_only"
nomodels "1"  // Don't show models in browser, since you don't pick them there anyway.
mpentity "info_tfdetect"
gamedll "dlls\tfc.dll"
// Valve Game Info file
//  These are key/value pairs.  Certain mods will use different settings.
//
game "Half-Life"
startmap "c0a0"
trainmap "t0a0"
hlversion "1009"
mpentity "info_player_deathmatch"
gamedll "dlls\hl.dll"
- game - The name of the mod
- url_info - The mod's informational web site
- url_dl - The ftp site from where the mod can be downloaded
- version - The mod's version number
- size - The size, in bytes, of the mod
- svonly - "1" if the mod is a server only mod ( no client side content or code ), "0" otherwise
- cldll - "1" if the mod requires a matching client.dll
- type - If this mod is "multiplayer_only", then the single player buttons ( New Game/Hazard Course/Load game etc.) are disabled in the Half-Life launcher
- hlversion - The version of Half-Life for which the mod was generated. Revisions to Half-Life will require updates by mod authors.
- nomodels - Set to "1" if model bitmaps should not be shown in the Multiplayer | Customize menu of the Half-Life launcher
- mpentity - When a user chooses to create a listen server from the interface, each BSP file in the maps folder for the mod is searched. The entity data for the BSP is scanned for the presence of the string identified by mpentity. For instance, in Half-Life, the string is "info_player_deathmatch" ( which is also the default if no string is specified )
- gamedll - The game DLL to load for running a server for this mod.
- startmap - When a user chooses "New Game" for a single player mod, this is the map that is loaded.
- trainmap - When a user chooses "Hazard Course" for a single player mod, this is the map that is loaded.
Changing the interface:
A Mod can change all the graphics of the Half-Life interface to give the entire game a new look that fits with the theme of the modified game.The main logo can be changed by creating a new "logo.avi" and placing it in your custom game directory in a media subdirectory. It can be a single frame AVI if you want a non-animating logo, or a standard AVI of any length you desire.
The graphics for the various elements of the interface are BMP files, and would go into a gfxShell subdirectory of your custom game directory. The individual elements can be obtained from either SDK, in the Shell directory.
The "logo.bmp" is the image that is used to create the console background, which gets compiled into the "cached.wad" file that resides in your custom game directory. A sample LS file to compile the cached.wad is in the Shell directory of the SDK.
Another aspect of changing the interface is customizing the key bindings menu. Many mods have new actions that Half-Life does not have, like "drop the flag" or "feign death". These actions can be inserted into the interface for easy key binding by editing the kb_act.lst and kb_def.lst files, found within the Shell directory.
This covers the basics of making mods functional within the Half-Life interface. As always, the best resources for information are talking to other mod authors. The forums at http://www.planethalflife.com and http://www.valve-erc.com are great places to start.
In addition, with the release of version 2.0 of the Half-Life SDK, mod authors may modify the strings shown in the Half-Life launcher. Care should be taken, of course, to consider localization/translation issues when overriding strings ( perhaps offering multiple versions of the strings.lst file ). Exact details may be found in the documents in the Launcher Strings subdirectory of the SDK.
In addition, the color of the help text in the launcher may be modified be editing gfx/shell/colors.lst. Finally, additional launcher graphic content has been moved to the gfx/shell directory ( scroll bar thumbs, close and minimize boxes, etc. ).
Comments
You must log in to post a comment. You can login or register a new account.