Vlatitude: Easy Spiral Staircases Using the Arch Tool Last edited 5 years ago2019-04-25 11:33:44 UTC
You are viewing an older revision of this wiki page. The current revision may be more detailed and up-to-date.
Click here to see the current revision of this page.
While it may seem like Half-Life is ages old, the MOD community is still in full force, but unfortunately, the emergence of new tutorials has been nearly non-existent these days, and this will hopefully contribute to the community as being a unique and useful tutorial. And it is a 69th Vlatitude exclusive as well. Eat that Valve-ERC! 
First of all, so you know what you're getting yourself into, here is what we'll be making:
 Believe it or not, this staircase only took me around 10 minutes, and it is far superior to the old vertex manipulation method, which is subject to creating invalid faces and inconsistencies in your staircase. Unfortunately, this method only works for WorldCraft users, so Quark users and the like may be out of luck here.
Even though this tutorial was designed to be very user friendly and detailed, some general WorldCraft knowledge is required. Veterans to Half-Life mapping may find that I'm pointing out the obvious in certain areas of this tutorial but the intention is to just be clear and detailed. There's nothing worse than having to go all the way back to the beginning of a tutorial because you did one step wrong or missed a step or misunderstood a step.
Okay, so enough with the jabbering and one with the training.
In the side view, resize so that the block's lower left corner is @384, -256 and the upper right corner is @1472, 576. Don't worry; we won't have to deal with this coordinate stuff too much in this tutorial. Since this is just a tutorial map, it doesn't hurt to make a large room and give yourself plenty of space to work with.
b) Be sure and pick a texture before you create this thing. I used C2A4E_W1B. Use whatever you'd like but pick something low key, so that the texture of the outside walls don't distract from the stairs. Remember, this is just a test, so those walls don't have to look sweet or anything.
Highlight your block and hollow that puppy out with a 16-unit wall width.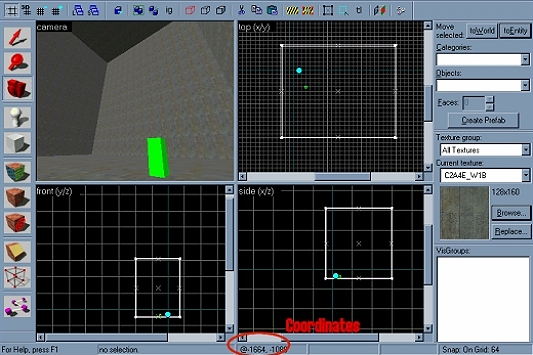 c) Now on to the stairs. Resize your work grid to 64. Now, in the top view, drag a square that starts @448, -64 and ends @1088, -704. In the front or side view, drag the bottom of that thing down to the floor on the room. Make it 8 units high. Don't create a block! First, let me explain what we're doing before we do anything else. The top view of the block outline we're making is going to be the general circumference of the staircase. The 8-unit height is going to be the general height of each individual stair. You'll see this more clearly after we actually create it. Now go up and change objects from block to arch in the pulldown menu
 d) Now with the arch tool on, let's select a texture and save time. Choose GENERIC015V2 as that's a good grated texture for the type of stairs we're making. Go ahead and press enter.
e) Now here's the setting that will do it all! This makes spiral staircases a snap. First thing to do is click on the button that says 'circle'. We want that thing to go all the way around. Next, input these settings
Here's a quick explanation of each and what the importance is: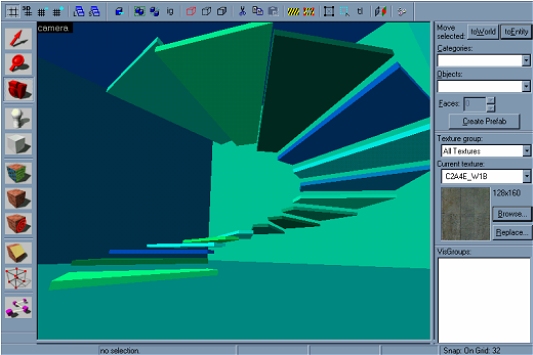 g) Of course, now that we look at it, it just doesn't go up as high as we'd like. Well, the answer to that is simple. If they are still grouped, select it, and then copy and paste. Take the copy and push it up so that it is aligned with the other staircase in the top view, and has a gap interval that is consistent with the other staircase in the front and side view. In this case, if the grid size is on 32, and you just place the bottom step of the new staircase right above the top stair of the first staircase, the new staircase will snap to the correct interval, making one seamless spiral staircase!
b) Do you remember when I said we needed to make sure that the wall width of the staircase needed to be at an increment of 8? Now we'll see why. Resize the grid to 8 and draw a block in the center of the staircase (in the top view) that touches each of the furthest points of the center. The picture explains better: Make the height reach from the bottom of the room to the top of the room. Select a new texture (I used GENERIC012). Set the block tool to the arch tool again and press enter. Set these settings:
 c) Wow. We've got the start of something pretty cool here. Of course, that centerpiece is touching the ground, and that's going to be murder when the compilers break that floor apart. Let's turn that into a func_wall and add in some light flags (you need Zoner's Compile tools to do this, but if you aren't using Zoner's Compile Tools, you really have no business mapping in the first place). If you don't know how to do this, just turn all of those pieces into an entity, turn off smart edit and the key: zhlt_lightflags with a value of 1.
 b) We need to give these walls some thickness. Since this is a see-through grated style wall, it shouldn't be too thick. We'll make it 2 units thick. Set the grid down to 2 and then pull each side of the block we just made out 1 grid space (2 units). Make sure you're still on the arch tool and press enter.
c) Change the settings to this:
d) Okay, now we have a situation. How is the player supposed to get in? Well, here's we'll have to do some clipping with the clip tool. In this case, I think it's best to clip away any part of the wall that jets out below the first full circle of stairs. This will be the most tedious part of the job, but well worth it. Look at the picture below to see what I mean by this. Do this until you get back to the bottom stair again and stop.
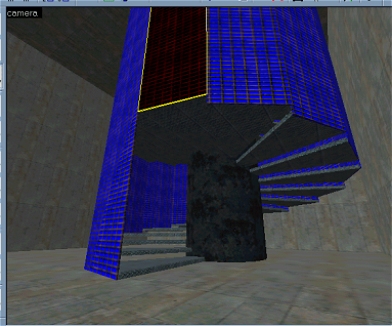
 a) Now using the same method as before, we're going to cut out some of that stuff so that the player can walk on to the platform. After we do some cutting, we'll notice that there is a piece of that wall that sticks into the platform. What are we to do? Of course, the ArchVile, always has a solution. Yes, simply do another clip and you're off again! Simply split the wall section into two halves and cut away the excess. Look at the picture to understand this better.
 b) Now all we have left is to take that outer wall and make the openings transparent. Select them all, change the render mode to solid and the FX amount to 255, yadda, yadda, yadda.
I'm going to add some colored lighting in there just to give it some something special. Of course remember that in a real map, colored lighting that comes from no obvious source does not show off your l33T skills, but for the sake of playing around, we can go ahead and do it here.
After all that, add anything else you want in there. This is just a test map anyway, so from here on out, you can't possibly screw anything important up. Just remember to save and then compile that sucker and check it out. It's a small map so go ahead, add some lights and compile with the extra RAD features. Indulge yourself. Now you have a totally awesome spiral staircase.
Okay, so that probably took more than 10 minutes to do just now, but that's because you were doing this step by step. If you've picked anything up from here, you should be able to do that same thing in around 10 minutes, provided you don't make any mistakes. Oh and you should most definitely play around with all of the settings of the arch tool to get the effect you want. This was just to get you familiar with the process, but of course, you can use your own ideas. Have fun and enjoy, and use the example map given however you need it. Enjoy and have fun.
First of all, so you know what you're getting yourself into, here is what we'll be making:
Even though this tutorial was designed to be very user friendly and detailed, some general WorldCraft knowledge is required. Veterans to Half-Life mapping may find that I'm pointing out the obvious in certain areas of this tutorial but the intention is to just be clear and detailed. There's nothing worse than having to go all the way back to the beginning of a tutorial because you did one step wrong or missed a step or misunderstood a step.
Okay, so enough with the jabbering and one with the training.
1) The Stairs
a) First thing we'll need to do is open up WC. Start a brand new blank map file and stick an info_player_start in there. Now we'll need a basic room to put this staircase into. Next we'll create a large block that will be enough room for a large spiral staircase. Turn on the block creation tool and in the top view, drag from the coordinates @384, 256 all the way down to @1472, -768. (Use the cords at the bottom of the WorldCraft info bar shown in the picture below). The reason I have you follow the same coordinates, is to make sure that you are working consistently with the tutorial. This will make sure that you get the same results that I show in the screenshots. Of course, if you just want to guess it all, I won't stop you, but when we're dealing with the staircase itself, I strongly recommend that you follow the coordinates, as the consistency will be very important when making spiral staircases.In the side view, resize so that the block's lower left corner is @384, -256 and the upper right corner is @1472, 576. Don't worry; we won't have to deal with this coordinate stuff too much in this tutorial. Since this is just a tutorial map, it doesn't hurt to make a large room and give yourself plenty of space to work with.
b) Be sure and pick a texture before you create this thing. I used C2A4E_W1B. Use whatever you'd like but pick something low key, so that the texture of the outside walls don't distract from the stairs. Remember, this is just a test, so those walls don't have to look sweet or anything.
Highlight your block and hollow that puppy out with a 16-unit wall width.
e) Now here's the setting that will do it all! This makes spiral staircases a snap. First thing to do is click on the button that says 'circle'. We want that thing to go all the way around. Next, input these settings
- Wall Width: 216
- Number of Sides: 16
- Arc: 360 (We already set this by clicking the circle button)
- Start Angle: 0
- Add Height: 17
Here's a quick explanation of each and what the importance is:
- Wall Width ' Pretty much self-explanatory, but in the case of spiral staircases, you will need to make sure that whatever you set this to, make sure it is a multiple of 8. (Ex. 8, 16, 32, 64, 216, etc.). You'll see the reason for this a little later.
- Number of Sides ' This can be anything you want, but I think 16 is a reasonable number.
- Arc ' This makes it a full circle (duh)
- Start Angle ' Change it if you want, but I see no need to. Causes less confusion later, unless of course the situation calls for a different situation.
- Add Height ' This is one you'll have to play around with later to really understand how it works, because it's difficult to give a visual explanation in writing. In a nutshell, this will determine how much higher each step will be raised from the other. Higher numbers will spread them out more, while lower ones will keep them tight. With the height of the step we made earlier, the value we used, 17 will keep a gap in between each, while still allowing the player to climb each stair without the need to jump. Don't confuse this with individual step height. This just determines how high each step will raise from each other. This value can't be too high, or else the player won't be able to walk up it.
Now you can go ahead and press OK
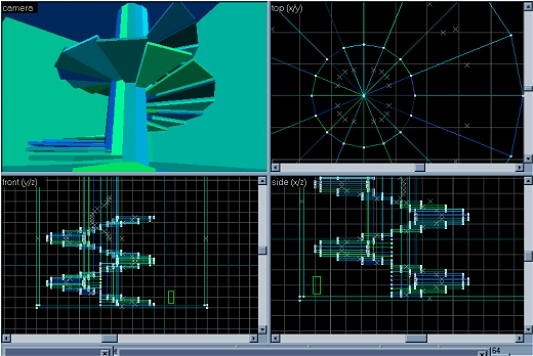
f) Wow! Look at that! In an instant, we got cool spirals. Now before we do anything else, let's save and then compile the map so that we can make certain the player can actually walk up them with ease, before we do anything else to this map. Be sure and skip the RAD compile, since we don't have any lights set up.2) The Centerpiece
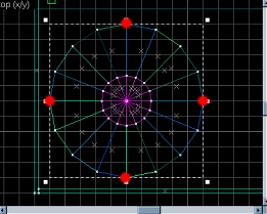
a) As cool as this looks now, it just isn't very convincing. In reality, stairs don't normally float without support. This is where we get to add some visuals extras and put some logic into the stairs using the same arch method and keeping the compile process from creating any weird splices.b) Do you remember when I said we needed to make sure that the wall width of the staircase needed to be at an increment of 8? Now we'll see why. Resize the grid to 8 and draw a block in the center of the staircase (in the top view) that touches each of the furthest points of the center. The picture explains better:
- Wall Width: 300 (doesn't matter, just as long as it all goes directly to the center)
- Number of Sides: 16 (This resets back to 8 every time so always remember to change this)
- Arc: 360
- Start Angle: 0
- Add Height: 0 (We aren't making steps anymore, so make this 0)
3) The Outer Walls
a) Let's add some walls to that. This is where the arch tool will save your life. It will make sure all of that stuff lines up nice and neat. First let's select a new texture. For this, I think {GRATE4A is appropriate. Now, in the same manner in which we created the centerpiece, we'll create the walls. Box around the farthest outer edges of the staircase, with the center of each side touching each farthest point on the staircase. Again, its height should touch the ground and the ceiling of the room. Don't press enter just yet.c) Change the settings to this:
- Wall Width: 2
- Number of Sides: 16
- Arc: 360
- Start Angle: 0
- Add Height: 0
d) Okay, now we have a situation. How is the player supposed to get in? Well, here's we'll have to do some clipping with the clip tool. In this case, I think it's best to clip away any part of the wall that jets out below the first full circle of stairs. This will be the most tedious part of the job, but well worth it. Look at the picture below to see what I mean by this.
4) Final Touches
Those of you experienced mappers, who think they've got the gist of it, can probably let this be the end of the tutorial and go on, but just to be complete, we'll go ahead and finish up, by adding a ledge. What would be the point of climbing up those stairs if the player didn't have anything to climb up to? Go back and select the texture we had selected for the stairs. Make sure you aren't still set on the arch tool, as that can be very annoying when trying to create a new block. Create an extra block at the very top stair and drag it all the way to the other side of the room up to the wall.I'm going to add some colored lighting in there just to give it some something special. Of course remember that in a real map, colored lighting that comes from no obvious source does not show off your l33T skills, but for the sake of playing around, we can go ahead and do it here.
After all that, add anything else you want in there. This is just a test map anyway, so from here on out, you can't possibly screw anything important up. Just remember to save and then compile that sucker and check it out. It's a small map so go ahead, add some lights and compile with the extra RAD features. Indulge yourself. Now you have a totally awesome spiral staircase.
Okay, so that probably took more than 10 minutes to do just now, but that's because you were doing this step by step. If you've picked anything up from here, you should be able to do that same thing in around 10 minutes, provided you don't make any mistakes. Oh and you should most definitely play around with all of the settings of the arch tool to get the effect you want. This was just to get you familiar with the process, but of course, you can use your own ideas. Have fun and enjoy, and use the example map given however you need it. Enjoy and have fun.
- Categories
- Archived Articles
- Vlatitude Archive
- Tutorials
- Goldsource Tutorials
- Mapping
- Images Required
1 Comment

The Skeleton
Commented 3 years ago2021-09-01 23:09:02 UTC
Comment #103697
Yeah, this page needs an update
You must log in to post a comment. You can login or register a new account.