Vlatitude: Gensurf Explained Last edited 5 years ago2019-04-25 11:33:49 UTC
You are viewing an older revision of this wiki page. The current revision may be more detailed and up-to-date.
Click here to see the current revision of this page.
While mapping can be a very enjoyable pursuit there can be times when something is just too tough to do yourself. One such example is decent outdoor scenery and landscapes. Well, I say landscapes but the HL (quake) engine never could do these very well so what you end up with is very large rooms that appear to be outside environments. But to get away from a feeling that this is some man-made area, you have to make uneven shapes and random features. Gensurf a program that solves this problem to a certain extent. I say 'certain extent' because it has limitations that I'll come to later.
A quick run through of the tabs is required to familiarise you with what everything is. The GENERAL tab is your basic features of what you want to create. It's where you set what game you want to generate a surface for, set what orientation the surface is (i.e. Is it a wall or a floor?) then there is the most important section that decides how you want to generate the surface. In the bottom right corner there will be some value boxes that can be used when creating surfaces in different ways.
That's everything covered. Now onto the step by step guide: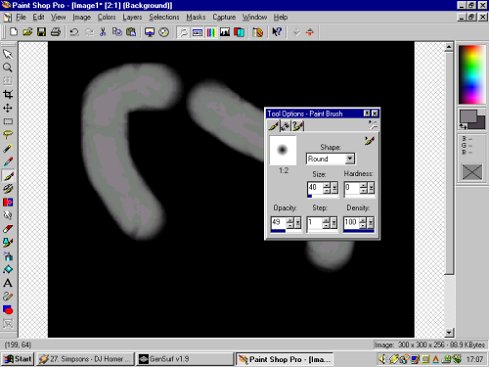 Pick a soft brush and lower the opacity and use a texture that will give some faint pattern. For this we will be making a small basin valley with some hills around the edge, well I say valley but it's really like a small indent. Use a grey colour so that the hills are not there highest around the middle but will still make some nice uneven ground. Here you can see that around the edges I have used white for the highest hills, now to smooth this off.
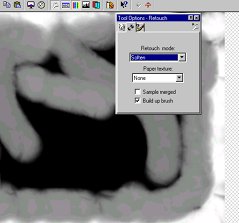 Use the soften brush to blur the grey into the white and the resulting hills will have shallow slopes. Make sure that you only blur the edges that you want to have shallow slopes, using a blur filter on the whole image will give you a nice smooth landscape if that is what you want. Make sure that when you use the soften tool that it is set to blur as much as possible with no texture effects.
Next on to some messy artwork.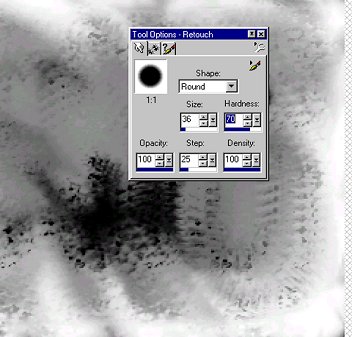 Here you can see that going nuts with the smudge brush is good for making a nice organic look, pull the white into the black and vice versa so that you get some interesting features. Depending on how detailed you want the generated terrain in the end result you can be as creative or sloppy as you want at this point. The fact is that barley none of this detail will be translated on your average Gensurf map. But with some higher setting you will will see these streaks and lines appear in the 3d version. Depending on what you are aiming for you will have your own setting for the smudge tool, but its best to have the hardness set to about 50 so that not everything is moved around. Use an interesting texture in conjunction with this to get an effect like I have here.
As you can see it resembles the image that you made. It a bit hard to tell from the wireframe, but as you can see it is a basin valley with high hills around the edge and some smaller hills in the middle. The dimensions are 1000 x 1000 so this is a very large map. You have the option to include a skybox with every map that is generated by simply ticking the box on the first tab.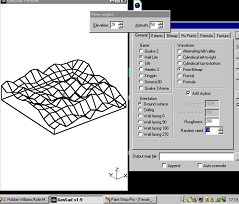 If you look closely at these two pictures you will see a slight difference. This is because the second image has a different 'SEED' value. This as you can see make a variation of the Bitmap image that was inputted. The first image has a seed value of '1' while the second map has a seed value of '10'. So you can make slight changes to your map if you don't like how it looks.
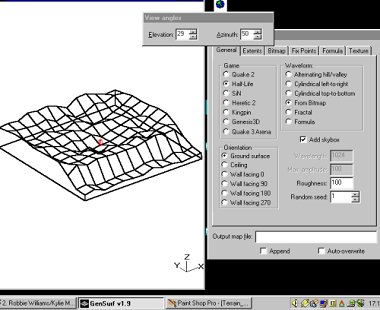 Using the ROUGHNESS value it is possible to make the surface more or less uneven. In the previous pictures the roughness was set to '200' here it is at '100'. The hills have been smoothed over and balanced out a little. Doing this cuts down on any graphical glitches occurring when the map is compiled and run in HL. Over some time and practice you will be able to see at this stage if any problems are going to arise.
 Look carefully at the above picture. The EXTENTS tab is very important for final checks and changes. The DIVISIONS values are set to '12' and '10' meaning that each block used to make up a hill is a rectangle. This may cause problems so setting the values to be even to each other is advised. Increasing the divisions here will make a more detailed landscape but will result in a higher r_speed. It is up to the mapper to trade detail for speed when making these. The choice is yours!
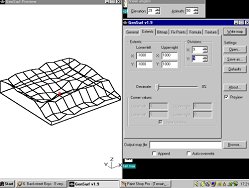 Here I shave lowered the DIVISIONS to 9x9 so that the blocks are squares and the r_speeds will not be too high You will also notice that some hills have been lost from doing this and the over all smoothness is greater.
 The final step in this section is to set the textures and get ready to compile. Here I have set OUT_DIRT1 as the default texture. The other texture is OUT_DIRT2 this is applied to the flat ground where no hills are. The steep hills will have OUT_RK3 so that it will seem like rocks are sticking out of the ground. Remember that Gensurf rarely (from my experience) uses these 2 extra texture features.
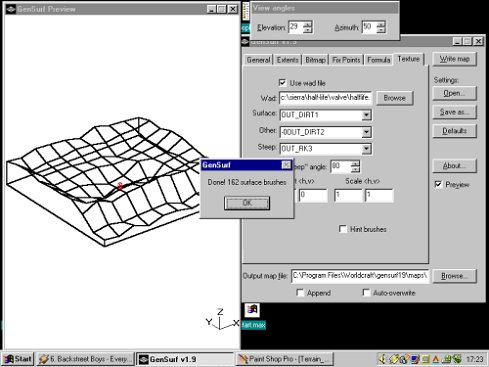 Now that everything is set up, all you need to do is click on WRITE MAP and the program will compile. It will then give you a polygon count of how many surfaces have been made. In this case its 162. This number will be higher with more divisions. During HL this number is normally doubled to give you a rough idea of the r_speeds. This map will have an overall r_speed of about 320.
Remember to set the output file destination. If you remember I said that you should make a MAPS folder in Gensurf to store these too.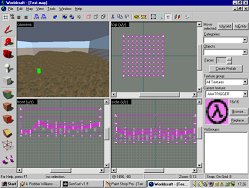 Here is the map loaded into WC showing that everything is fine. Gensurf groups all the blocks together to make an entity group. To compile this you will have to tie the landscape to the WORLD. Strangely enough you will have an over lapping trigger brush in the skybox. Just replace the trigger texture with the SKY one. I didn't like the look of the texture that I originally used so I just changed them to this sand texture.
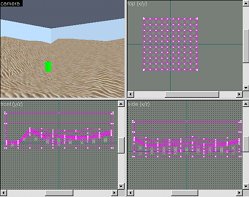 If you notice in the last picture there was no rock or other textures used. Once again Gensurf forgets that you set the textures to be different for steep slopes. Anyway this sand textures looks just as good anyway. Before you compile the map remember to add an ENV_LIGHT so the map has some light.
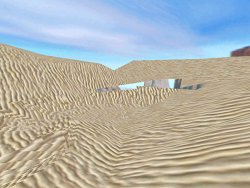
Now to compile and have a look at this in the game. One feature of theses maps is that they always have 'LEAF SAW INTO LEAF PORTAL' errors. Just ignore these as they happen all the time.
20 Minutes later...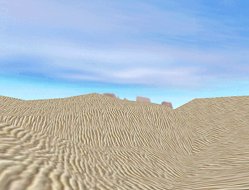
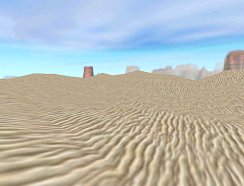 Far from fantastic mapping, but it serves as an example. Nice rolling dunes with the mountains in the distance. Add some marines and a few tanks and it could pass for Iraq (or maybe not).
Now for the downs to Gensurf
It does take quite some time to work out little graphical glitches caused by Gensurf. Sometimes HL will seem to make false leaks in the maps as some surfaces disappear. It's a matter of playtesting and modifications to the map to get everything looking seamless without any bugs.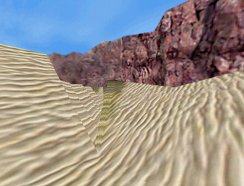
 Sometimes these bugs only appear when you stand in a certain place, also watch out for invisible brushes that stop the player from getting stuck in some strange shaped holes.
Good luck and happy mapping.
A quick run through of the tabs is required to familiarise you with what everything is. The GENERAL tab is your basic features of what you want to create. It's where you set what game you want to generate a surface for, set what orientation the surface is (i.e. Is it a wall or a floor?) then there is the most important section that decides how you want to generate the surface. In the bottom right corner there will be some value boxes that can be used when creating surfaces in different ways.
Waveforms
The values available will depend on what waveform you have selected.- ALTERNATING HILL/VALLEY will make a surface that has hills surrounded by a valley and then another hill beyond that, creating a rolling hills effect.
- CYLINDRACAL LEFT TO RIGHT will create waves of hills coming from the X-axis.
- CYLINDRACAL TOP TO BOTTOM will create waves of hills coming from the Y-axis.
- FROM BITMAP allows the terrain to be generated from a grey-scale image that you load into the program (see more on this bit later)
- FRACTAL uses random number calculations and a random seed formula to generate a totally unique surface.
- FORMULA uses Excel compatible geometric formulas to generate terrain; if you have a degree in geometry or know how to make best use of this then have a go.
- WAVELENGTH is used by ALTERNATING HILL/VALLEY, both CYLINDRICAL valleys and FORMULA. It is used to make the frequency of hills and valleys, dictating how many are on the surface and how wide they are (not how high). It's like dropping a stone into a pool of water; the wavelength is how many ripples are made and how wide they are.
- MAX AMPLITUDE is the maximum height that a hill can be, so if you want a fairly flat surface with a few uneven areas set this to 20 - 40. To get some slightly hilly areas set the value to 50 - 80. For some really tough terrain that stop you from seeing very far ahead set this to 90 - 150. I wouldn't recommend exceeding this as errors can be developed from have some sharp angles from mountains (but feel free to try)
- ROUGHNESS does exactly what it says. The terrain that you have generated will become more uneven the higher you set this value.
- RANDOM SEED is a mathematical variation on what you have currently made; this value just changes from different variations on a theme. Over 400 different versions can be generated from a single equation using this.
Extents
These are the basics for the grid that the surface will be generated on. The EXTENTS are the dimensions of the map. This will allow you to make the area as large or as small as you want. Each area is divided into boxes that will be used to make the uneven surface. Having more DIVISIONS will mean that the surface is more intricate but will have a higher polygon count. The dial in the middle is used to flatten the surface that you have already generated, it will act as an erosion dial smoothing hills and making the area more even. A corner value is just used to make a hill around the area as if it was a hole or a basin.Bitmap
This is by far the best section as it allows you to load a bitmap (BMP) image into the program and a surface will be generated based on the picture. Map colours just sets how the image is read by the program, since it must be in grey scale 255 will be white and the highest possible height, 0 which is black will be the lowest possible height.Fix Points
This will allow you to make a surface from scratch by making the vertexes and setting their heights, can also be used to edit existing surfaces.Formula
Is where you input the formula to generate a surface.Texture
If you don't understand this bit then you shouldn't be mapping. It sets the texture to be applied to the surface, plus any other textures that are put onto steep hills or flat areas. The last 2 don't work very well so it is best to do it manually in WC. You can also dictate as what a steep hill is by setting the 'Steep' value.That's everything covered. Now onto the step by step guide:
How to make a landscape
The best way to use Gensurf is to make a bitmap image and then generate a surface from that, for this tutorial you will need:- A good Knowledge of how to use WC
- An art package that use greyscale (preferably Paint Shop Pro)
- Art tools that allow for blurring and smudging effects (available in PSP, see above).
- Some amount of artistic talent

- Gensurf (durr)
- WC (obviously)
- This tutorial.
Step 1
Open up your paint program (for this tutorial I will be using PSP6), and make a new image 300 x 300. Make sure that it is in GREY SCALE format! The palette will now list every colour available to you; black will be the lowest land while white will be the highest land. In this picture you can see that you will need a soft brush to make sure that the hill don't look to steep.Next on to some messy artwork.
Step 2
Open up Gensurf and click on the 'BITMAP' tab. Use 'browse' to find the image that you just made and load it into the program. (This is why keeping it I a simple place can be useful). Gensurf will now use what you have just loaded into it to make a surface.As you can see it resembles the image that you made. It a bit hard to tell from the wireframe, but as you can see it is a basin valley with high hills around the edge and some smaller hills in the middle. The dimensions are 1000 x 1000 so this is a very large map. You have the option to include a skybox with every map that is generated by simply ticking the box on the first tab.
Remember to set the output file destination. If you remember I said that you should make a MAPS folder in Gensurf to store these too.
Step 3
Now to compile and have a look at this in the game. One feature of theses maps is that they always have 'LEAF SAW INTO LEAF PORTAL' errors. Just ignore these as they happen all the time.
20 Minutes later...
Now for the downs to Gensurf
It does take quite some time to work out little graphical glitches caused by Gensurf. Sometimes HL will seem to make false leaks in the maps as some surfaces disappear. It's a matter of playtesting and modifications to the map to get everything looking seamless without any bugs.
Good luck and happy mapping.
Comments
You must log in to post a comment. You can login or register a new account.