Vlatitude: HL2 - Changes from HL1 Last edited 2 years ago2022-09-29 07:56:11 UTC
This is not so much a tutorial, as it is a quick list of stuff that has changed since HL1 in the use of hammer and HL2.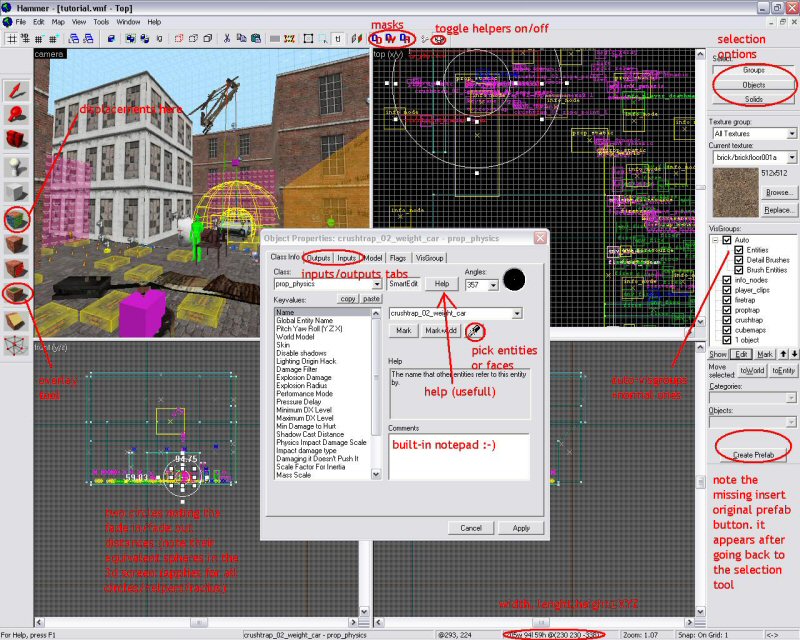
Don't forget to disable auto-update from the steam menu, and if you then run the SourceSDK once, you can just use the shortcut to run hammer, which is much faster. You may need to run the SourceSDK menu again to change game-configs or after an update (only once; after that the shortcut works again)
A few new options are:
Extra options are:
Ground-textures, independent rotating, flipping and resizing (you can rotate and resize overlays just like you do it with normal brushes). Overlays can also be added to displacement maps.
To flip overlays, edit the U End and V end values lower than the U start and V start values, each representing horizontal and vertical flipping respectively.
Also, overlays can be applied to brush-faces you specify, by clicking "select brush faces" and then selecting your (hold ctrl for multiple) faces you want the overlay to apply to.
You can specify a render order, so you can choose which overlay is rendered first (at the bottom) and which overlays should be rendered over that one. One negative point however, is that overlays take a little more stress on the engine compared to decals, especially if they are big. If possible, use decals instead
Also instead of just textures, you can add displacements to a face. To do that, start the texture application tool (shift + A), go to the displacements tab, press select, select your face, press create (power=detailedness, more looks better but is laggier) and you can edit your displacement using all the tools.
The basic ones are:
A few basic hints though:
"When I do this, you do that". In other words, you can't just trigger an entity, but you can give it an assignment to do anything you want, when you want.
To use it, simply click on an entity and go to its OUTPUTS-tab.
The screen you see now: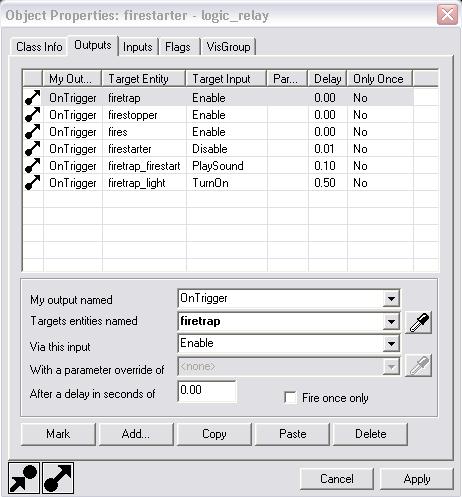 Explanation of the buttons:
My output named: here you specify when your entity must trigger the other one. Remember that these conditions differ from entity to entity. You can select it from a list if you want. So, if you put OnTrigger here, the output will be passed if the current entity is triggered
When I do this, you do that:
Target entity: which one? Specify the targetname of that entity here. If it's in red, the entity does not exist, and if it's in bold, there are more entities with that name.
When I do this, you do that:
Via this input: what must the other entity do? Of course these values also differ from what the other entity can do. If you remembered to make the other entity before making this output, you can select the inputs from a list
parameters: sometimes you have to specify something apart from the input itself, for instance a value to pass, or a target to change. Again, the availability of this option differs from entity to entity
When I do this, you do that some time later:
Delay: specifies a time before the input is fired.
Most rotating entities rotate around their origin (which you can select and move; it's a little white circle) but sometimes entities have a location of a movement axle, or a place to hinge around, and that's where you use helpers. Helpers are small spheres, which you can move all around. Almost all moving point-based entities and all physics entities use helpers. If you want more info about them, I suggest you take a look at the example maps in your username\sourcesdk_content\hl2\mapsrc directory.
Placement: Anywhere. Best point is eye-height of the player, minimal 16 units from any wall/brush/floor etc.
You can also tie it to certain faces, but that should rarely be necessary (everything already defaults to the nearest env_cubemap).
NOTE: Cubemaps may be a major engine load if their size is big and their numbers are abundant (or the entities they are used for). Don't overdo them!
username\sourcesdk_content\hl2\mapsrc for a great amount of example maps. Look, reproduce, and learn
Other notes:
Name it, and set template1 to the name of your barrels (they can all have the same name).
Make a math_counter. It counts if sufficient barrels have been destroyed, and if there are, makes them respawn. Set the maximum value of the math_counter to the amount of barrels you have, and make it trigger the point_template if it reaches its maximum:
my output named: OnHitMax
Target entity: point_template
input: Forcespawn
The math_counter also has to target itself to reset itself.
my output named: OnHitMAx
Target entity: math_counter
input: SetValue
parameter:0
Have all barrels trigger the math_counter:
my output named: OnBreak
Target entity: math_counter
input: Add
parameter:1
Once all barrels have triggered the math_counter, the math_counter will make them respawn using the point_template.
HAMMER:
Don't run hammer using the steam menu. Its a waste of time and CPU. Instead, run it using a shortcut to steamdir\SteamApps\username\sourcesdk\bin\hammer.exe.Don't forget to disable auto-update from the steam menu, and if you then run the SourceSDK once, you can just use the shortcut to run hammer, which is much faster. You may need to run the SourceSDK menu again to change game-configs or after an update (only once; after that the shortcut works again)
A few new options are:
- auto-visgroups. You can add brushes to visgroups manually, but some entities are automatically tied to their own visgroup, e.g. func_details, entities, displacements etc.
- The edit menu has options to find names and/or replace them
- the view menu has a "go to brush number" you use to find brushes the compile-log names
- The tools menu has a sound-browser
- There are masks available to see where the player can walk (Dw)
- Some textures may become semi-transparent, and entity names/types may be displayed near them
- Try and remember where the models are that you usually use. It's a pain (esp. on lower-end machines) to load and reload hundreds of models you'll never use.
- New shapes to use: torus (donut shaped, I don't recommend ever using it, but. . . meh) and sphere (ball)
- Model entities have two circles to denote where they should start fading and from where they are invisible. It's a pain in the ass, but its way to easy to accidentally change them (so toggle off helpers as much as you can). If you can't see your models in game, check the following:
- -log and console (ingame) for entity/model mismatches (not all models go with all entities)
- -their draw radius (fade properties)
THE OVERLAY TOOL
A new tool has been added: the Overlay Tool (shift+O). It's a tool for advanced decal placing.Extra options are:
Ground-textures, independent rotating, flipping and resizing (you can rotate and resize overlays just like you do it with normal brushes). Overlays can also be added to displacement maps.
To flip overlays, edit the U End and V end values lower than the U start and V start values, each representing horizontal and vertical flipping respectively.
Also, overlays can be applied to brush-faces you specify, by clicking "select brush faces" and then selecting your (hold ctrl for multiple) faces you want the overlay to apply to.
You can specify a render order, so you can choose which overlay is rendered first (at the bottom) and which overlays should be rendered over that one. One negative point however, is that overlays take a little more stress on the engine compared to decals, especially if they are big. If possible, use decals instead
TEXTURE APPLICATION TOOL
All pretty much the same, except for the lightmap option. You can set the size of lightmaps higher or lower. Higher looks better, lower looks worse.Also instead of just textures, you can add displacements to a face. To do that, start the texture application tool (shift + A), go to the displacements tab, press select, select your face, press create (power=detailedness, more looks better but is laggier) and you can edit your displacement using all the tools.
The basic ones are:
- paint geometry: can be used to morph the displacement.
- raise/lower: left click raises, right click lowers the selected area
- raise/lower to: set height of the displacement points to the specified height (0=original face location)
- smooth: smoothens the selected points to each other (you'll need to have more than one point in your brush to use this)
- distance=height to which the points should be put (or speed of lowering/heightening)
- radius (if "spacial" is checked) makes a circle that allows you to select more than one point at a time
- paint alpha can create blending textures, to use it you'll need a "blend" texture on the displacement
- invert alpha switches primary and secondary textures (if the one used is a "blend" texture)
- noise adds random heightening/lowering
COMPILING
Valve has improved the compile tools greatly. Instead of four programs (hlcsg, hlbsp, hlvis and hlrad) there are only three left (csg has been integrated into bsp), thus you only run vbsp, vvis and vrad. Also, vvis has been improved speed-wise. Big ass maps can be compiled in 10 minutes! Compare that to the hours of compiling on HL1 maps...A few basic hints though:
- You can't integrate textures using an option. You'll need an external program, called bspzip.
- Don't be surprised by the amount of brushes you'll need to make func_detail so vvis wont get stuck. func_details are entities that work just like world brushes, only they are skipped by vvis.
- Extra entities that can help you with reducing rendering amounts, are (apart from hints)
- -func_areaportal: its a visdoor ( if closed things behind it wont render and vice-versa) you'll have to trigger it to open and close. it also cuts visleaf-geometry to its size.
- -func_areaportalwindow: its basic use is for windows. If you are far from it, the window brush will be rendered. If closer, the outside will be rendered (the further away the blurrier). You can also think of other funky uses I'm sure
HUGE ENTITY CHANGES
Two major things changed in entity world: outputs/inputs and helpers.OUTPUTS/INPUTS
Instead of triggering an entity, you give it an input. It works sort of like"When I do this, you do that". In other words, you can't just trigger an entity, but you can give it an assignment to do anything you want, when you want.
To use it, simply click on an entity and go to its OUTPUTS-tab.
The screen you see now:
- MARK: selects the entity targeted by the selected output
- ADD..: adds another output
- COPY/PASTE/DELETE: just guess
- [pic] arrow with red stripe -> output/input doesn't work, you've set it up wrong or aren't finished with it
- [pic] arrow without stripe -> it works
My output named: here you specify when your entity must trigger the other one. Remember that these conditions differ from entity to entity. You can select it from a list if you want. So, if you put OnTrigger here, the output will be passed if the current entity is triggered
When I do this, you do that:
Target entity: which one? Specify the targetname of that entity here. If it's in red, the entity does not exist, and if it's in bold, there are more entities with that name.
When I do this, you do that:
Via this input: what must the other entity do? Of course these values also differ from what the other entity can do. If you remembered to make the other entity before making this output, you can select the inputs from a list
parameters: sometimes you have to specify something apart from the input itself, for instance a value to pass, or a target to change. Again, the availability of this option differs from entity to entity
When I do this, you do that some time later:
Delay: specifies a time before the input is fired.
HELPERS
HL2 doesn't need origin brushes anymore (they are still there for compatibility only, they work, but using helpers is easier).Most rotating entities rotate around their origin (which you can select and move; it's a little white circle) but sometimes entities have a location of a movement axle, or a place to hinge around, and that's where you use helpers. Helpers are small spheres, which you can move all around. Almost all moving point-based entities and all physics entities use helpers. If you want more info about them, I suggest you take a look at the example maps in your username\sourcesdk_content\hl2\mapsrc directory.
SMALLER ENTITY CHANGES
Some smaller entity changes are:- More use of models. Almost everything more detailed than a square box is a model. You need to place them using the prop_ models. Remember, prop_physics_multiplayer is only for debris or other junk that isn't supposed to collide.
- For anything you want to be able to pick up, use prop_physics
- For anything non-moving, use a prop_static
- You can make entities move with other entities, by parenting them to other entities. Just enter the name of the other entity in the "parent" value, and your entity will move with its parent (the other entity). For making working levers, you'll have to parent a prop_dynamic with a lever- model to a brush-based model that rotates, e.g. a func_rot_button
- Instead of the env_sound, you must now use env_soundscapes. They use a script (some of them are in a /scripts folder, others are in sound.gcf) to create random sounds, ambience, and other sound-setting, room per room. Some of them can be triggered to start, other use their radius.
ENTITY: ENV_CUBEMAP
This nifty little point-entity is used for creating shiny stuff. Basically, using "buildcubemaps" in the HL2 console (INGAME, yes, you heard it) the engine makes pictures of your level, which it will project on shiny/reflective entities, models, or walls to create a shiny/reflective effect.Placement: Anywhere. Best point is eye-height of the player, minimal 16 units from any wall/brush/floor etc.
You can also tie it to certain faces, but that should rarely be necessary (everything already defaults to the nearest env_cubemap).
NOTE: Cubemaps may be a major engine load if their size is big and their numbers are abundant (or the entities they are used for). Don't overdo them!
MONSTERS AND AMMO
They are still there, only different names:- monster_ -> npc_
- ammo_ -> item_ammo
- ammocrates -> item_ammo_crate
- goodiescrate ->item_item_crate (contains weapons or healthkits/batteries, and can be broken. Ammo doesn't seem to work)
OTHER ENTITIES
Look in:username\sourcesdk_content\hl2\mapsrc for a great amount of example maps. Look, reproduce, and learn
Other notes:
- Disable the dynamic light flag for point_spotlights if they are static, they kill FPS. Also, don't overdo dynamic lights either.
- Ropes are only drawn in hammer if there's one move_rope in the chain.
Workaround for exploding barrels-bug
Make a point_template. It's an entity that can make copies of other entities.Name it, and set template1 to the name of your barrels (they can all have the same name).
Make a math_counter. It counts if sufficient barrels have been destroyed, and if there are, makes them respawn. Set the maximum value of the math_counter to the amount of barrels you have, and make it trigger the point_template if it reaches its maximum:
my output named: OnHitMax
Target entity: point_template
input: Forcespawn
The math_counter also has to target itself to reset itself.
my output named: OnHitMAx
Target entity: math_counter
input: SetValue
parameter:0
Have all barrels trigger the math_counter:
my output named: OnBreak
Target entity: math_counter
input: Add
parameter:1
Once all barrels have triggered the math_counter, the math_counter will make them respawn using the point_template.
- Article Credits
- Zombie@computer – Author
This article was originally published on 69th Vlatitude.
The original URL of the article was http://www.vlatitude.com/tutorials.php?tutID=61.
The archived page is available here.
TWHL only publishes archived articles from defunct websites, or with permission.
For more information on TWHL's archiving efforts, please visit the
TWHL Archiving Project page.
Comments
You must log in to post a comment. You can login or register a new account.