Vlatitude Archive: An Introduction to Triggers Last edited 5 years ago2019-04-25 02:41:00 UTC
You are viewing an older revision of this wiki page. The current revision may be more detailed and up-to-date.
Click here to see the current revision of this page.
This tutorial is going to be pretty basic, and is mostly aimed at those who are new to Worldcraft and making levels. Trigger_once and trigger_multiple entities are the most commonly used way to make something happen. Yeah, that's not a very precise description, but stay with me. These two triggers cause other entities to perform their functions. They can trigger a door to open, water to start flowing, a light to go on, or almost any other entity to do its stuff. However, these two are not the only way to trigger entities. Entities can be triggered by buttons, monsters, the breaking of a crate, etc. Basically, any entity which has a target attribute in its properties can trigger another entity, and any entity with a name attribute can be triggered. The target attribute should be filled in with the name of the entity we want to activate. First, let's take a look at the two triggers mentioned above in bold.
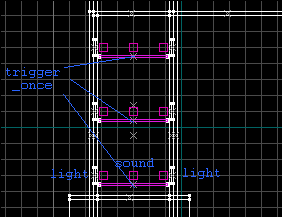
Trigger_once and Trigger_multiple are almost identical, but a trigger_once can only be activated...once. These two triggers are brush-based. Brush based triggers can be triggered by the player. When you create a brush, click To Entity, and make the class trigger_once or trigger_multiple, the brush becomes a brush-based trigger. It can be activated by the player, monster, or a pushable when they enter its boundaries. When the level is compiled and the game is ran, brush-based triggers are invisible and walk-through(able). Therefore, they can be activated when a player "touches" them. This is similar to the touchplate triggers in some other games, but brush-based triggers can cover any area you want them to. Note, brush-based triggers should be given one of the AAATRIGGER textures. This ensures that you can tell them apart from other structures in your level, and it reminds you that they will be transparent in the game itself.On the left is a side view of an elevator shaft from the level I'm currently working on. Here's the setup: As the player goes up in the elevator, 3 pairs of red lights go on with a small beeping sound. This is how it works: the long horizontal brushes are trigger_once brush-based entities. Their length and width cover the whole area of the shaft, while as you can see, their height is pretty small. The first one from the bottom has a target attribute field of "shaft1" The two lights on its side as well as the sound entity each have the name value "shaft1" The middle trigger's target is "shaft2" and its accompanying lights and sound have the name "shaft2" Therefore, when the player's head (on ascending) touches the triggers, two lights go on, and a sound plays. Since this is a trigger_once, the player can ride the elevator all he wants, and the lights will stay on.
I want to remind you that like I said, the trigger_once and trigger_multiple entities are not the only ways to trigger something. Buttons are probably the second most popular way to trigger events and actions. Monsters can also be triggers. They have many trigger "conditions", meaning that when this condition is achieved (like death for example), the entity in the name attribute field is activated. I hope you understand this tutorial because you will be using triggers a LOT in your level-editing. Good luck, and feel free to e-mail me with questions.
- Categories
- Archived Articles
- Vlatitude Archive
- Tutorials
- Mapping
- Examples Required
- Images Required
- Review Required
Comments
You must log in to post a comment. You can login or register a new account.

