Vlatitude: Exploiting the Custom Game menu Last edited 2 years ago2022-09-29 07:56:07 UTC
Redirected from Vlatitude_Archive:_Exploiting_the_Custom_Game_menu
You've seen it when you go to play Counter-Strike, Team Fortress, They Hunger, USS Darkstar and any other of the numerous MODs out there. It's that convenient accessibility for the user to just point and click to activate a desired MOD.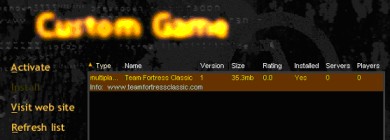 You may think that only the best MODers and people with knowledge of coding can do this, but you are actually very far from the truth. It's actually extremely easy to do, and can be done by pretty much anyone. It also lets you look cool - having your MOD flash up there next to the other good stuff. But I digress...
Before I go on, you really need to know that this will not work for any Half-Life version under 1.1.0.0. This is because the Custom Game menu wasn't incorporated into the game until v1.1.0.0 of Half-Life.
Now, I'll explain what you will be doing to get this done. There is a file in your Half-Life\Valve directory called liblist.gam. This will be the file that you will need to alter to put your MOD into the "Custom Game" menu. Don't worry though; you won't need to have any knowledge of C++ or programming at all to alter this. In fact, it's like setting up a configuration file, and in essence, that's all we're really doing. Why don't you go ahead and open up notepad and take a gander at liblist.gam. I actually find it useful to just associate this file with Notepad so that all I have to do is double-click it to open it. Doing so will not cause any problems and is simply a convenience. To do this, double click the file in explorer and wait for a menu to pop up prompting you for a program to open the liblist.gam file with. Scroll down until you see Notepad and then make sure the box that says "Always use this program to open these files" box is checked. Now you can open it just by double clicking it.
Now that you have the Half-Life liblist open you should see something similar to this:
Let's pretend that you want to make a MOD called "Zombies from Space". Just pretend for now and then later you can make necessary changes.
First, we'll need to make a directory for that MOD. Yes, you MUST! But it's okay: it's really easy. First, go into your Half-Life directory, if you are still in the Valve directory. You should now be in the Half-Life root directory. Create a new directory. Let's call it "zombspce". Technically, you can name this directory anything you want and it doesn't really need to have anything to do with the name of your MOD, but to make it easier on everyone else, try to make the directory name have something to do with your MOD. You should now have a Half-Life\zombspce directory.
Now go back into the Valve directory, select the liblist.gam file, and copy it to your zombspce directory. Now leave that file alone for a minute. We still have some directories to create. Make sure you're in your zombspce directory again. Now create a new sub-directory called dlls. Note that unless you've already compiled your own source code into your own homemade dll file, you will probably just be using the original Half-Life dll. Okay, now back on topic. You have just created a directory called dlls. Let's go ahead and smack a dll in there. Go to the Half-Life\Valve directory, copy the hl.dll file and slap it into our dlls directory. For future reference, you can actually rename this DLL file into whatever you want, provided that the extension reads .dll
Now, create a second directory called cl_dlls. We'll do the exact same thing we did with the hl.dll and just copy the client.dll from the Half-Life\Valve directory into yours.
Okay, now your MOD will have some code to work with when you start it up. Let's finish making these directories up (I know, there's a lot). Actually, there's really only one more that we really need, and that's the maps directory. Create that now. Luckily, we don't need to actually put anything in here right now. The maps directory is required if you want to run maps using your enabled MOD and will also be used when you compile maps for your MOD. That is unless you have placed your maps into a .pak file, but that'll be another tutorial.
For right now, we should have all the necessary directories and files we need. Your directory structure should look like this:
Now we'll need to add a line in there, because our MOD is in a different directory from the default (Valve). Underneath the game "Zombies from Space" line, add a new line that says gamedir "zombspce". Remember when we made that directory? Well, this line will tell Half-Life where the necessary files reside. So now your new code should look like this:
Now, you need to get your opening map ready. This is the map that you will be using as the very first the game will start with. You really don't need to do this if you plan on just compiling to the maps directory, or wish to load maps using the console, but let's just say, you're all ready to start off the game with the first map by clicking the New Game menu. Well, you would change the line that says: startmap "c0a0" into something like startmap "zombie1". That is, if you had name your map zombie1. You don't need to put the BSP extension at the end of it.
Actually, that's really all you need to do, or at least all that is required. But it still looks a little boring if you were to look at it in the custom game menu. Let's add some cool stuff to it that will make your MOD unique and give special information. Let's make it so the player can go to a website that we display. This is good if you want commend credit for your MOD.
Add a line of code that says url_info www.vlatitude.com. Now we've added a web address that will allow people to go to the website that hosts your MOD. Maybe that will be your personal web site. It's up to you.
We want this to be a single player MOD, so let's make sure the player knows that. Add a new line of code that says type "Single".
You should now have a liblist.gam file that looks something like this: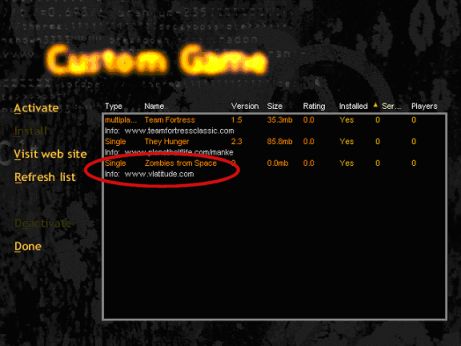 Coolness huh? You can also change the version number, MOD size, as well as tweak other settings which I will describe the commands for at the end of the document as a resource. For the most part, however, we're done. Pat yourself on the back. You can also do some cool things like add your own menu art (which I hope to cover in another tutorial) and deactivate menu options. Remember, some of these should be changed to suit your personal needs, like whatever name you choose to name your MOD. At least with this tutorial, I believe you can have an understanding of how this is done, and be able to do it yourself.
Here is a list of other lines you can add into the liblist.gam file that is given in the Half-Life SDK, in the DOC file called "How to Make a MOD":
Before I go on, you really need to know that this will not work for any Half-Life version under 1.1.0.0. This is because the Custom Game menu wasn't incorporated into the game until v1.1.0.0 of Half-Life.
Now, I'll explain what you will be doing to get this done. There is a file in your Half-Life\Valve directory called liblist.gam. This will be the file that you will need to alter to put your MOD into the "Custom Game" menu. Don't worry though; you won't need to have any knowledge of C++ or programming at all to alter this. In fact, it's like setting up a configuration file, and in essence, that's all we're really doing. Why don't you go ahead and open up notepad and take a gander at liblist.gam. I actually find it useful to just associate this file with Notepad so that all I have to do is double-click it to open it. Doing so will not cause any problems and is simply a convenience. To do this, double click the file in explorer and wait for a menu to pop up prompting you for a program to open the liblist.gam file with. Scroll down until you see Notepad and then make sure the box that says "Always use this program to open these files" box is checked. Now you can open it just by double clicking it.
Now that you have the Half-Life liblist open you should see something similar to this:
// Valve Game Info file
//  These are key/value pairs. Certain mods will use different settings.
//
game "Half-Life 1.5"
startmap "c0a0"
trainingmap "t0a0"
mpentity "info_player_deathmatch"
gamedll "dlls\hl.dll"
gamedll_linux "dlls/hl_i386.so"Let's pretend that you want to make a MOD called "Zombies from Space". Just pretend for now and then later you can make necessary changes.
First, we'll need to make a directory for that MOD. Yes, you MUST! But it's okay: it's really easy. First, go into your Half-Life directory, if you are still in the Valve directory. You should now be in the Half-Life root directory. Create a new directory. Let's call it "zombspce". Technically, you can name this directory anything you want and it doesn't really need to have anything to do with the name of your MOD, but to make it easier on everyone else, try to make the directory name have something to do with your MOD. You should now have a Half-Life\zombspce directory.
Now go back into the Valve directory, select the liblist.gam file, and copy it to your zombspce directory. Now leave that file alone for a minute. We still have some directories to create. Make sure you're in your zombspce directory again. Now create a new sub-directory called dlls. Note that unless you've already compiled your own source code into your own homemade dll file, you will probably just be using the original Half-Life dll. Okay, now back on topic. You have just created a directory called dlls. Let's go ahead and smack a dll in there. Go to the Half-Life\Valve directory, copy the hl.dll file and slap it into our dlls directory. For future reference, you can actually rename this DLL file into whatever you want, provided that the extension reads .dll
Now, create a second directory called cl_dlls. We'll do the exact same thing we did with the hl.dll and just copy the client.dll from the Half-Life\Valve directory into yours.
Okay, now your MOD will have some code to work with when you start it up. Let's finish making these directories up (I know, there's a lot). Actually, there's really only one more that we really need, and that's the maps directory. Create that now. Luckily, we don't need to actually put anything in here right now. The maps directory is required if you want to run maps using your enabled MOD and will also be used when you compile maps for your MOD. That is unless you have placed your maps into a .pak file, but that'll be another tutorial.
For right now, we should have all the necessary directories and files we need. Your directory structure should look like this:
\Half-Life
    |
    +--- zombspce
    |       |
    |       +-- liblist.gam
    |       |
    |       +-- DLLS
    |       |      |
    |       |      +-- hl.dll
    |       |
    |       +-- CL_DLLS
    |       |       |
    |       |       +-- client.dll
    |       |
    |       +---MAPS
    |
+--- VALVE// Valve Game Info file
// These are key/value pairs. Certain mods will use different settings.
//
game "Half-Life 1.5"
startmap "c0a0"
trainingmap "t0a0"
mpentity "info_player_deathmatch"
gamedll "dlls\hl.dll"
gamedll_linux "dlls/hl_i386.so"Now we'll need to add a line in there, because our MOD is in a different directory from the default (Valve). Underneath the game "Zombies from Space" line, add a new line that says gamedir "zombspce". Remember when we made that directory? Well, this line will tell Half-Life where the necessary files reside. So now your new code should look like this:
// Valve Game Info file
// These are key/value pairs. Certain mods will use different settings.
//
game "Zombies from Space"
gamedir "zombspce"
startmap "c0a0"
trainingmap "t0a0"
mpentity "info_player_deathmatch"
gamedll "dlls\hl.dll"
gamedll_linux "dlls/hl_i386.so"Now, you need to get your opening map ready. This is the map that you will be using as the very first the game will start with. You really don't need to do this if you plan on just compiling to the maps directory, or wish to load maps using the console, but let's just say, you're all ready to start off the game with the first map by clicking the New Game menu. Well, you would change the line that says: startmap "c0a0" into something like startmap "zombie1". That is, if you had name your map zombie1. You don't need to put the BSP extension at the end of it.
Actually, that's really all you need to do, or at least all that is required. But it still looks a little boring if you were to look at it in the custom game menu. Let's add some cool stuff to it that will make your MOD unique and give special information. Let's make it so the player can go to a website that we display. This is good if you want commend credit for your MOD.
Add a line of code that says url_info www.vlatitude.com. Now we've added a web address that will allow people to go to the website that hosts your MOD. Maybe that will be your personal web site. It's up to you.
We want this to be a single player MOD, so let's make sure the player knows that. Add a new line of code that says type "Single".
You should now have a liblist.gam file that looks something like this:
// Valve Game Info file

// These are key/value pairs. Certain mods will use different settings.
//
game "Zombies from Space"
gamedir "zombspce"
startmap "xxxx (name of your starting map)"
trainingmap "t0a0"
mpentity "info_player_deathmatch"
gamedll "dlls\hl.dll"
gamedll_linux "dlls/hl_i386.so"
url_info www.vlatitude.com
type "Single"Here is a list of other lines you can add into the liblist.gam file that is given in the Half-Life SDK, in the DOC file called "How to Make a MOD":
- game - The name of the mod
- url_info - The mod's informational web site
- url_dl - The ftp site from where the mod can be downloaded
- version - The mod's version number
- size - The size, in bytes, of the mod
- svonly - "1" if the mod is a server only mod ( no client side content or code ), "0" otherwise
- cldll - 1 if the mod requires a matching client.dll
- type - If this mod is "multiplayer_only", then the single player buttons ( New Game/Hazard Course/Load game etc.) are disabled in the Half-Life launcher
- hlversion - The version of Half-Life for which the mod was generated. Revisions to Half-Life will require updates by mod authors.
- nomodels - Set to "1" if model bitmaps should not be shown in the Multiplayer | Customize menu of the Half-Life launcher
- mpentity - When a user chooses to create a listen server from the interface, each BSP file in the maps\ folder for the mod is searched. The entity data for the BSP is scanned for the presence of the string identified by mpentity. For insance, in Half-Life, the string is "info_player_deathmatch" ( which is also the default if no string is specified )
- gamedll - The game DLL to load for running a server for this mod.
- startmap - When a user chooses "New Game" for a single player mod, this is the map that is loaded.
- trainingmap - When a user chooses "Hazard Course" for a single player mod, this is the map that is loaded.
Counter-Strike:
game "Counter-Strike"
url_info "www.counter-strike.net"
url_dl ""
version "1.0"
size "184000000"
svonly "0"
cldll "1"
hlversion "1104"
nomodels "1"
mpentity "info_player_start"
gamedll "dlls\mp.dll"
gamedll_linux "dlls/cs_i386.so"
trainmap "tr_1"
Team Fortress Classic:
// Team Fortress Classes Game .dll Listing File
// Load order is determined by file order.
game "Team Fortress"
url_info "www.teamfortressclassic.com"
url_dl ""
version "1.5"
size "37000000"
svonly "0"
cldll "0"
type "multiplayer_only"
nomodels "1" // Don't show models in browser, since you don't pick them there anyway.
mpentity "info_tfdetect"
gamedll "dlls\tfc.dll"
gamedll_linux "dlls/tfc_i386.so"- Article Credits
- ArchVile – Author
This article was originally published on 69th Vlatitude.
The original URL of the article was http://www.vlatitude.com/tutorials.php?tutID=43.
The archived page is available here.
TWHL only publishes archived articles from defunct websites, or with permission.
For more information on TWHL's archiving efforts, please visit the
TWHL Archiving Project page.
Comments
You must log in to post a comment. You can login or register a new account.