Vlatitude Archive: Rocks and Cliffs Last edited 5 years ago2019-04-25 02:41:25 UTC
You are viewing an older revision of this wiki page. The current revision may be more detailed and up-to-date.
Click here to see the current revision of this page.
Between a rock and a hard place
WARNING: This guide is aimed at those who are familiar with WC and general mapping practices.This guide is designed to help those who are struggling to create good outside environments with realistic scenery such as rocks, cliffs and other natural features. While HL is not the perfect engine for large areas, it can do this very well using complex shapes. However, this technique requires the mapper to carefully control these odd shapes, thus avoiding invalid shape errors and clipping problems. This guide looks at how to create good cliffs and rocks in an area that won't receive much action, meaning that r-speeds that don't result from our cliffs have to be lower. Our target for this area would be an average r-speeds of about 700-800. The reason that this guide targets this range is because it allows you to fully make use of the methods explained, meaning that you are able to cut back on things if you want to make a lower r-speed area.
One thing you should remember is to use the cubic brush when you first start, this means that you will always have plenty of excess edges to trim away. Like doing work with clay, it's best to start with too much than to find that you need to add more later. Now once you have everything laid out you should start slicing edges of with the clipping tool. This works much like a knife and helps to avoid errors caused if you use the vertex tool.
You can however still develop errors from the carving process. If you find that you get an invalid brush error turning up, then it's because you have created a side of the brush that is very, very thin. The problem finder will lead you to offending brush and then you will have to get very close to it in order to find the edge. Locate the vertices in the 3D view and select them. Then move it to the nearby vertices on the same edge to weld them together into one vertice. You will have to do that twice for each face.
You can only carve from 2 sides without rotating the brush. This can lead to problems if you have the cliffs on the outer edge of your map with a sky brush behind. When you cut off a large section of the cliff, the sky brush may become visible in the gap. To solve this problem, you can pull a little trick. Before you cut the brush, first select it and chose copy from the menu. Make your cut and then right click to bring up the menu again. Select paste special. Paste the copy at 0,0,0 from the origin of the original. Now slice this new brush the opposite way that you cut the original. In other words you are trying to make the original shape of the brush from 2 brushes. You can then cut this new brush from above to hide the sky visible behind it.
Now whenever you make large areas it's very important to scale 'up' the textures whenever possible. Changing a flat surface's texture from the regular x1 scale to x2 will nearly half the number of polygons it will be composed from in the actual game. With large cliffs, you can sometimes get away with having a x3 scale texture.
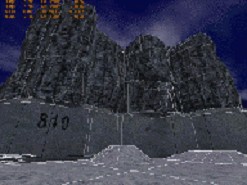
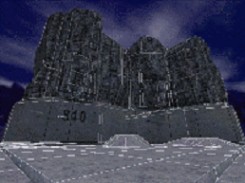
Just a note: the pictured cliff had a maximum r_speed of only 350.
Lastly, you should remember that you want uneven ground if you are on surfaces made of sand, mud, snow, or grass. While materials like grass and mud will just have small hills, stuff like snow and sand will tend to also make mounds against objects as they are blown by the wind. On the pictured map there are some small mounds of snow against the walls. To stop these from upping the r-speeds due to their strange shape touching other brushes and breaking them up, you should make them func_wall entities.
That's everything there is to say on the matter of vertical stacking. But remember that you can get a similar effect with other surfaces if you make them up from more than one brush. Programs like GENSURF use the same method and any mapper should consider this program as yet another tool for making realistic organic scenery.
- Categories
- Archived Articles
- Vlatitude Archive
- Tutorials
- Mapping
- Examples Required
- Images Required
- Review Required
Comments
You must log in to post a comment. You can login or register a new account.