RUST: Skies (2) Last edited 2 years ago2022-09-29 07:53:58 UTC
This tutorial is designed to give you some general information on the sky properties in Half-Life.
In the last tutorial we looked at the file names of the skies available in Half-Life and where to find your skies (half-life/valve/gfx/env).
This time we are going to look at placement of the sky in game and shadow effects.
Recapping on the last tutorial, here is a visual representation of the desert series of skies: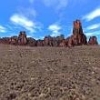 North = BK, desertbk.bmp
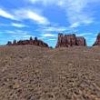 East = RT, desertrt.bmp
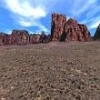 South = FT, desertft.bmp
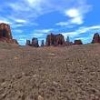 West = LF, desertlf.bmp
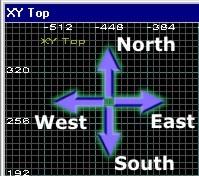 The game engine places the sky texture on brushes that are orientated in the directions above, but it is easier to understand if you have an idea of how this is done in the editor. The picture above is representative of the Top (x,y) view in most editors. This will give you an idea of what sky texture the 'player' will see, but more importantly it allows you to add shadows.
 Most Half-Life skies have the sun positioned directly above, but the morning series has the sun just rising above the South brush. If you positioned your light_environment without any modification to the default settings, then there wouldn't be any shadows cast by the sun and it wouldn't look right. Careful positioning of the light_environment will enhance the 'feel' and look of your maps by achieving a cast shadow that fit's the sky.
For a more in depth look at creating skies have a look at RUST: Creating Environment Maps With Terragen by Mithodeil.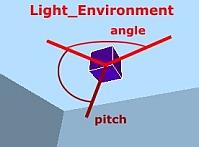 The light_environment controls the style of light emitted from the sky.
It only works when there are brushes textured with sky in your map.
You can place the entity anywhere in the map, but to help out, it is usually a good idea to place it next to the brush face that you have identified as the one that will represent the sun in game.
In the case of the morning series of textures this will be the brush that is placed at the 'South' direction in the editor.
If you place it near this face, then changing the properties of the entity will correspond to the editor window.
If you set the Yaw to 90 then the sun will appear 'ingame' to be coming directly from the 'South Brush' and going to the 'North Brush'.
The shadows in the morning series of skies are slightly angled again, and to make all the brushes in your map give off a shadow that it is consistent with the sky, you have to increase the YAW slightly. 100 seems to be right.
This is very much trial and error.
A setting of 0 will not produce any shadow as the light will be emitted horizontally across the roof of your map.
A setting of minus 90 will simulate the sun shining straight down. To cast a long shadows enter a figure around minus 35 , and for a short shadow minus 70.
The default is 200, so a figure of 150 will be lees bright. If you set the luminosity to 0 you will not get a dark map, instead you will get a medium lit map.
Changing the colour of the light is also beneficial. You can choose the colour of the 'sun' from by changing the RGB and softening the colour.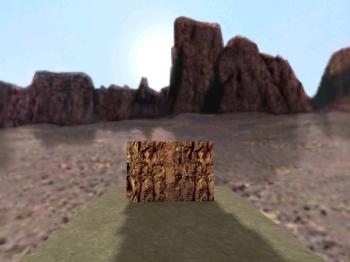
In the last tutorial we looked at the file names of the skies available in Half-Life and where to find your skies (half-life/valve/gfx/env).
This time we are going to look at placement of the sky in game and shadow effects.
Recapping on the last tutorial, here is a visual representation of the desert series of skies:
North = BK, desertbk.bmpEast = RT, desertrt.bmpSouth = FT, desertft.bmpWest = LF, desertlf.bmpFor a more in depth look at creating skies have a look at RUST: Creating Environment Maps With Terragen by Mithodeil.
Shadows and the Light_environment.
It only works when there are brushes textured with sky in your map.
You can place the entity anywhere in the map, but to help out, it is usually a good idea to place it next to the brush face that you have identified as the one that will represent the sun in game.
In the case of the morning series of textures this will be the brush that is placed at the 'South' direction in the editor.
If you place it near this face, then changing the properties of the entity will correspond to the editor window.
Pitch Yaw Roll (Y Z X):
One of the properties of the light_environment is angles or "Pitch Yaw Roll (Y Z X)". Looking down on the 2D editor window above, setting the Yaw property will direct the light out into your map.If you set the Yaw to 90 then the sun will appear 'ingame' to be coming directly from the 'South Brush' and going to the 'North Brush'.
The shadows in the morning series of skies are slightly angled again, and to make all the brushes in your map give off a shadow that it is consistent with the sky, you have to increase the YAW slightly. 100 seems to be right.
This is very much trial and error.
Pitch:
The "Pitch property" of the light-environment, (not to be confused with the Pitch of the angles mentioned above) is the property that will provide the shadows created by the brushes in your map.A setting of 0 will not produce any shadow as the light will be emitted horizontally across the roof of your map.
A setting of minus 90 will simulate the sun shining straight down. To cast a long shadows enter a figure around minus 35 , and for a short shadow minus 70.
Brightness:
One more thing worth considering is the "Brightness" setting of the light_environment. You can soften the light by adjusting the fourth figure in the RBG values of the Brightness property as that will increase of decrease the luminosity.The default is 200, so a figure of 150 will be lees bright. If you set the luminosity to 0 you will not get a dark map, instead you will get a medium lit map.
Changing the colour of the light is also beneficial. You can choose the colour of the 'sun' from by changing the RGB and softening the colour.
- Categories
- Archived Articles
- RUST Archive
- Tutorials
- Mapping
- Article Credits
- Andy – Author
This article was originally published on Gamedesign.net RUST.
The original URL of the article was http://www.gamedesign.net/node/613.
The archived page is available here.
TWHL only publishes archived articles from defunct websites, or with permission.
For more information on TWHL's archiving efforts, please visit the
TWHL Archiving Project page.
Comments
You must log in to post a comment. You can login or register a new account.