VERC: Random Event Generator Last edited 5 years ago2019-04-21 12:35:34 UTC
You are viewing an older revision of this wiki page. The current revision may be more detailed and up-to-date.
Click here to see the current revision of this page.
While looking through the gamedesign.net Half-Life editing discussion forums (which sadly no longer exist), I found a post by mazemaster mentioning his idea for creating a random event generator. It's an excellent idea that's quite easy to implement.
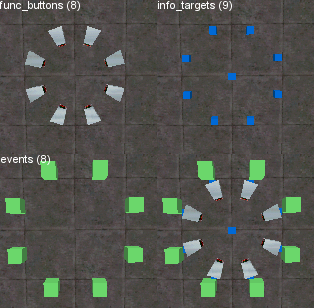
The process is visually intuitive and easy to setup. This article covers a simple example that covers eight random events, but you could expand this to cover as many events as you'd like. The entities follow the basic pattern below. The blue objects are info_target entities, the white are func_buttons, and the green are the random events that get activated, in this case game_text entities. The random effects can be placed anywhere -- they were arranged like this to illustrate their connection to the targets and buttons.
Introduction
At the heart of the idea is the env_beam and it's random properties, both in regards to strike time and target acquisition. When an env_beam has more than one target entity available to it, it will choose one randomly as it's end point. When the random strike flag is checked, the beam will strike randomly with a delay between 0 and the specified Strike Again Time.The process is visually intuitive and easy to setup. This article covers a simple example that covers eight random events, but you could expand this to cover as many events as you'd like. The entities follow the basic pattern below. The blue objects are info_target entities, the white are func_buttons, and the green are the random events that get activated, in this case game_text entities. The random effects can be placed anywhere -- they were arranged like this to illustrate their connection to the targets and buttons.
Mechanics
The Buttons
First, create a circle of func_button entities. This is most easily done by creating an arch.- Go into Block creation mode by pressing Shift+B.
- Select arch from the Objects list.
- Drag a 128 unit x 128 unit box in a 2D view and press Enter.
- In the Arch Properties box, set Wall width to 16, Number of sides to 8 (for this example), click on the Circle button, then press Ok.
- Switch to the selection tool by pressing Shift+S.
- Click on one of the arch pieces to select it (make sure it actually is selected) and press Ctrl+U to ungroup the pieces.
func_button properties
- Target (target) - this setting will be different for each button. Each button should target a different event. For the buttons in the example map, the targets are set to text1, text2, text3, text4, text5, text6, text7, and text8. Each button targets a different game_text entity which prints to the screen the event number that was activated. In practice, it would be a good idea to target multi_managers instead of directly targeting events. This would allow you to easily activate a number of events for each button, as well as overlapping effects for some buttons.
- Health (shootable if > 0) (health) - Set this to 1. This will cause the button to activate it's target when it takes damage.
- Delay before reset (-1 stay) (wait) - This can be set to whatever you like. You can use this setting to make sure that a button gets activated less often than others (by giving it a higher reset value). If you're making something where you only want a specific event to be activated once, you can set this value to -1.
- Don't move (Flag 1) - In the flag properties, this property should be enabled. It ensures that the button stays in place and the event gets activated immediately.
center info_target properties
- Name (targetname) - Set this to target0 . It will be used as the starting point for the env_beam entity.
outside info_target properties
- Name (targetname) - Set these to target1 . These info_targets will be used as the ending point for the env_beam entity. Each time the beam fires, it will randomly pick one of the target1 info_target entities as it's end point.
env_beam properties
- Start Entity (LightningStart) - Set this to target0. This is the name of the info_target that will be used as the starting point of the beam.
- Ending Entity (LightningEnd) - Set this to target1. This is the name of the info_target that will be used as the ending point of the beam. Since there are a group of info_target entities named target1, one at random will be chosen for each strike
- Beam Color (R G B) (rendercolor) - If you want this beam to be visible for some reason (most likely so you can test it), set a color here. If the player will never see this, then you don't need to set a color here if you don't want to.
- Life (seconds 0 = infinite) (life) - Set this to 1. This is the length of time the beam will be active for each strike.
- Strike again time (secs) (StrikeTime) - Set this to the maximum amount of time you want between beam strikes. For the example map, i've set this to 5. This means the beam will strike once every 0 to 5 seconds.
- Damage / second (damage) - This only needs to be set high enough to damage a button, unless you're using the beam as part of your level, in which case set it as you wish (as long as it causes damage).
- Start On (Flag 1) - If you want the random effects to start happening immediately, enable this flag. If this flag is not enabled, you'll have to give this env_beam a name and activate at some point in your level.
- Random Strike (Flag 4) - Setting this flag causes the beam to strike at random times, between 0 and the specified Strike again time.
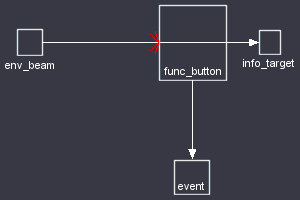
- The env_beam is fired. (Note that, although it is labeled "env_beam", the initial point of the beam is also an info_target entity. If you had wanted, you could have named the env_beam target0 and used it as its own starting point.)
- It passes through the button, damaging it.
- The damaged button activates it's targeted event.
- The env_beam terminates at the info_target.
Resources
Below is a list of entities related to this tutorial. For a more concrete illustration, check out the example map linked below.- Categories
- Archived Articles
- VERC Archive
- VERC - Half-Life
- VERC - mapping
- Tutorials
- Mapping
- Examples Required
1 Comment
Captain P
Commented 1 year ago2023-12-05 23:35:17 UTC
Comment #105701
An alternative to manually placing all these entities is to use mtl_trigger_random, a template entity that comes with MESS, an automation tool that can generate entities for you. One added benefit is that mtl_trigger_random produces less entities by giving the func_buttons a carefully placed origin brush, which removes the need for info_targets.
You must log in to post a comment. You can login or register a new account.


